Home>Automotive>How To Remove A Stuck Oil Filter
Automotive
How To Remove A Stuck Oil Filter
Published: March 4, 2024
Learn how to safely remove a stuck oil filter in this comprehensive automotive guide. Get expert tips and tricks for a hassle-free oil filter removal.
(Many of the links in this article redirect to a specific reviewed product. Your purchase of these products through affiliate links helps to generate commission for Regretless.com, at no extra cost. Learn more)
Table of Contents
Introduction
Removing a stuck oil filter can be a frustrating and challenging task for any car owner or mechanic. Over time, oil filters can become tightly fused to the engine block due to heat, pressure, and the accumulation of debris. This can make the simple task of changing the oil filter a daunting and time-consuming endeavor. However, with the right tools, techniques, and a bit of patience, you can successfully remove a stuck oil filter without damaging your vehicle.
In this comprehensive guide, we will walk you through the step-by-step process of safely and effectively removing a stubborn oil filter. Whether you're a seasoned DIY enthusiast or a novice looking to save on maintenance costs, mastering the art of removing a stuck oil filter is a valuable skill that can save you time, money, and unnecessary headaches in the long run.
By following the methods outlined in this guide, you'll gain the confidence and know-how to tackle this common automotive challenge with ease. So, roll up your sleeves, gather your tools, and let's dive into the essential steps for removing a stuck oil filter from your vehicle.
Read more: How To Remove A Stuck Hose From A Spigot
Step 1: Gather Necessary Tools
Before embarking on the task of removing a stuck oil filter, it's crucial to gather the necessary tools to ensure a smooth and efficient process. Having the right equipment at your disposal will not only make the job easier but also minimize the risk of causing damage to the filter housing or surrounding components. Here's a comprehensive list of essential tools you'll need for this task:
-
Oil Filter Wrench: This specialized tool is designed to grip and turn the oil filter, providing the necessary leverage to loosen it from the engine block. Ensure that the wrench is compatible with the size of your oil filter to prevent slippage and potential damage.
-
Screwdriver: A sturdy flat-head screwdriver can be used as an alternative method for removing a stubborn oil filter. It can be employed to puncture and twist the filter for added leverage.
-
Hammer: A small to medium-sized hammer can aid in tapping the screwdriver or wrench for additional force when attempting to loosen the stuck oil filter.
-
Rubber Mallet: In some cases, a rubber mallet can be gentler on the surrounding components than a metal hammer. It can be used to tap the oil filter wrench or screwdriver to dislodge the filter.
-
Oil Absorbent Mat or Rags: It's essential to have a mat or a few absorbent rags on hand to catch any oil spills or drips during the removal process. This will help maintain a clean and safe working environment.
-
Safety Gloves: Protect your hands from sharp edges, hot surfaces, and oil spills by wearing a pair of durable safety gloves. They will provide a better grip and shield your skin from potential hazards.
-
Safety Glasses: When working under the vehicle, debris and oil can fall from the filter housing. Wearing safety glasses will safeguard your eyes from any unexpected splashes or particles.
-
New Oil Filter: It's advisable to have a replacement oil filter ready for installation once the old one has been successfully removed. Ensure that the new filter is compatible with your vehicle's make and model.
By assembling these essential tools before starting the oil filter removal process, you'll be well-prepared to tackle the task with confidence and precision. With the right equipment at your disposal, you can approach the subsequent steps knowing that you have everything needed to successfully remove the stuck oil filter from your vehicle.
Step 2: Prepare the Vehicle
Before diving into the process of removing a stuck oil filter, it's essential to prepare the vehicle to ensure a safe and efficient working environment. Proper preparation not only minimizes the risk of accidents but also facilitates better access to the oil filter, making the removal process more manageable. Here's a detailed breakdown of the crucial steps to prepare your vehicle for the task at hand:
-
Park on a Level Surface: Begin by parking your vehicle on a flat and level surface. This will prevent any unexpected rolling or shifting of the vehicle during the oil filter removal process, ensuring stability and safety.
-
Engage the Parking Brake: To further secure the vehicle in place, engage the parking brake. This additional measure will prevent any unintended movement while you work underneath the vehicle.
-
Locate the Oil Filter: Identify the location of the oil filter in your vehicle's engine bay. Depending on the make and model, the oil filter may be situated at the front, rear, or side of the engine. Familiarizing yourself with its exact position will streamline the removal process.
-
Allow the Engine to Cool: If the vehicle has been recently driven, allow the engine to cool down before attempting to remove the oil filter. Hot oil and engine components can pose a burn risk, so exercising caution is crucial.
-
Open the Hood: Pop the hood of the vehicle and secure it in place using the prop rod or hood support. This will provide better visibility and access to the engine bay, allowing you to work comfortably and effectively.
-
Gather Additional Lighting: Depending on the lighting conditions in your workspace, consider using a portable LED light or flashlight to illuminate the area around the oil filter. Adequate lighting is essential for identifying the filter and ensuring precision during the removal process.
-
Position Oil Absorbent Mat or Rags: Place an oil absorbent mat or a few rags beneath the area where the oil filter is located. This precautionary step will help contain any oil spills or drips, keeping the workspace clean and preventing environmental contamination.
By meticulously preparing the vehicle using the aforementioned steps, you'll create a conducive environment for safely and effectively tackling the task of removing a stuck oil filter. With the vehicle securely positioned and the workspace optimized for the task at hand, you're now ready to proceed to the next steps of the oil filter removal process.
Step 3: Loosen the Oil Filter
Loosening a stuck oil filter requires a strategic approach and careful execution to avoid damaging the filter housing or surrounding components. The following steps outline the process of effectively loosening the stubborn oil filter from the engine block:
-
Assess the Tightness: Before applying any force, assess the level of tightness of the oil filter. Attempt to rotate the filter counterclockwise using moderate pressure. If it moves even slightly, this indicates that it is not completely seized, and you can proceed with the removal process. However, if the filter does not budge, it is likely tightly fused to the engine block.
-
Use a Proper Grip: Ensure that the oil filter wrench or any alternative tool you are using provides a secure and snug grip around the filter. This will prevent slippage and minimize the risk of damaging the filter or the surrounding components. Position the wrench or tool at the base of the filter, ensuring a firm hold.
-
Apply Penetrating Oil: If the oil filter remains stubbornly stuck, applying a liberal amount of penetrating oil around the base of the filter can help loosen the grip. Allow the oil to penetrate the threads and the contact point between the filter and the engine block for a few minutes. The penetrating oil works to break down any rust, corrosion, or debris that may be contributing to the filter's tightness.
-
Utilize a Filter Wrench: With the penetrating oil applied, reposition the oil filter wrench securely around the filter. Slowly and steadily apply force in a counterclockwise direction. Exercise patience and avoid using excessive force, as this can lead to damage. The goal is to gradually work the filter loose without abrupt or jerky movements.
-
Alternate Techniques: If the oil filter remains unyielding, consider using a rubber mallet to tap the handle of the oil filter wrench. The gentle impact can help dislodge the filter by breaking the seal between the filter gasket and the engine block. Alternatively, a flat-head screwdriver can be inserted through the filter and used to provide additional leverage for turning the filter.
By following these steps and employing a combination of techniques, you can effectively loosen a stuck oil filter without causing harm to your vehicle. Patience, precision, and the right tools are key to successfully overcoming the challenge of a tightly fused oil filter.
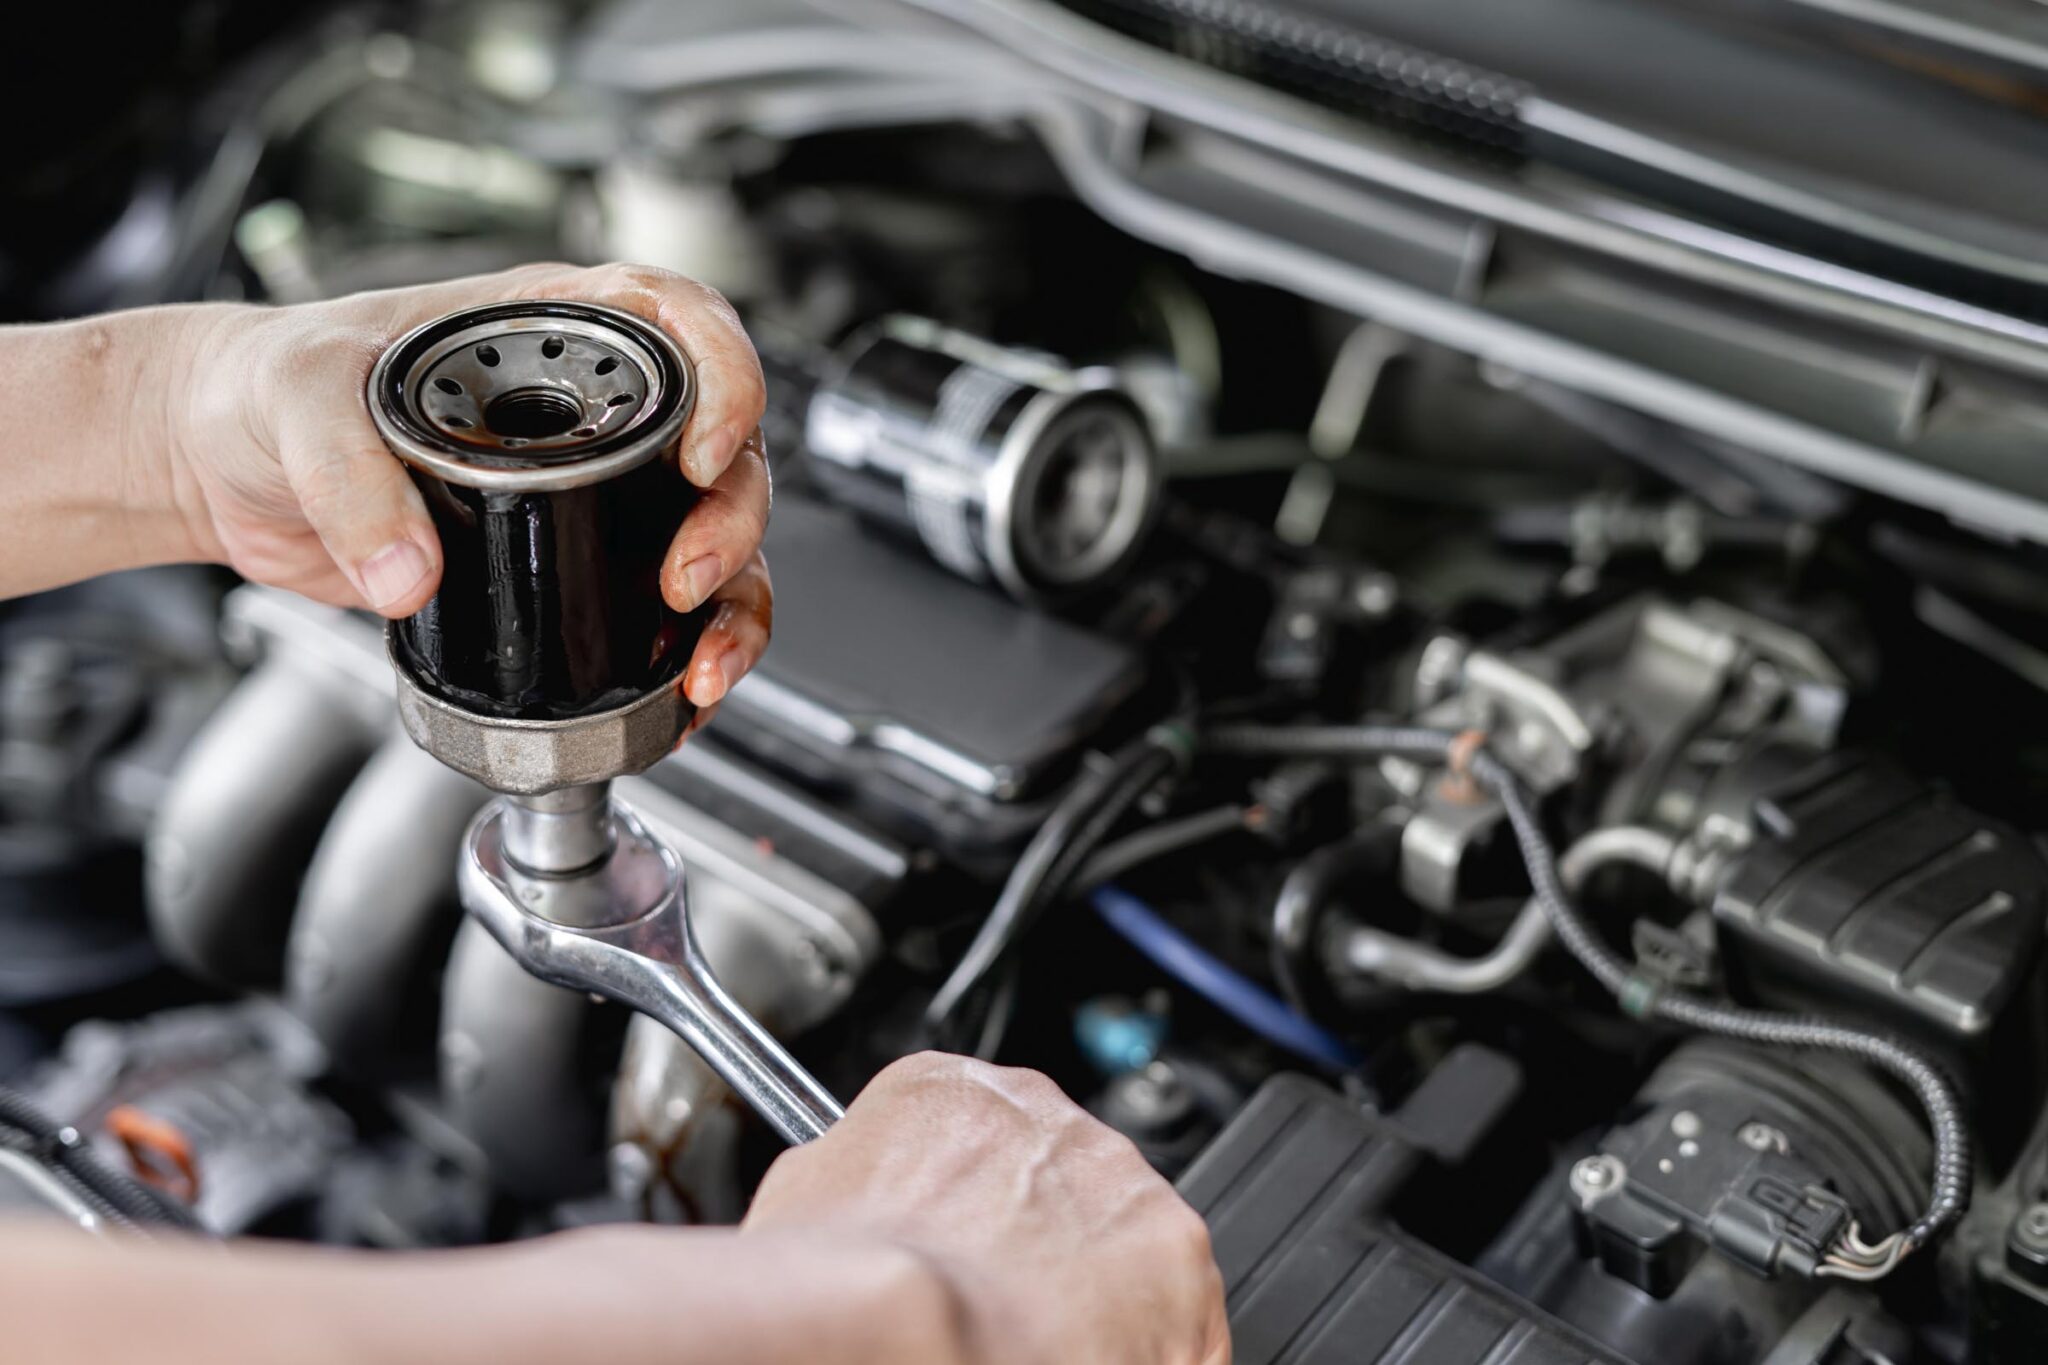
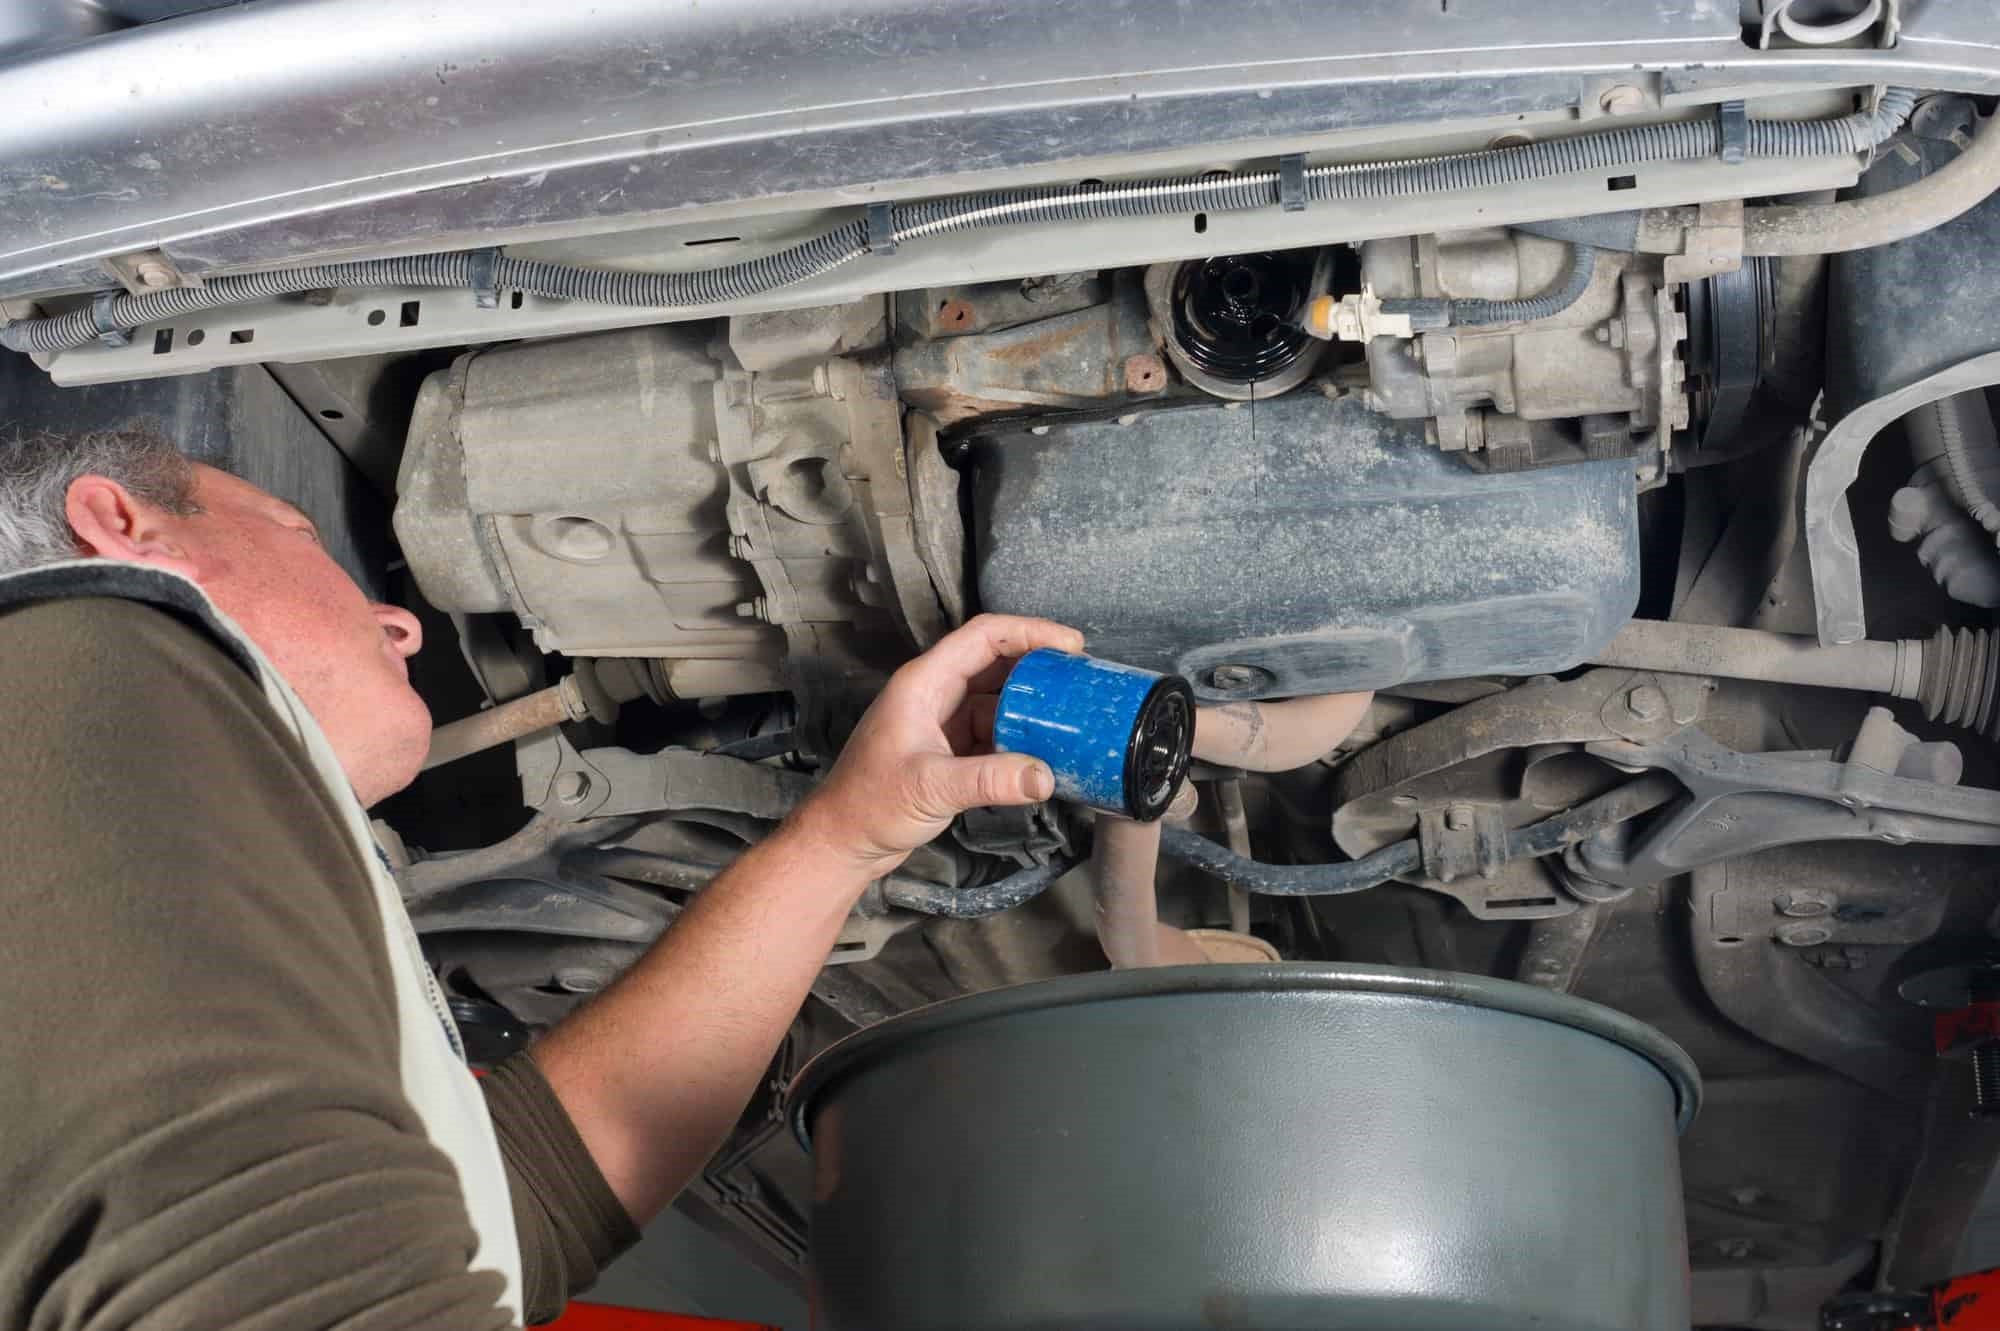
Step 4: Use an Oil Filter Wrench
When facing a stubborn oil filter, an oil filter wrench becomes an indispensable tool in your arsenal. Designed specifically for the task of gripping and turning oil filters, this specialized wrench provides the leverage and torque needed to tackle even the most tightly fused filters. Here's a detailed breakdown of the process of using an oil filter wrench to effectively remove a stuck oil filter:
-
Select the Right Size: Oil filter wrenches come in various sizes to accommodate different filter diameters. It's crucial to choose a wrench that matches the size of your specific oil filter to ensure a secure and snug fit. Using an ill-fitting wrench can lead to slippage and potential damage to the filter or surrounding components.
-
Position the Wrench: With the correct-sized wrench in hand, position it around the base of the oil filter, ensuring that it securely grips the filter without any wobbling or play. The adjustable band or claw-like mechanism of the wrench should be snugly tightened around the filter, providing a stable foundation for turning the filter.
-
Apply Gradual Pressure: Once the wrench is securely in place, begin applying gradual pressure in a counterclockwise direction. It's essential to maintain a steady and controlled grip on the wrench, avoiding sudden jerks or abrupt movements that can compromise the integrity of the filter or the filter housing.
-
Monitor Progress: As you apply pressure, monitor the progress of the filter's movement. If the filter begins to turn and loosen from its seated position, continue the motion with consistent pressure. If the filter remains resistant, refrain from forcing it further to prevent damage.
-
Reposition as Needed: In some cases, repositioning the wrench to achieve a better angle or grip on the filter may be necessary. Adjust the wrench as needed to optimize leverage and ensure a secure hold on the filter.
-
Exercise Patience: Removing a stuck oil filter with an oil filter wrench requires patience and a methodical approach. By exerting controlled and gradual force, you can effectively work the filter loose without risking damage to the filter housing or the engine block.
By following these steps and utilizing an oil filter wrench with precision and care, you can effectively tackle the challenge of removing a stuck oil filter. The specialized design and functionality of the oil filter wrench make it an invaluable tool for any DIY enthusiast or professional mechanic facing the task of oil filter replacement.
Step 5: Use a Screwdriver and Hammer
When confronted with a stubborn oil filter that refuses to yield to conventional removal methods, employing a screwdriver and hammer can provide an alternative approach to dislodging the filter. This technique requires precision, caution, and a strategic application of force to effectively loosen the tightly fused oil filter from the engine block.
Here's a detailed breakdown of the process of using a screwdriver and hammer to tackle a stuck oil filter:
-
Assess the Filter's Material: Before proceeding with this method, it's essential to determine the material of the oil filter. If the filter is constructed of metal, it is suitable for the screwdriver and hammer technique. However, if the filter is made of plastic or composite material, it's advisable to avoid this approach to prevent damage.
-
Position the Screwdriver: Insert the tip of a sturdy flat-head screwdriver into the side of the oil filter. The goal is to puncture the filter to create a leverage point for turning it counterclockwise. Position the screwdriver at a slight angle to maximize the surface area of contact with the filter.
-
Apply Controlled Force: With the screwdriver in place, use a hammer to gently tap the handle of the screwdriver. The impact should be carefully controlled to avoid excessive force that could lead to damage. The objective is to create a small puncture and initiate a turning motion to loosen the filter.
-
Rotate the Filter: Once the screwdriver has punctured the filter and provided a leverage point, attempt to rotate the filter counterclockwise using the screwdriver as a handle. Exercise caution and apply gradual pressure to avoid causing the filter to break or sustain damage.
-
Monitor Progress: As you apply turning pressure, monitor the filter's movement. If it begins to loosen from its seated position, continue the motion with controlled force. If the filter remains resistant, refrain from forcing it further to prevent potential harm.
-
Alternate Tapping Points: If the initial puncture and turning attempt do not yield results, reposition the screwdriver to create additional puncture points around the filter's circumference. By strategically tapping and rotating the screwdriver, you can gradually weaken the filter's grip on the engine block.
By following these steps and exercising caution, the screwdriver and hammer method can serve as an effective alternative for removing a stuck oil filter. This technique requires patience, precision, and a keen awareness of the filter's material and structural integrity. When executed with care, it can provide the leverage needed to dislodge a tightly fused oil filter and facilitate its safe removal from the vehicle.
Step 6: Clean the Area
Once the stubborn oil filter has been successfully removed, it's essential to dedicate attention to cleaning the surrounding area to ensure a pristine and well-maintained workspace. This step not only promotes a tidy and organized environment but also allows for thorough inspection of the filter housing and adjacent components. Here's a detailed breakdown of the process of cleaning the area after removing a stuck oil filter:
-
Inspect for Residual Debris: Begin by visually inspecting the area around the oil filter housing for any residual debris, oil, or contaminants. Use a flashlight or portable light source to illuminate the space and identify any accumulated dirt, grime, or remnants of the old filter's gasket.
-
Wipe Down the Housing: Using a clean, lint-free cloth or disposable shop towels, carefully wipe down the surface of the oil filter housing. Pay close attention to removing any oil or residue that may have accumulated during the removal process. Thoroughly cleaning the housing prepares it for the installation of the new oil filter.
-
Check for Leaks or Damage: While cleaning the area, take the opportunity to inspect the oil filter housing and surrounding components for any signs of leaks, cracks, or damage. Look for evidence of oil seepage, corrosion, or compromised gaskets. Identifying and addressing potential issues at this stage can prevent future complications.
-
Clear Oil Drips and Spills: If any oil drips or spills occurred during the removal process, use an oil absorbent mat or disposable rags to carefully blot and clean up the affected area. It's crucial to prevent oil from accumulating on the engine block or other components, as it can lead to unpleasant odors and potential fire hazards.
-
Dispose of Old Filter and Waste: Properly dispose of the old oil filter and any waste materials, such as used shop towels or absorbent mats. Adhere to local regulations and guidelines for the disposal of automotive waste to ensure environmental responsibility.
-
Prepare for New Filter Installation: As the area is cleaned and inspected, prepare for the installation of the new oil filter. Ensure that the filter housing is free of debris and contaminants, providing a clean and secure foundation for the new filter.
By meticulously cleaning the area after removing a stuck oil filter, you not only maintain a tidy workspace but also lay the groundwork for a seamless transition to the installation of the new filter. This step fosters a proactive approach to vehicle maintenance and underscores the importance of attention to detail in the oil filter replacement process.
Step 7: Install the New Oil Filter
With the old oil filter successfully removed and the surrounding area meticulously cleaned and inspected, the final step in the oil filter replacement process involves the installation of a new, high-quality oil filter. This critical component plays a pivotal role in maintaining the health and performance of your vehicle's engine, making the installation process a key aspect of routine maintenance. Here's a comprehensive guide to effectively installing a new oil filter:
-
Select the Correct Filter: Ensure that the new oil filter is the correct match for your vehicle's make, model, and engine specifications. Cross-reference the part number and dimensions to guarantee a precise fit, preventing any potential leaks or installation issues.
-
Prep the Filter Gasket: Prior to installation, apply a thin, even coat of clean engine oil to the rubber gasket of the new oil filter. This lubrication serves to create a proper seal and facilitates easy removal during the next oil change.
-
Hand-Tighten the Filter: Carefully position the new oil filter in place, aligning the threads with the filter housing. Begin by hand-tightening the filter in a clockwise direction, ensuring that it seats snugly against the housing. Avoid using tools at this stage to prevent over-tightening, which can lead to gasket damage.
-
Check Manufacturer's Specifications: Refer to the manufacturer's specifications for the recommended torque setting for the oil filter. Utilize a torque wrench to apply the specified amount of torque to securely fasten the filter to the housing. This step ensures a proper seal without the risk of overtightening.
-
Inspect for Leaks: Once the new oil filter is securely installed, visually inspect the area for any signs of oil leaks or drips. Run the engine for a few minutes and check for leaks again. Address any leaks immediately to prevent oil loss and potential engine damage.
-
Dispose of Old Filter and Waste: Properly dispose of the old oil filter and any waste materials in accordance with local regulations. Adhering to environmentally responsible disposal practices is essential for minimizing impact and promoting sustainability.
By meticulously following these steps, you can confidently and effectively install a new oil filter, ensuring optimal engine performance and longevity. This proactive approach to oil filter replacement underscores the significance of meticulous maintenance practices in preserving the health and efficiency of your vehicle's engine.
Conclusion
Successfully removing a stuck oil filter is a testament to the resilience and resourcefulness of car owners and mechanics alike. The process, though challenging at times, is a crucial aspect of routine vehicle maintenance that directly impacts the health and longevity of the engine. By following the comprehensive steps outlined in this guide, you've gained valuable insights into the art of tackling a stubborn oil filter with precision, patience, and the right tools.
From the initial preparation of the vehicle to the strategic application of force and the meticulous installation of a new oil filter, each step in the process contributes to the overall well-being of your vehicle. The careful selection and use of tools, such as oil filter wrenches, screwdrivers, and hammers, exemplify the ingenuity and adaptability required to overcome automotive challenges.
Moreover, the emphasis on cleanliness and attention to detail during the removal and installation process underscores the proactive approach to vehicle maintenance. By maintaining a clean and organized workspace and inspecting the oil filter housing for potential issues, you've demonstrated a commitment to preserving the integrity of your vehicle's engine.
As you reflect on the journey of removing a stuck oil filter, it's important to recognize the empowerment that comes with mastering this essential skill. Whether you're a seasoned DIY enthusiast or a novice looking to expand your automotive knowledge, the ability to confidently address a stuck oil filter instills a sense of self-reliance and competence.
Furthermore, the successful removal and installation of a new oil filter signify a proactive stance toward vehicle maintenance, contributing to the overall efficiency and reliability of your vehicle. By adhering to manufacturer specifications, disposing of waste responsibly, and conducting thorough inspections, you've exemplified a commitment to sustainable and responsible automotive practices.
In conclusion, the process of removing a stuck oil filter transcends the mechanical task at hand, embodying a dedication to vehicle care, problem-solving, and the preservation of automotive integrity. As you apply the knowledge and techniques acquired from this guide, you're poised to approach future maintenance challenges with confidence and expertise, ensuring the continued health and performance of your vehicle's engine.