Home>Automotive>How To Change Cabin Air Filter
Automotive
How To Change Cabin Air Filter
Published: February 28, 2024
Learn how to change your automotive cabin air filter with our step-by-step guide. Improve your car's air quality and breathe easier today!
(Many of the links in this article redirect to a specific reviewed product. Your purchase of these products through affiliate links helps to generate commission for Regretless.com, at no extra cost. Learn more)
Table of Contents
Introduction
Changing the cabin air filter is a crucial yet often overlooked aspect of automotive maintenance. This simple task can significantly enhance the air quality inside your vehicle, ensuring a clean and healthy environment for you and your passengers. The cabin air filter plays a vital role in trapping dust, pollen, and other airborne particles, preventing them from entering the vehicle's interior through the heating, ventilation, and air conditioning (HVAC) system.
Over time, the cabin air filter becomes clogged with debris, reducing its effectiveness and impeding the flow of fresh, clean air into the cabin. This can lead to unpleasant odors, decreased HVAC performance, and potential health issues, particularly for individuals with allergies or respiratory sensitivities. Therefore, regular replacement of the cabin air filter is essential for maintaining a comfortable and healthy driving experience.
In this comprehensive guide, we will walk you through the step-by-step process of changing your cabin air filter. Whether you're a seasoned car enthusiast or a novice DIYer, this article will equip you with the knowledge and confidence to tackle this maintenance task with ease. By following these instructions, you can ensure that your vehicle's interior air remains free from contaminants, promoting a more enjoyable and breathable driving environment.
Now, let's dive into the details and learn how to locate, remove, and install a new cabin air filter in your vehicle. With just a few simple tools and a little bit of time, you can make a significant impact on the air quality within your car, providing a breath of fresh air for your daily commute or road trips. So, let's get started and take the first step toward cleaner, healthier air inside your vehicle.
Read more: How To Remove A Stuck Oil Filter
Step 1: Locate the Cabin Air Filter
Locating the cabin air filter is the first crucial step in the process of replacing it. The cabin air filter is typically located within the HVAC system, behind the glove compartment, under the dashboard, or beneath the windshield wipers. However, the exact placement varies depending on the make and model of the vehicle.
To begin, open the vehicle's front passenger door and locate the glove compartment. In some cars, the cabin air filter is situated behind or beneath the glove compartment. To access it, you may need to empty the contents of the glove compartment and gently press the sides to release the compartment from its hinges. Once the glove compartment is removed or lowered, you will have a clear view of the cabin air filter housing.
In other vehicles, the cabin air filter is positioned under the dashboard on the passenger side. To locate it, you may need to kneel down outside the vehicle and look underneath the dashboard. The filter housing is often secured with clips or screws and may be concealed by a plastic cover. Additionally, in some cars, the cabin air filter is situated beneath the windshield wipers, requiring access to the engine compartment for replacement.
It's important to consult your vehicle's owner's manual for specific instructions on locating the cabin air filter. The manual provides valuable insights into the filter's exact placement and the necessary steps for accessing it. If you don't have the manual on hand, you can often find it online through the manufacturer's website or other automotive resources.
Once you've located the cabin air filter housing, take note of its size and the orientation of the filter. Some filters are rectangular, while others are square or irregularly shaped. Understanding the filter's position and dimensions will facilitate the subsequent steps of removing the old filter and installing the new one.
By successfully identifying the cabin air filter's location, you've completed the initial phase of the replacement process. With this knowledge in hand, you're now ready to proceed to the next step of removing the old cabin air filter, which we'll cover in detail in the following section.
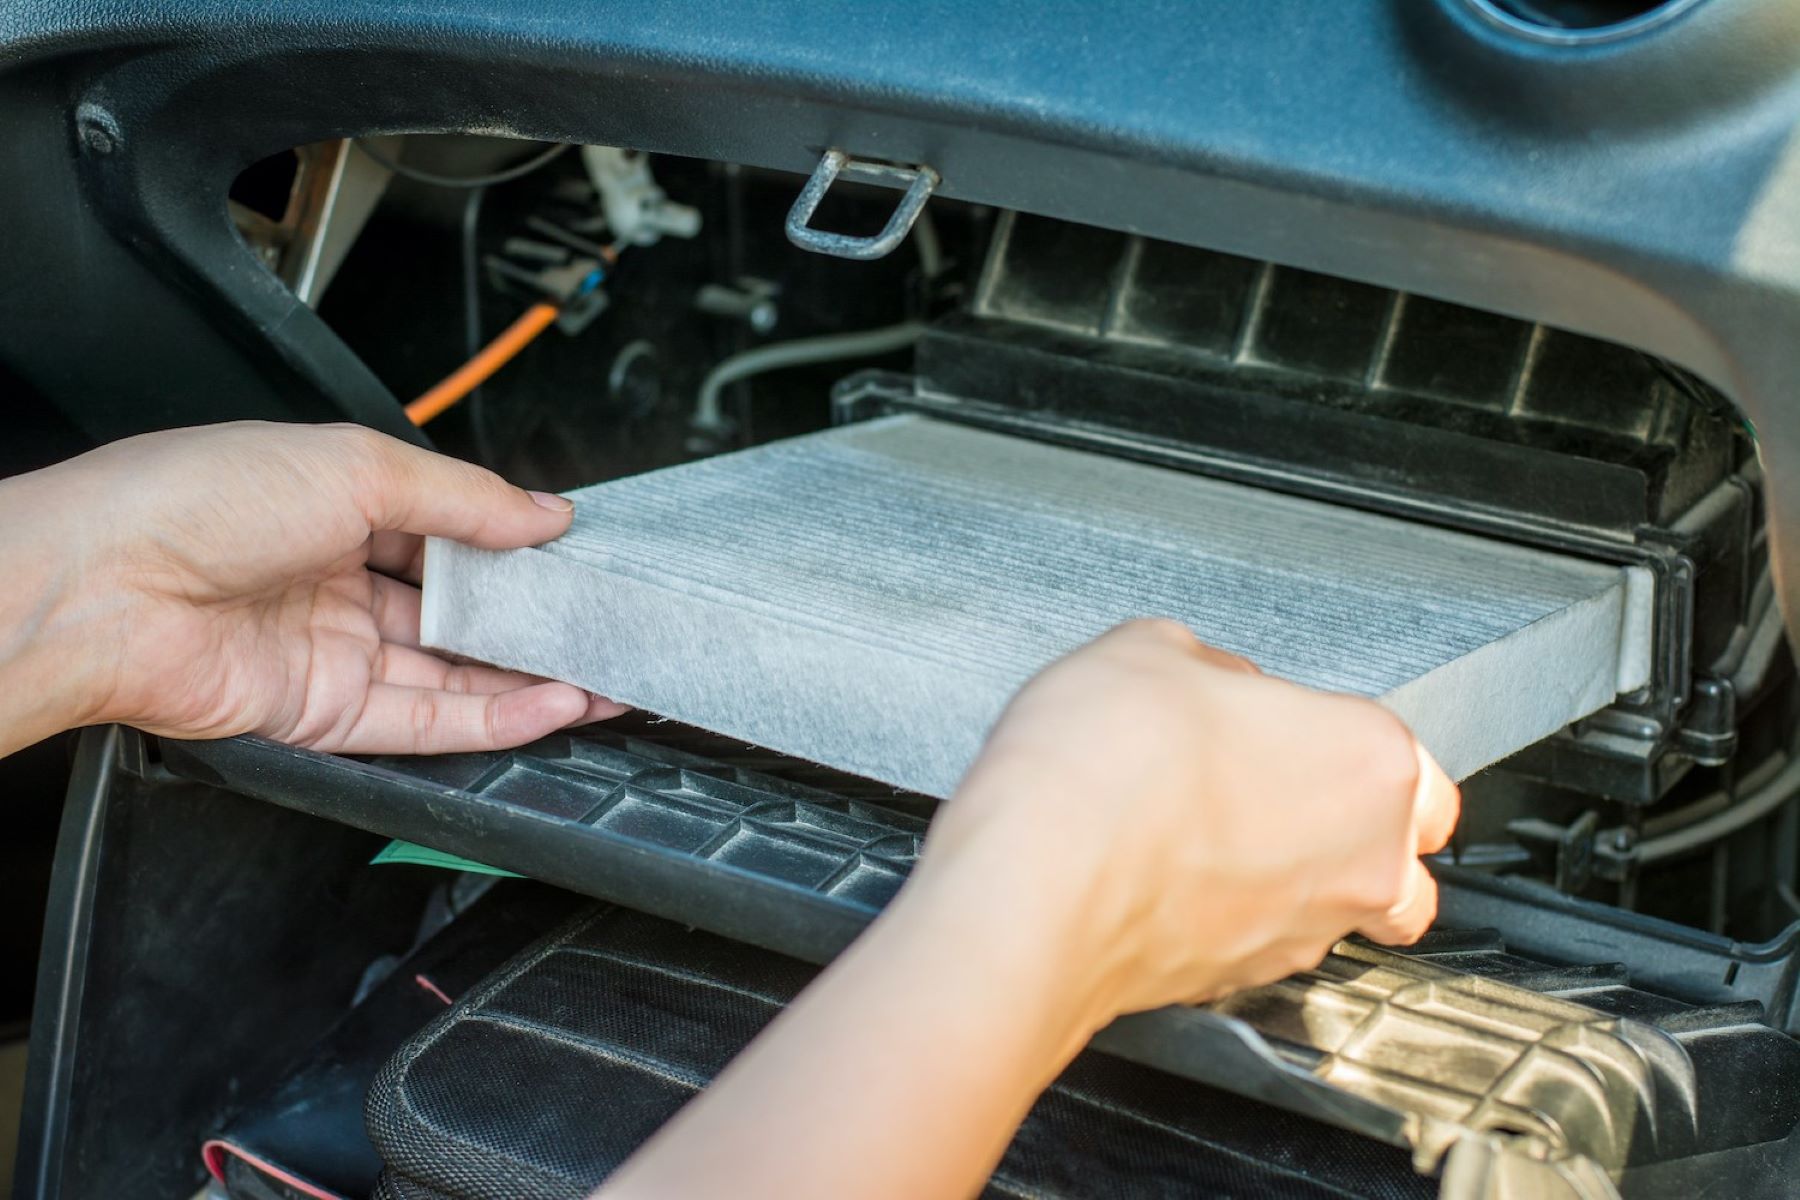
Step 2: Remove the Old Cabin Air Filter
Removing the old cabin air filter is a straightforward yet essential task in the process of replacing it with a new one. After successfully locating the filter housing, the next step is to carefully extract the existing filter, which may have accumulated dust, debris, and other airborne particles over time.
-
Inspect the Filter Housing: Before proceeding with the removal, take a moment to inspect the filter housing. Depending on the vehicle's make and model, the housing may be secured with clips, screws, or latches. Carefully examine the housing to identify the fastening mechanism and determine the best approach for accessing the filter.
-
Unfasten the Housing: Using the appropriate tools, such as a screwdriver or socket wrench, unfasten the clips or screws that secure the filter housing. In some cases, the housing may feature a simple latch mechanism that can be released by hand. Exercise caution to avoid damaging the housing or surrounding components during this process.
-
Extract the Old Filter: Once the housing is accessible, carefully slide out the old cabin air filter. Be mindful of its orientation and any accumulated debris, as the filter may contain a significant amount of dust, leaves, or other contaminants. Dispose of the old filter in a responsible manner, taking care to prevent the spread of debris within the vehicle interior.
-
Inspect the Housing Interior: With the old filter removed, take a moment to inspect the interior of the filter housing. Use a flashlight to examine the compartment for any residual debris or signs of mold or moisture. If necessary, gently clean the housing interior using a soft brush or cloth to ensure that it is free from obstructions before installing the new filter.
By following these steps, you can effectively remove the old cabin air filter, preparing the filter housing for the installation of a fresh, clean filter. With the old filter safely removed and the housing inspected and cleaned, you are now ready to proceed to the next phase of the replacement process: installing the new cabin air filter.
Step 3: Install the New Cabin Air Filter
Installing a new cabin air filter is a pivotal step in maintaining optimal air quality within your vehicle. By replacing the old filter with a fresh one, you can ensure that the HVAC system continues to deliver clean, filtered air into the cabin, promoting a healthier and more comfortable driving environment. Let's delve into the detailed process of installing the new cabin air filter:
-
Select the Correct Replacement Filter: Before proceeding with the installation, ensure that you have the correct replacement cabin air filter for your vehicle. Refer to the vehicle's owner's manual or consult an automotive parts specialist to obtain the appropriate filter that matches the make, model, and year of your car. It's essential to use a filter that aligns with the manufacturer's specifications to guarantee a proper fit and optimal filtration performance.
-
Position the New Filter: Carefully position the new cabin air filter into the filter housing, aligning it according to the orientation of the old filter. Take note of any directional arrows or markings on the filter, which indicate the correct airflow direction. Proper alignment ensures that the filter functions effectively, allowing air to pass through it in the designated direction for efficient filtration.
-
Secure the Filter Housing: Once the new filter is in place, secure the filter housing by reattaching the clips, screws, or latches that hold it in position. Ensure that the housing is firmly and securely fastened to prevent any movement or dislodgment of the filter during vehicle operation. This step is crucial for maintaining the integrity of the filter and preventing air leaks within the HVAC system.
-
Perform a Functionality Check: After installing the new cabin air filter, it's advisable to perform a quick functionality check to verify that the filter is properly seated and the housing is securely closed. Gently tap the filter housing to ensure that it is stable and free from any loose components. Additionally, turn on the vehicle's HVAC system and assess the airflow to confirm that the new filter does not impede the air circulation.
-
Record the Replacement Date: As a proactive measure for future maintenance, record the date of the cabin air filter replacement in your vehicle's maintenance log or service records. Keeping track of the replacement date allows you to adhere to a regular maintenance schedule, ensuring that the cabin air filter is replaced at recommended intervals to maintain optimal air quality.
By following these steps, you can successfully install a new cabin air filter, contributing to a cleaner and healthier interior environment within your vehicle. With the new filter in place, you can enjoy improved air quality and enhanced HVAC performance, creating a more pleasant driving experience for you and your passengers.
Step 4: Reassemble the Cabin Air Filter Housing
Reassembling the cabin air filter housing is the final step in the process of replacing the cabin air filter in your vehicle. This critical phase ensures that the filter is securely enclosed within the housing, safeguarding it from external contaminants and maintaining the integrity of the HVAC system. Let's delve into the detailed process of reassembling the cabin air filter housing:
-
Align the Housing Components: Before reassembling the housing, ensure that all components, including the cover or access panel, are properly aligned with the filter housing. Verify that the housing is free from any residual debris or obstructions that could impede the installation of the cover.
-
Secure the Cover or Access Panel: Carefully position the cover or access panel over the filter housing, aligning it with the corresponding fastening points. Depending on the design of the housing, the cover may feature tabs, clips, or screws that secure it in place. Exercise caution to align the cover accurately to prevent misalignment or potential damage during installation.
-
Fasten the Housing Components: Using the appropriate fastening method, secure the cover or access panel to the filter housing. If the cover utilizes clips, gently press them into place until they audibly click, indicating a secure attachment. In the case of screws, tighten them evenly to ensure a snug fit without over-torquing.
-
Verify the Sealing Integrity: After reassembling the housing, verify the sealing integrity by gently pressing around the perimeter of the cover to ensure a uniform and secure seal. A properly sealed housing prevents unfiltered air from bypassing the filter, maintaining the effectiveness of the HVAC system in delivering clean, purified air into the vehicle's interior.
-
Test the HVAC System: To confirm the successful reassembly of the cabin air filter housing, activate the vehicle's HVAC system and assess the airflow. Listen for any unusual noises or air leaks that may indicate a loose or improperly sealed housing. Additionally, check the functionality of the air conditioning and heating modes to ensure that the system operates smoothly with the new filter in place.
By meticulously following these steps, you can effectively reassemble the cabin air filter housing, completing the comprehensive process of replacing the cabin air filter in your vehicle. With the housing securely reassembled and the new filter in position, you can enjoy the benefits of improved air quality and optimal HVAC performance, creating a more comfortable and inviting driving environment for you and your passengers.
Read more: How To Change Colors In Crochet
Conclusion
In conclusion, the process of changing the cabin air filter is a fundamental aspect of vehicle maintenance that directly impacts the air quality within the car's interior. By following the step-by-step guide outlined in this article, you have gained the knowledge and confidence to undertake this essential task with ease. From locating the filter housing to installing the new filter and reassembling the housing, each stage of the process contributes to ensuring a cleaner and healthier driving environment for you and your passengers.
Regular replacement of the cabin air filter is paramount for several reasons. Firstly, a clean filter promotes improved air circulation within the HVAC system, enhancing the efficiency of heating and cooling functions. This, in turn, contributes to a more comfortable and enjoyable driving experience, particularly during extreme weather conditions. Additionally, a fresh cabin air filter helps to mitigate unpleasant odors and allergens, creating a more inviting and breathable atmosphere inside the vehicle.
Furthermore, maintaining a clean cabin air filter is essential for preserving the longevity and performance of the HVAC system. By preventing the accumulation of debris and contaminants, the filter safeguards vital components of the HVAC system, reducing the risk of potential malfunctions and costly repairs. Moreover, a well-maintained cabin air filter supports the overall well-being of vehicle occupants, especially those with allergies or respiratory sensitivities, by minimizing exposure to airborne particles and pollutants.
As you embark on the journey of replacing your cabin air filter, it's important to approach the task with diligence and attention to detail. By selecting the correct replacement filter, ensuring proper installation, and adhering to recommended maintenance intervals, you can uphold the air quality standards within your vehicle and contribute to a healthier driving environment.
In essence, changing the cabin air filter is a simple yet impactful maintenance practice that aligns with the broader goal of preserving the overall comfort, performance, and longevity of your vehicle. By incorporating this routine task into your maintenance regimen, you are actively investing in the well-being of your vehicle and the satisfaction of your driving experience.
So, as you complete the process of replacing the cabin air filter, take pride in knowing that you have taken a proactive step toward maintaining a clean and healthy interior environment within your vehicle. With the new filter in place, you can breathe easy, knowing that you have contributed to a fresher and more enjoyable driving experience for yourself and your passengers.