Home>Automotive>The Ultimate Guide To Perfectly Tightening Your Oil Filter!
Automotive
The Ultimate Guide To Perfectly Tightening Your Oil Filter!
Published: January 10, 2024
Learn the essential steps for expertly tightening your oil filter in this comprehensive automotive guide. Master the process for optimal performance and longevity.
(Many of the links in this article redirect to a specific reviewed product. Your purchase of these products through affiliate links helps to generate commission for Regretless.com, at no extra cost. Learn more)
Table of Contents
Introduction
Ensuring the proper tightening of your oil filter is a crucial aspect of vehicle maintenance that is often overlooked. When changing your vehicle's oil, the oil filter must be securely tightened to prevent leaks and maintain the integrity of the oil system. Inadequately tightened oil filters can lead to oil leaks, loss of oil pressure, and potential engine damage, making this a task that should never be taken lightly.
Properly tightening the oil filter is not only essential for preventing leaks but also for ensuring the effective filtration of oil throughout the engine. A securely tightened oil filter helps maintain the necessary pressure and flow of oil to lubricate engine components, thereby prolonging the engine's lifespan and maximizing its performance.
In this comprehensive guide, we will delve into the intricacies of tightening your oil filter with precision and care. From the tools and materials required to the step-by-step process and valuable tips, this guide will equip you with the knowledge and expertise to execute this maintenance task with confidence and proficiency. By mastering the art of tightening your oil filter, you can safeguard your vehicle's engine, optimize its performance, and contribute to its longevity.
Now, let's embark on this enlightening journey, arming ourselves with the knowledge and skills necessary to perfectly tighten your oil filter and ensure the smooth operation of your vehicle's vital systems.
Read more: How To Remove A Stuck Oil Filter
Importance of Tightening Your Oil Filter
Properly tightening your oil filter is a critical aspect of vehicle maintenance that directly impacts the overall health and performance of your engine. The oil filter plays a pivotal role in safeguarding the engine by trapping contaminants and preventing them from circulating through the lubrication system. However, if the oil filter is not adequately tightened during installation, it can lead to a myriad of issues that compromise the engine's functionality and longevity.
When the oil filter is not securely tightened, it can result in oil leaks. These leaks not only create a messy and potentially hazardous environment but also lead to a gradual loss of oil. Insufficient oil levels can cause a drop in oil pressure, which is essential for lubricating the engine's moving parts. Inadequate lubrication due to oil leaks can result in increased friction and heat within the engine, potentially leading to accelerated wear and tear of critical components.
Furthermore, a loosely tightened oil filter can compromise the effectiveness of the oil filtration process. If the filter is not snugly secured in place, it may develop gaps or loose connections, allowing unfiltered oil to bypass the filtration system and circulate through the engine. This can lead to the accumulation of harmful contaminants, such as dirt, metal particles, and sludge, within the engine, ultimately impairing its performance and longevity.
Properly tightening the oil filter is also essential for maintaining the integrity of the oil system. A securely fastened oil filter ensures that the oil remains contained within the designated pathways, preventing seepage and preserving the optimal oil pressure and flow throughout the engine. This, in turn, facilitates the efficient lubrication of critical engine components, reducing friction, dissipating heat, and promoting smooth operation.
In essence, the importance of tightening your oil filter cannot be overstated. It is a fundamental aspect of preserving the health and functionality of your vehicle's engine. By recognizing the significance of this seemingly small task and diligently ensuring the proper tightening of the oil filter, you can contribute to the overall well-being and longevity of your vehicle's engine, thereby enhancing its reliability and performance.
Tools and Materials Needed
When embarking on the task of tightening your oil filter, it is essential to gather the requisite tools and materials to ensure a seamless and effective process. Here's a comprehensive list of the items you will need:
Tools:
-
Oil Filter Wrench: This specialized wrench is designed to securely grip the oil filter, allowing for easy removal and installation. It comes in various sizes to accommodate different filter diameters.
-
Gloves: A pair of mechanic's gloves provides protection for your hands while handling the oil filter and other components, preventing potential cuts and exposure to contaminants.
-
Shop Rags: Having a supply of clean shop rags or paper towels on hand is crucial for wiping away any residual oil and maintaining a clean work environment.
-
Oil Drain Pan: To catch the oil that drains from the filter and prevent spills, an oil drain pan with a capacity suitable for the volume of oil in your vehicle is necessary.
-
Safety Glasses: Protecting your eyes from accidental splashes of oil or debris is paramount, making safety glasses an indispensable part of your toolkit.
Materials:
-
New Oil Filter: Ensure that you have the correct replacement oil filter for your vehicle's make and model. Refer to your owner's manual or consult with an automotive expert to identify the appropriate filter.
-
Motor Oil: Depending on your vehicle's oil capacity and the type of oil recommended for your engine, you will need the corresponding quantity of motor oil to refill the system after the filter change.
-
Oil Filter Gasket: Some oil filters come with a gasket or O-ring that forms a seal between the filter and the engine. If your new filter does not include this component, it is essential to have a replacement gasket to prevent leaks.
-
Oil Filter Lubricant: A small amount of oil filter lubricant can be applied to the gasket or O-ring to facilitate a secure seal and ensure ease of removal during the next oil change.
By assembling these tools and materials before initiating the oil filter tightening process, you can streamline the procedure and minimize the risk of complications. Adequate preparation and the presence of the necessary equipment will contribute to a successful and efficient oil filter maintenance endeavor, ultimately promoting the health and longevity of your vehicle's engine.
Step-by-Step Guide to Tightening Your Oil Filter
-
Prepare the Vehicle: Park the vehicle on a level surface and engage the parking brake. Ensure that the engine is turned off and allowed to cool down to prevent accidental burns from hot engine components.
-
Locate the Oil Filter: Consult your vehicle's owner's manual or seek guidance to locate the oil filter. It is typically positioned near the engine and may be accessible from below the vehicle, depending on the make and model.
-
Drain the Oil: If you are performing an oil change simultaneously, drain the old oil from the engine by removing the drain plug and allowing the oil to flow into the drain pan.
-
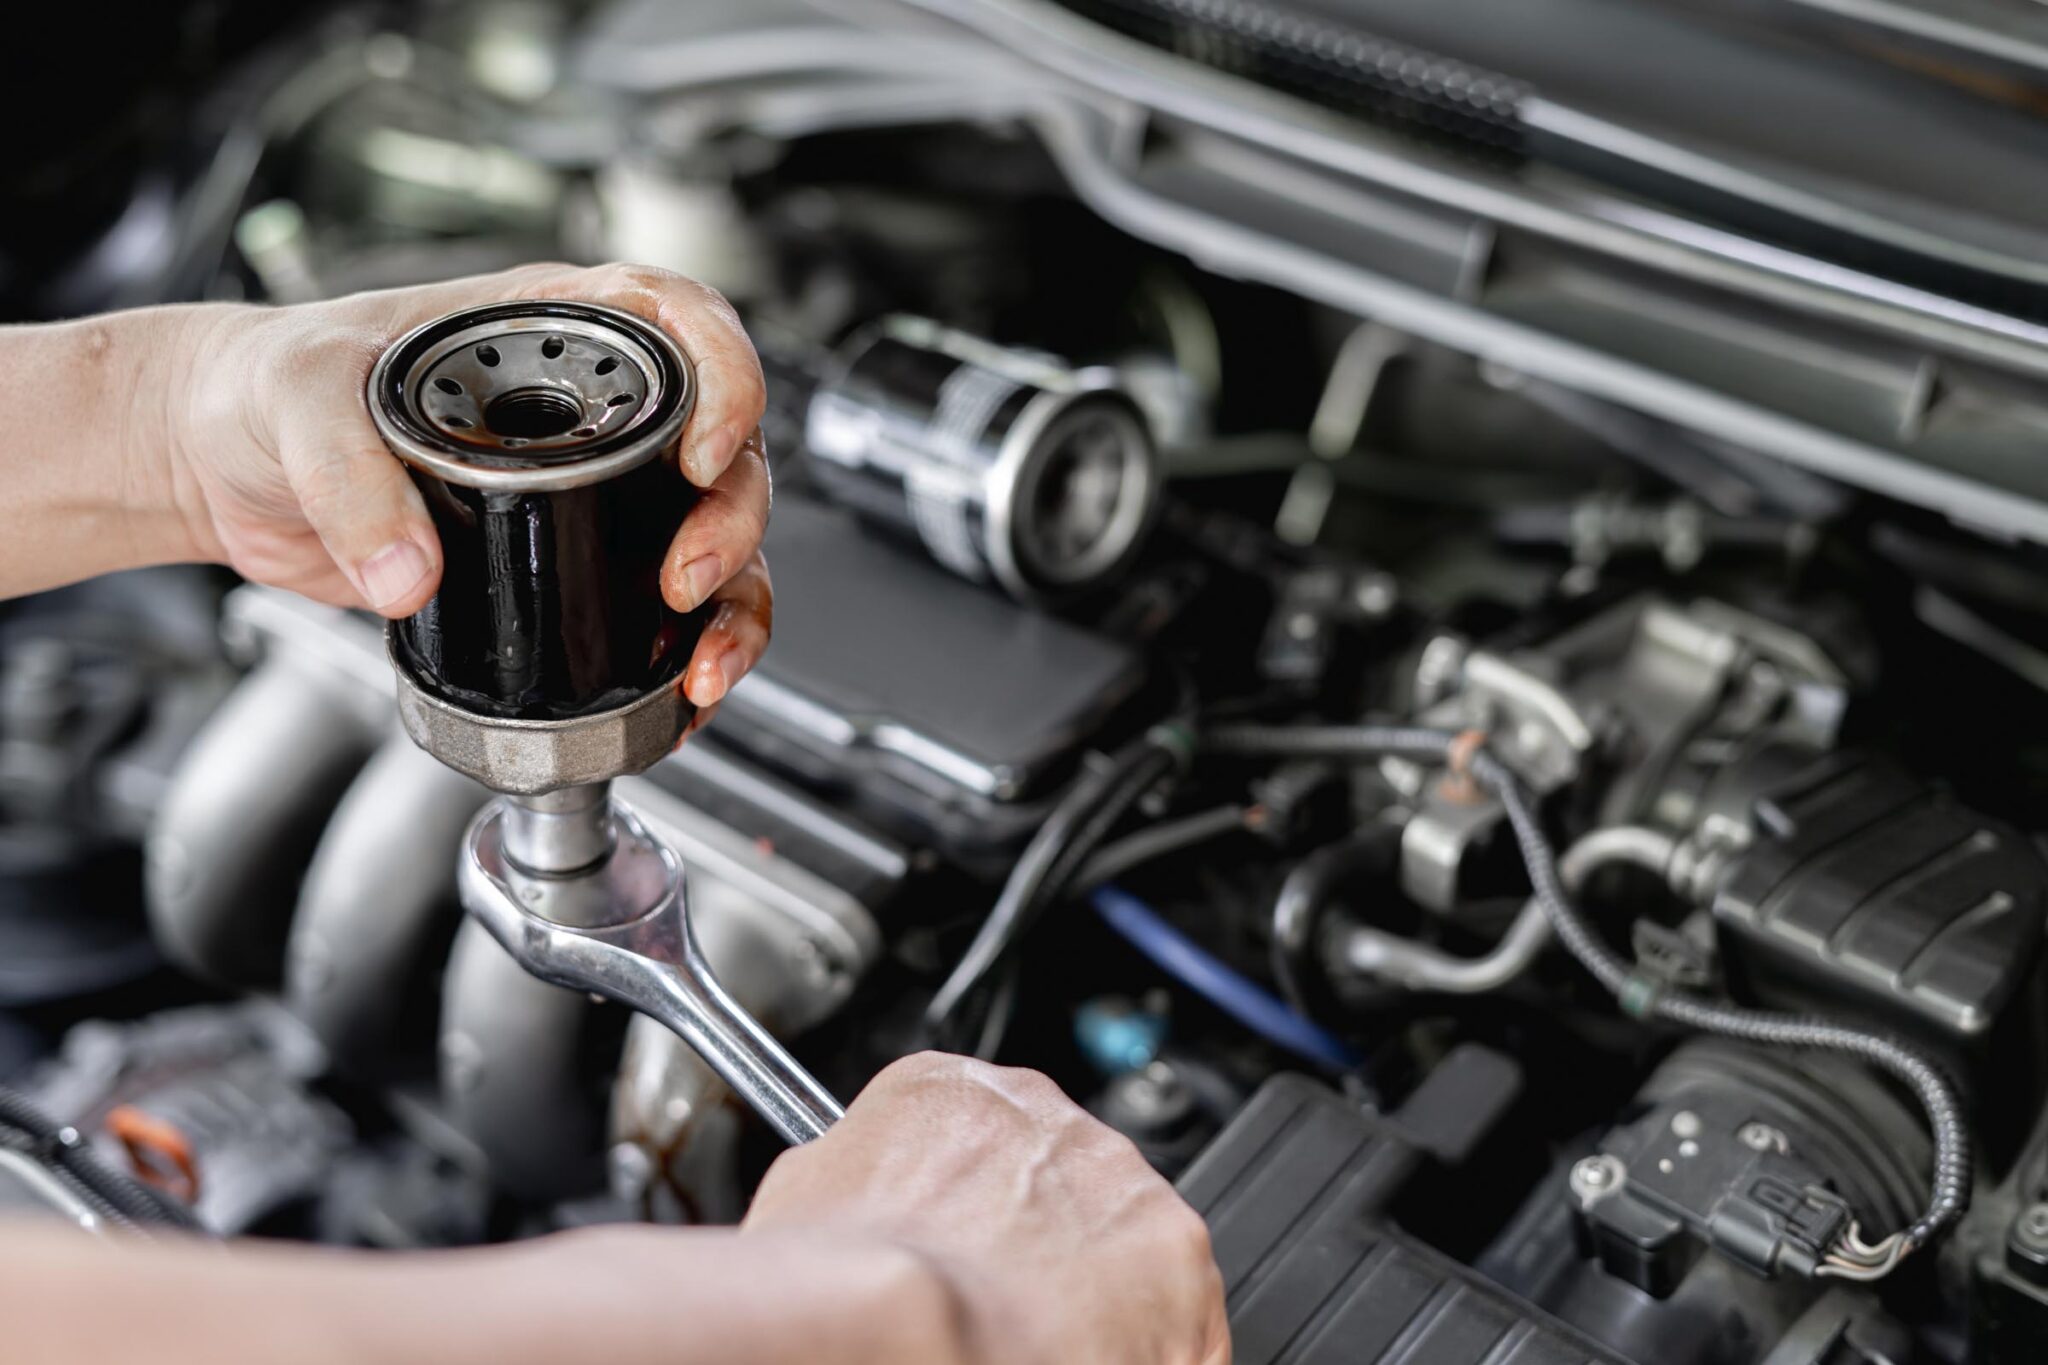
Remove the Old Oil Filter: Using an oil filter wrench, carefully loosen and remove the old oil filter by turning it counterclockwise. Be prepared for residual oil to drain out, so position the drain pan accordingly.
-
Prepare the New Oil Filter: Before installing the new oil filter, lubricate the rubber gasket or O-ring with a small amount of motor oil. This lubrication ensures a proper seal and facilitates easy removal during the next oil change.
-
Install the New Oil Filter: Gently screw the new oil filter into place by hand, ensuring that it is aligned correctly and making initial contact with the mounting surface. Once the gasket touches the surface, tighten the filter by an additional three-quarters of a turn using an oil filter wrench.
-
Check for Leaks: After the new oil filter is securely installed, wipe away any excess oil and visually inspect the area for leaks. This step is crucial for confirming that the filter is properly sealed and preventing potential oil leaks during engine operation.
-
Refill with Oil: If you drained the oil, refill the engine with the appropriate type and quantity of motor oil as recommended by the manufacturer. Be mindful of the oil capacity and avoid overfilling the engine.
-
Dispose of Old Oil and Filter: Safely dispose of the old oil and filter in accordance with local regulations. Many auto parts stores and service centers accept used oil and filters for recycling.
-
Record Maintenance Details: Keep a record of the oil change, including the date, mileage, type of oil used, and the oil filter's brand and part number. Maintaining a comprehensive maintenance log aids in tracking the vehicle's service history and scheduling future maintenance tasks.
By meticulously following these step-by-step instructions, you can effectively tighten your oil filter, ensuring a secure seal and optimal performance of your vehicle's engine. This systematic approach not only promotes the longevity of engine components but also contributes to the overall reliability and efficiency of your vehicle.
Tips for Properly Tightening Your Oil Filter
-
Hand-Tighten Before Using a Wrench: When installing the new oil filter, begin by hand-tightening it onto the mounting surface. This initial manual tightening ensures that the filter's gasket makes proper contact with the engine, reducing the risk of misalignment or damage to the gasket during the subsequent use of an oil filter wrench.
-
Use the Correct Filter Size: Ensure that the replacement oil filter matches the specifications outlined in your vehicle's manual. Using the correct filter size and type is crucial for achieving a secure fit and preventing leaks. Mismatched or ill-fitting filters can lead to inadequate sealing and compromised filtration efficiency.
-
Avoid Over-Tightening: While it is essential to securely fasten the oil filter, over-tightening can lead to detrimental consequences. Excessive force can distort the filter's housing, damage the gasket, or make it challenging to remove during the next oil change. Adhering to the manufacturer's recommended tightening torque specifications is pivotal in achieving the optimal balance between a secure seal and ease of removal.
-
Inspect the Mounting Surface: Before installing the new oil filter, inspect the mounting surface on the engine for any remnants of the old gasket or debris. A clean and smooth surface ensures proper contact and sealing between the new filter's gasket and the engine, reducing the likelihood of leaks.
-
Apply Oil to the Gasket: Prior to installing the new oil filter, applying a thin layer of clean motor oil to the gasket enhances its flexibility and sealing capabilities. This lubrication minimizes the risk of the gasket sticking or tearing during installation and facilitates a snug and effective seal against the engine.
-
Hand-Tighten, Then Quarter Turn: After hand-tightening the oil filter, use an oil filter wrench to give it an additional quarter turn. This method ensures that the filter is securely fastened without risking over-tightening. The quarter turn with the wrench provides the extra torque necessary to achieve a proper seal while preventing excessive force that may compromise the filter or gasket.
-
Check for Leaks After Running the Engine: Once the new oil filter is installed and the engine is running, inspect the filter and surrounding area for any signs of leakage. This visual check ensures that the filter is effectively sealed and that the mounting surface is free from leaks under operating conditions.
-
Consult the Vehicle Manual: Always refer to the vehicle's manual for specific guidelines and torque specifications related to oil filter installation. Following the manufacturer's recommendations regarding tightening procedures and torque values is essential for maintaining the integrity of the engine and ensuring optimal filtration and lubrication performance.
By adhering to these tips, you can confidently and effectively tighten your oil filter, promoting the longevity and reliability of your vehicle's engine while minimizing the risk of leaks and performance issues.
Common Mistakes to Avoid
-
Over-Tightening the Oil Filter: One of the most common mistakes is applying excessive force when tightening the oil filter. Over-tightening can lead to the deformation of the filter housing, causing the gasket to be compressed beyond its optimal capacity. This can result in the gasket becoming misshapen, leading to leaks and making it challenging to remove the filter during the next oil change. It's crucial to adhere to the manufacturer's recommended torque specifications and avoid using excessive force when securing the oil filter.
-
Using the Wrong Oil Filter: Installing an incorrect or incompatible oil filter is a critical error that can have detrimental consequences. Using a filter that does not match the specifications outlined in the vehicle's manual can lead to improper sealing, inadequate filtration, and potential leaks. It's essential to verify the correct filter size, type, and compatibility with the vehicle's make and model to ensure a proper fit and effective filtration.
-
Neglecting to Lubricate the Gasket: Failing to lubricate the rubber gasket or O-ring on the new oil filter before installation is a common oversight. The absence of lubrication can result in the gasket sticking to the mounting surface, making it challenging to achieve a proper seal. Additionally, a dry gasket is more susceptible to damage during installation, potentially leading to leaks. Applying a thin layer of clean motor oil to the gasket enhances its flexibility and sealing capabilities, facilitating a secure and effective seal against the engine.
-
Double-Gasketing: Double-gasketing occurs when the old gasket from the previous oil filter remains stuck to the engine's mounting surface, and a new filter with an attached gasket is installed on top of it. This oversight can lead to a faulty seal, causing oil leaks and compromising the oil system's integrity. Always ensure that the mounting surface is clean and free of any remnants of the old gasket before installing a new oil filter to prevent double-gasketing.
-
Ignoring Leaks and Drips: After installing a new oil filter and refilling the engine with oil, it's crucial to check for leaks and drips. Ignoring signs of leakage can lead to a gradual loss of oil, potentially resulting in decreased oil pressure and inadequate lubrication. Regularly inspecting the oil filter and surrounding area for leaks after the engine has been running is essential for identifying and addressing any sealing issues promptly.
Avoiding these common mistakes is essential for maintaining the integrity of the oil filter installation process and ensuring the effective operation of the vehicle's engine. By being mindful of these potential pitfalls and adhering to best practices, you can safeguard your engine against avoidable complications and promote its longevity and performance.
Conclusion
In conclusion, mastering the art of perfectly tightening your oil filter is a fundamental aspect of vehicle maintenance that significantly impacts the health and performance of your engine. By diligently adhering to the proper tightening procedures and leveraging the insights and tips provided in this guide, you can effectively safeguard your engine against potential leaks, pressure loss, and filtration inefficiencies.
The significance of this seemingly small task cannot be overstated, as it directly contributes to the overall reliability, longevity, and efficiency of your vehicle's engine. Properly tightened oil filters play a pivotal role in maintaining optimal oil pressure, facilitating efficient lubrication, and preserving the integrity of the oil system. By ensuring a secure seal and effective filtration, you can mitigate the risk of contaminants infiltrating critical engine components, thereby enhancing the engine's performance and prolonging its lifespan.
Through the systematic approach outlined in this guide, which encompasses the meticulous preparation, step-by-step installation process, and adherence to best practices, you can elevate your vehicle maintenance endeavors to a new level of precision and expertise. By embracing the tips for proper tightening and steering clear of common mistakes, you empower yourself to execute this essential maintenance task with confidence and proficiency.
As you embark on your journey of tightening your oil filter, remember that attention to detail and adherence to manufacturer specifications are paramount. Whether you are a seasoned automotive enthusiast or a novice DIYer, the knowledge and techniques shared in this guide equip you with the essential skills to maintain your vehicle's engine with precision and care.
By embracing the role of a conscientious caretaker for your vehicle's engine, you contribute to its sustained reliability, longevity, and optimal performance. The diligence and expertise you apply to the task of tightening your oil filter can yield far-reaching benefits, ensuring that your engine operates smoothly and efficiently for miles to come. So, embrace this essential aspect of vehicle maintenance with confidence, knowing that your commitment to perfectly tightening your oil filter is a testament to your dedication to preserving the heart of your vehicle—the engine.