Home>Home and Garden>How To Remove A Ceiling Fan
Home and Garden
How To Remove A Ceiling Fan
Published: February 28, 2024
Learn how to remove a ceiling fan with our step-by-step guide. Upgrade your home and garden with this easy DIY project.
(Many of the links in this article redirect to a specific reviewed product. Your purchase of these products through affiliate links helps to generate commission for Regretless.com, at no extra cost. Learn more)
Table of Contents
Introduction
Removing a ceiling fan can be a straightforward yet rewarding home improvement project. Whether you're looking to upgrade to a new fixture or simply want to change the look of your space, taking down a ceiling fan is a task that can be accomplished with the right tools and a bit of know-how. By following the steps outlined in this guide, you'll be able to safely and efficiently remove a ceiling fan, leaving you with a blank canvas to work with.
Ceiling fans are not only functional but also serve as a decorative element in a room. However, there are times when you may want to replace them with a different lighting fixture or simply remove them altogether. Perhaps you're looking to install a stylish chandelier, a modern pendant light, or a sleek ceiling medallion. Whatever the reason, the process of removing a ceiling fan involves several key steps that, when executed properly, can result in a smooth transition to your desired lighting arrangement.
Before you embark on this project, it's important to gather the necessary tools and materials to ensure a seamless removal process. Additionally, it's crucial to prioritize safety by turning off the power to the fan and following best practices for electrical work. By carefully disconnecting the wiring and removing the mounting bracket, you can effectively take down the fan without causing damage to the ceiling or surrounding areas.
Once the fan is removed, you may need to address any holes or marks left behind on the ceiling. This can be accomplished by patching and painting the affected areas to restore a seamless and polished look to your ceiling. Finally, you have the option to install a new light fixture or cover plate, allowing you to complete the transformation of your space according to your preferences.
In the following steps, we'll delve into the detailed process of removing a ceiling fan, providing you with the guidance and insights needed to successfully complete this home improvement task. Whether you're a seasoned DIY enthusiast or a novice homeowner looking to tackle a new project, this guide will equip you with the knowledge and confidence to take on the removal of a ceiling fan with ease.
Read more: Say Goodbye To Annoying Squeaks And Reverse Rotation With This Simple Fix For Your Ceiling Fan!
Step 1: Gather necessary tools and materials
Before embarking on the task of removing a ceiling fan, it's essential to gather the necessary tools and materials to ensure a smooth and efficient process. Having the right equipment at your disposal will not only make the job easier but also contribute to a safer working environment. Here's a comprehensive list of the tools and materials you'll need for this project:
Tools:
- Screwdriver Set: A set of screwdrivers, including both flathead and Phillips head varieties, will be essential for loosening and removing screws during the disassembly process.
- Adjustable Wrench: This tool will come in handy for loosening nuts and bolts, particularly when detaching the fan from the mounting bracket.
- Voltage Tester: Prior to working on the fan, it's crucial to ensure that the power is turned off. A voltage tester will help you verify that the electrical circuit is safely deactivated.
- Ladder or Step Stool: Depending on the height of your ceiling, a stable ladder or step stool will be necessary for reaching the fan and performing the removal process safely.
- Wire Cutters/Strippers: These tools will be used to disconnect the wiring from the fan, allowing for its removal without causing damage to the electrical components.
Materials:
- Safety Gloves: It's important to protect your hands during the removal process, especially when handling electrical components and sharp edges.
- Safety Goggles: To safeguard your eyes from dust, debris, and any potential hazards during the removal, wearing safety goggles is highly recommended.
- Electrical Tape: This will be used to secure and insulate the disconnected wires, preventing any accidental contact or exposure.
- Drop Cloth or Tarp: To protect the surrounding area from dust, debris, and potential damage, laying down a drop cloth or tarp beneath the work area is advisable.
- Patch and Paint Materials: Depending on the condition of the ceiling after the fan is removed, you may need patching compound, sandpaper, and paint to restore the surface to its original state.
By ensuring that you have all the necessary tools and materials on hand, you'll be well-prepared to tackle the task of removing the ceiling fan with confidence and efficiency. This proactive approach will contribute to a successful and hassle-free removal process, setting the stage for the subsequent steps in this home improvement project.
Step 2: Turn off the power
Before proceeding with the removal of the ceiling fan, it is crucial to prioritize safety by turning off the power to the fan. This step is essential to prevent any electrical accidents or hazards during the disassembly process. By following these guidelines, you can ensure a secure working environment while preparing to remove the fan.
-
Locate the Circuit Breaker: Begin by identifying the circuit breaker that controls the power supply to the ceiling fan. In most residential settings, the circuit breaker panel is located in a utility area or basement. Once you have located the panel, take note of the labeling to identify the specific breaker associated with the fan.
-
Switch Off the Circuit: With the knowledge of the corresponding breaker, switch it to the "off" position to deactivate the power supply to the fan. It is advisable to use a flashlight or portable light source during this process, as turning off the breaker may result in reduced visibility in the area where the fan is installed.
-
Verify the Power Deactivation: After switching off the circuit breaker, it is essential to verify that the power to the fan has been successfully deactivated. This can be done using a voltage tester, which will indicate whether the electrical circuit is safe to work on. By carefully testing the wires and connections associated with the fan, you can confirm that the power has been effectively turned off.
-
Exercise Caution: Even after deactivating the power, it is important to exercise caution when handling the fan and its components. Treat all electrical connections as if they are live until you have confirmed their deactivation. Additionally, it is advisable to avoid touching any exposed wires or terminals to minimize the risk of electrical shock.
By diligently following these steps to turn off the power to the ceiling fan, you can create a safe working environment for the subsequent stages of the removal process. Prioritizing safety at this stage will set the foundation for a smooth and secure disassembly of the fan, allowing you to proceed with confidence and peace of mind.
Read more: How To Remove Tattoos At Home
Step 3: Remove the fan blades
Removing the fan blades is a crucial step in the process of dismantling a ceiling fan. This task requires attention to detail and precision to ensure that the blades are detached safely and efficiently. By following the steps outlined below, you can navigate this stage of the removal process with confidence and ease.
-
Inspect the Blade Attachments: Begin by closely examining the attachment mechanism of the fan blades. Most ceiling fans feature blades that are secured in place with screws or clips. Identify the specific method used to fasten the blades to the fan motor housing. This initial inspection will provide insight into the type of fasteners that need to be addressed during the removal process.
-
Loosen the Fasteners: Using the appropriate screwdriver or tool, carefully loosen the screws or clips that secure each fan blade to the motor housing. It's important to support the blade with one hand while removing the fasteners with the other to prevent the blade from falling once it's detached. Work methodically, ensuring that each fastener is fully loosened before proceeding to the next one.
-
Remove the Blades: Once the fasteners are loosened, gently slide each blade out of its position on the motor housing. Take care to maintain a firm grip on the blade to prevent it from accidentally falling during removal. As each blade is detached, set it aside in a safe and designated area to avoid misplacement or damage.
-
Inspect and Clean the Blades: With the blades removed, take the opportunity to inspect them for any signs of wear, dust, or debris accumulation. Wipe down the blades using a soft cloth or a mild cleaning solution to remove any dirt or grime that may have accumulated over time. This step not only ensures that the blades are clean but also provides an opportunity to assess their condition before proceeding with the fan removal.
By methodically removing the fan blades and taking the time to inspect and clean them, you can effectively progress through this stage of the removal process. This careful approach sets the stage for the subsequent steps, allowing you to proceed with confidence as you continue to dismantle the ceiling fan.
Step 4: Disconnect the wiring
Disconnecting the wiring is a critical phase in the process of removing a ceiling fan. This step involves safely detaching the electrical connections that power the fan, ensuring that the wiring is properly managed to facilitate the fan's removal without causing damage or hazards. By following the detailed steps outlined below, you can navigate this stage of the removal process with precision and confidence.
-
Locate the Electrical Connections: Begin by identifying the electrical connections that supply power to the ceiling fan. These connections typically include wires for the fan motor, light fixture (if applicable), and any additional features such as a remote control receiver. Carefully trace the wires from the fan to their respective junction box or electrical source, taking note of their colors and configurations.
-
Turn Off the Power: Prior to handling the electrical connections, it is imperative to ensure that the power supply to the fan is deactivated. As outlined in Step 2, use a voltage tester to verify that the electrical circuit is safely turned off. This precautionary measure is essential to prevent the risk of electrical shock or injury during the disconnection process.
-
Label and Disconnect the Wires: To facilitate the reinstallation of a new fixture or cover plate in the future, it is advisable to label the wires before disconnecting them. Using masking tape or adhesive labels, mark each wire with its corresponding function (e.g., motor, light, neutral). Once labeled, carefully disconnect the wires by removing the wire nuts or untwisting the connections, ensuring that each wire is separated without causing strain or damage.
-
Secure the Disconnected Wires: After the wires are disconnected, it is essential to secure them to prevent accidental contact or exposure. Using electrical tape, insulate the exposed ends of the wires to safeguard against potential electrical hazards. This step is crucial in maintaining a safe working environment and preparing the wiring for subsequent steps in the removal process.
-
Verify the Disconnection: Once the wiring is disconnected and secured, use the voltage tester to verify that the electrical connections are no longer live. This final check ensures that the wiring is safely deactivated, allowing for the subsequent removal of the fan without the risk of electrical hazards.
By meticulously following these steps to disconnect the wiring, you can effectively navigate this pivotal stage of the removal process. Prioritizing safety and precision during the disconnection of the electrical wiring sets the stage for the seamless and secure removal of the ceiling fan, laying the groundwork for the subsequent steps in this home improvement project.
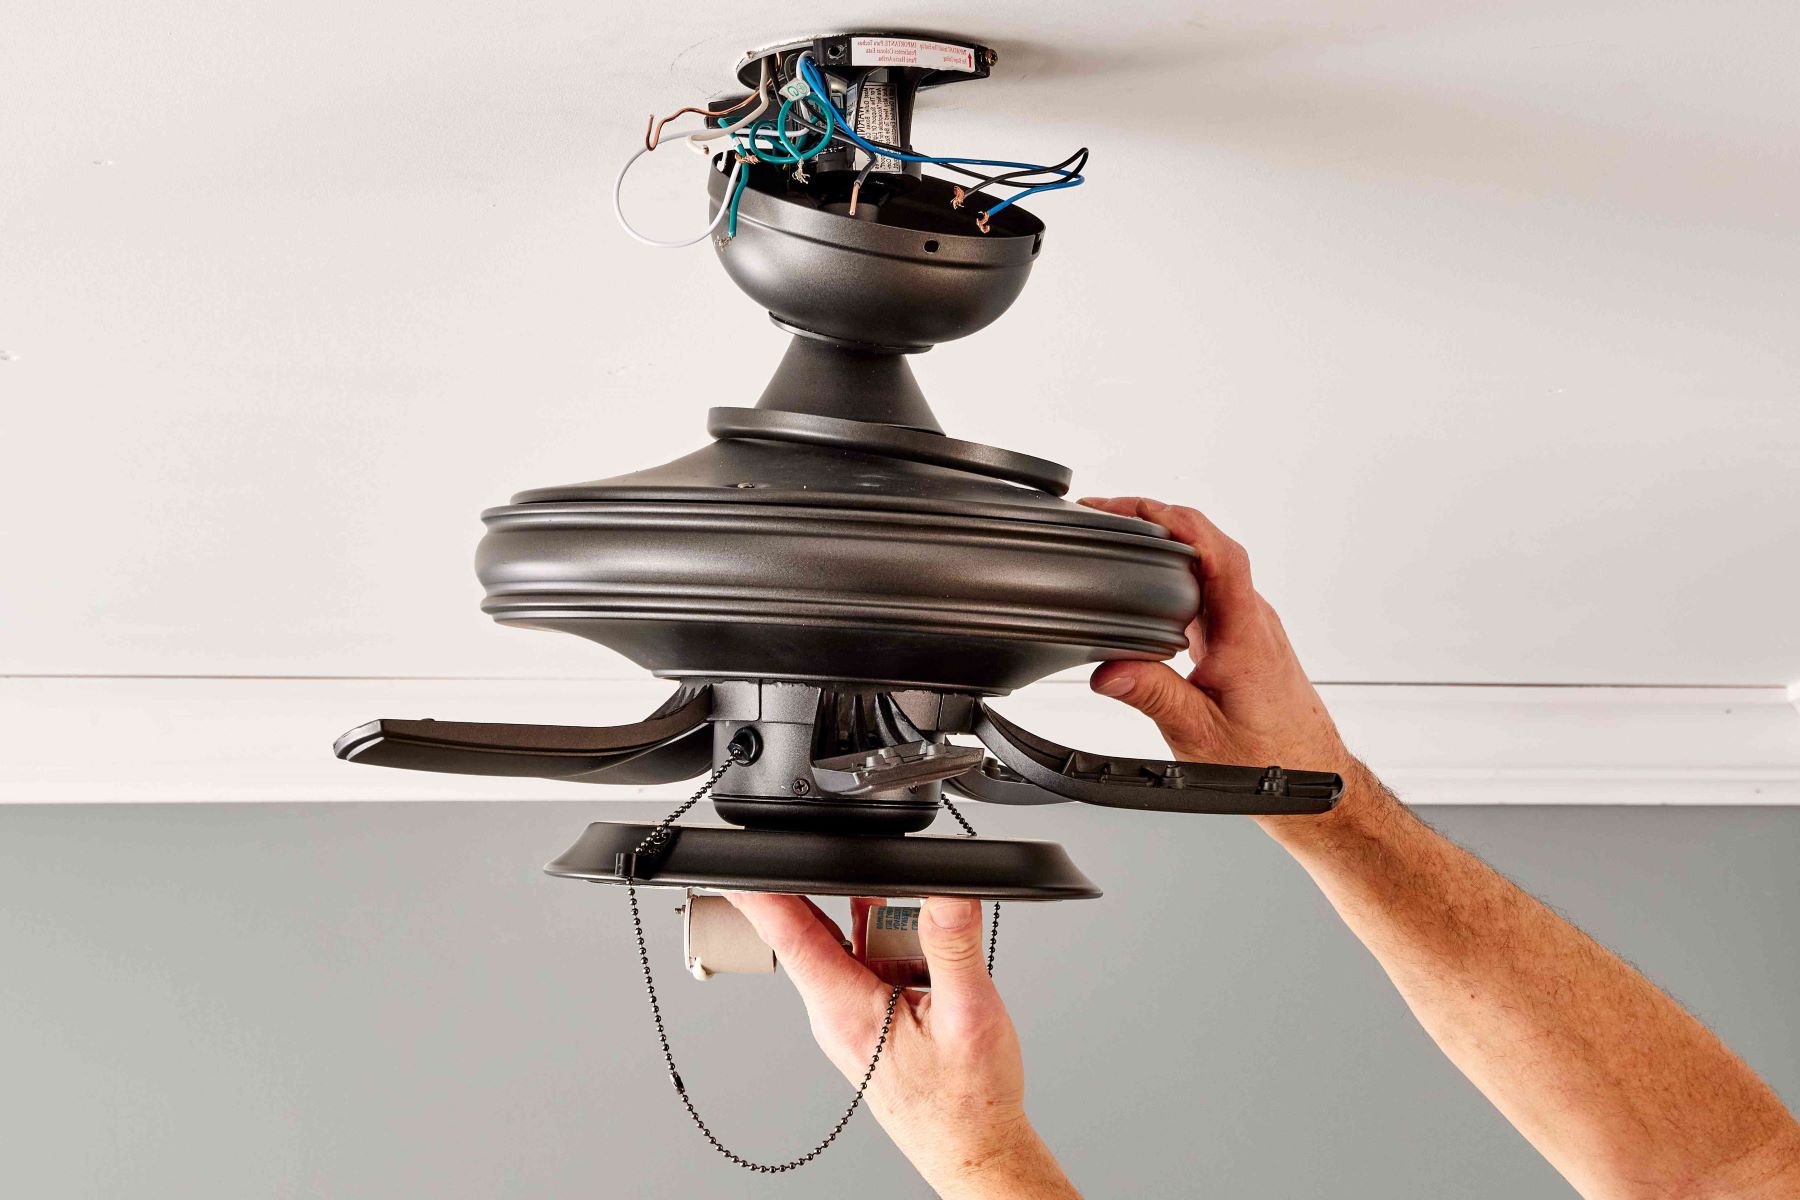
Step 5: Remove the mounting bracket
Removing the mounting bracket is a crucial step in the process of dismantling a ceiling fan. The mounting bracket secures the fan to the ceiling and facilitates its stability. By following the detailed steps outlined below, you can navigate this stage of the removal process with precision and confidence.
-
Locate the Mounting Bracket: Begin by identifying the location of the mounting bracket on the ceiling. The bracket is typically attached to the electrical junction box and provides support for the fan. Use a ladder or step stool to access the area safely, ensuring that the fan is stable and secure before proceeding.
-
Loosen the Mounting Screws: Using an appropriate screwdriver or tool, carefully loosen the screws that secure the mounting bracket to the electrical junction box. It's important to support the weight of the fan and bracket while loosening the screws to prevent any sudden movements or instability.
-
Support the Fan: As the mounting screws are loosened, it's essential to provide support for the fan to prevent it from falling once the bracket is detached. This can be done by having a helper hold the fan from below while you work on removing the bracket. Alternatively, you can use one hand to support the fan while using the other hand to handle the bracket.
-
Detach the Mounting Bracket: Once the screws are fully loosened, carefully detach the mounting bracket from the electrical junction box. Take care to ensure that the fan is adequately supported and that the bracket is removed without causing any strain or damage to the electrical connections.
-
Inspect the Electrical Box: With the mounting bracket removed, take the opportunity to inspect the electrical junction box to ensure that it is in good condition. Look for any signs of damage, wear, or instability that may require attention before installing a new fixture or cover plate.
By methodically removing the mounting bracket and ensuring the stability and safety of the fan throughout the process, you can effectively progress through this stage of the removal process. This careful approach sets the stage for the subsequent steps, allowing you to proceed with confidence as you continue to dismantle the ceiling fan.
Step 6: Patch and paint the ceiling
After the removal of the ceiling fan, it's essential to address any holes, marks, or imperfections left behind on the ceiling. This step involves patching the affected areas and applying a fresh coat of paint to restore the ceiling to its original condition. By following the detailed steps outlined below, you can seamlessly transition from the fan removal to the restoration of the ceiling, ensuring a polished and refined finish to the space.
Read more: How To Remove A Lipoma Yourself
Patching the Holes and Imperfections
-
Prepare the Patching Compound: Begin by preparing a high-quality patching compound suitable for repairing small to medium-sized holes and blemishes. Ensure that the compound is well-mixed and has a smooth consistency, making it easier to work with during the patching process.
-
Apply the Patching Compound: Using a putty knife or a suitable application tool, carefully apply the patching compound to the holes and imperfections on the ceiling. Work methodically, filling each area with the compound and smoothing it out to create a seamless surface. Take care to blend the edges of the patched areas to ensure a uniform finish.
-
Allow for Drying and Sanding: Once the patching compound is applied, allow it to dry according to the manufacturer's instructions. Once dry, use fine-grit sandpaper to gently sand the patched areas, creating a smooth and level surface that seamlessly integrates with the surrounding ceiling.
Painting the Restored Ceiling
-
Select the Paint: Choose a high-quality ceiling paint that matches the existing color or complements the overall aesthetic of the room. Consider using a paint with a matte or satin finish to minimize the visibility of any touch-up areas and provide a uniform appearance.
-
Protect the Surrounding Area: Before painting, use painter's tape and a drop cloth to protect the surrounding walls, fixtures, and flooring from paint splatter and drips. This precautionary measure helps maintain a clean and tidy work area while preventing accidental damage to adjacent surfaces.
-
Apply the Paint: Using a high-quality paint roller or brush, apply an even coat of paint to the restored areas of the ceiling. Work in a consistent and overlapping motion to ensure thorough coverage and a seamless blend with the existing ceiling surface. Allow the first coat to dry completely before applying a second coat if necessary.
-
Inspect and Touch-Up: Once the paint is dry, inspect the restored areas to ensure that the color and finish match the surrounding ceiling. If any touch-ups are required, carefully apply additional paint to achieve a uniform and flawless result.
By meticulously patching and painting the ceiling to restore its pristine condition, you can seamlessly transition from the fan removal to the enhancement of the overall aesthetic of the room. This attention to detail ensures that the space maintains a polished and refined appearance, setting the stage for the final steps in completing the transformation of the room.
Step 7: Install a new light fixture or cover plate
With the ceiling fan successfully removed and the ceiling restored to its original condition, the final step in this home improvement project involves installing a new light fixture or cover plate. This phase allows you to customize the lighting and aesthetic of the room according to your preferences, whether you opt for a stylish pendant light, a decorative chandelier, or a sleek cover plate to conceal the electrical junction box.
Installing a New Light Fixture
If you've chosen to replace the ceiling fan with a new light fixture, the following steps will guide you through the installation process:
-
Select the New Fixture: Choose a light fixture that complements the room's decor and meets your lighting needs. Ensure that the fixture is compatible with the electrical wiring and junction box.
-
Follow Manufacturer's Instructions: Carefully review the manufacturer's instructions that accompany the new light fixture. Familiarize yourself with the assembly and installation requirements outlined in the manual.
-
Prepare the Wiring: If necessary, adjust the wiring to accommodate the new fixture. Ensure that the power supply is turned off before making any modifications to the electrical connections.
-
Mount the Fixture: Securely mount the new light fixture according to the manufacturer's guidelines. Use appropriate hardware and ensure that the fixture is level and stable once installed.
-
Connect the Wiring: Follow the provided instructions to connect the electrical wiring from the fixture to the corresponding wires in the junction box. Use wire nuts to secure the connections and ensure proper insulation.
-
Test the Fixture: Once the wiring is connected, restore the power supply and test the new light fixture to ensure that it functions as intended. Make any necessary adjustments to the installation to achieve the desired lighting effect.
Read more: How To Clean A Lasko Tower Fan
Installing a Cover Plate
If you've opted to cover the electrical junction box without installing a new light fixture, the following steps will guide you through the process of installing a cover plate:
-
Select the Cover Plate: Choose a cover plate that matches the dimensions of the electrical junction box and complements the ceiling's aesthetic. Ensure that the cover plate is designed for the specific type of junction box in use.
-
Position the Cover Plate: Align the cover plate with the electrical junction box and ensure that it sits flush against the ceiling. Use the provided hardware to secure the cover plate in place, ensuring a stable and secure attachment.
-
Verify Stability: Once the cover plate is installed, verify that it is securely fastened and does not wobble or shift. Confirm that the cover plate effectively conceals the junction box while maintaining a seamless appearance with the ceiling.
By following these steps, you can seamlessly transition from the removal of the ceiling fan to the installation of a new light fixture or cover plate, allowing you to customize the lighting and visual appeal of the room to your desired specifications. This final touch completes the transformation of the space, leaving you with a refreshed and personalized environment that reflects your unique style and preferences.
Conclusion
In conclusion, the process of removing a ceiling fan involves a series of meticulous steps that culminate in a transformative home improvement project. By following the detailed guidelines outlined in this comprehensive guide, homeowners and DIY enthusiasts can confidently undertake the task of dismantling a ceiling fan, paving the way for a refreshed and personalized living space.
From the initial step of gathering the necessary tools and materials to the final stage of installing a new light fixture or cover plate, each phase of the removal process is characterized by precision, safety, and attention to detail. Prioritizing safety measures, such as turning off the power supply and securing electrical connections, ensures a secure working environment throughout the disassembly process.
The careful removal of the fan blades, disconnection of wiring, and detachment of the mounting bracket sets the stage for the subsequent restoration of the ceiling. Patching and painting the affected areas contribute to a seamless transition, restoring the ceiling to its original condition and preparing it for the installation of a new lighting fixture or cover plate.
Whether homeowners choose to replace the ceiling fan with a stylish pendant light, an elegant chandelier, or opt for a sleek cover plate to conceal the electrical junction box, the final step allows for personalization and customization according to individual preferences and room aesthetics.
By completing this home improvement project, individuals can not only enhance the visual appeal of their living spaces but also gain a sense of accomplishment and satisfaction in successfully executing a transformative upgrade. The removal of a ceiling fan opens up opportunities for creative expression and customization, allowing homeowners to curate a space that reflects their unique style and preferences.
In essence, the process of removing a ceiling fan transcends the physical act of disassembly, embodying a journey of transformation and renewal within the home. With the guidance provided in this comprehensive guide, individuals are empowered to embark on this endeavor with confidence, ultimately redefining their living spaces and creating an environment that resonates with their personal vision and style.