Home>Automotive>How To Clean A Rusty Gas Tank

Automotive
How To Clean A Rusty Gas Tank
Published: March 5, 2024
Learn how to effectively clean a rusty gas tank with our step-by-step guide. Keep your automotive fuel system in top condition with these expert tips.
(Many of the links in this article redirect to a specific reviewed product. Your purchase of these products through affiliate links helps to generate commission for Regretless.com, at no extra cost. Learn more)
Table of Contents
Introduction
A rusty gas tank can be a headache for any vehicle owner. Over time, moisture and impurities can cause the interior of the tank to corrode, leading to rust buildup. This not only compromises the integrity of the tank but can also contaminate the fuel system, leading to engine issues. However, with the right approach and some elbow grease, it's possible to restore a rusty gas tank to its former glory.
In this comprehensive guide, we will walk you through the step-by-step process of cleaning a rusty gas tank. Whether you're a seasoned automotive enthusiast or a DIY novice, this guide will equip you with the knowledge and techniques needed to tackle this common automotive challenge.
By following these steps, you can effectively remove rust and contaminants from your gas tank, ensuring optimal performance and longevity for your vehicle. So, roll up your sleeves, gather your supplies, and let's dive into the rewarding task of restoring your gas tank to pristine condition.
Read more: How To Clean A Tie
Step 1: Drain the Gas Tank
Before embarking on the process of cleaning a rusty gas tank, the first crucial step is to drain the tank of any remaining fuel. This is essential to ensure a safe and effective cleaning process. Here's a detailed breakdown of how to accomplish this task:
-
Safety First: Begin by parking the vehicle in a well-ventilated area, preferably outdoors. It's important to work in a space with good airflow to minimize exposure to fuel vapors. Additionally, ensure that there are no open flames or potential sources of ignition nearby.
-
Gather Supplies: To drain the gas tank, you will need a few essential tools and materials, including a siphon pump or hose, a suitable container to collect the fuel, safety gloves, and safety goggles. These items will help you safely and efficiently remove the fuel from the tank.
-
Locate the Fuel Tank: Depending on the vehicle make and model, the location of the gas tank may vary. In most cases, the tank is positioned underneath the vehicle, either in the rear or along the sides. Refer to your vehicle's manual or seek professional guidance if you are unsure about the tank's location.
-
Access the Fuel Tank: Once you have located the gas tank, carefully access the fuel filler neck or the fuel pump to gain entry to the tank. This may involve removing a cap or accessing the tank from underneath the vehicle, depending on the design.
-
Begin Draining: With the necessary precautions in place, use the siphon pump or hose to extract the fuel from the tank. Carefully insert the pump or hose into the tank, ensuring a secure connection to prevent spills or leaks. Transfer the fuel into the designated container, taking care to avoid any contact with your skin or clothing.
-
Empty the Tank: Allow the tank to drain completely, ensuring that all fuel has been extracted. Once the tank is empty, securely seal the container holding the fuel and set it aside in a safe location.
By following these steps, you can effectively drain the gas tank in preparation for the subsequent cleaning process. This initial step sets the stage for thorough rust removal and restoration, laying the groundwork for a rejuvenated gas tank and a well-maintained vehicle.
Step 2: Remove the Gas Tank
Removing the gas tank is a critical step in the process of cleaning a rusty gas tank. This task requires careful attention to detail and adherence to safety protocols to ensure a smooth and efficient removal. Here's a detailed guide on how to proceed with this essential step:
-
Prepare the Work Area: Before initiating the removal process, it's important to prepare the work area. Park the vehicle on a level surface and engage the parking brake to prevent any unintended movement. Additionally, ensure that the work area is well-lit and free from clutter to facilitate easy access to the gas tank.
-
Gather Necessary Tools: Removing the gas tank will require the use of specific tools to disconnect various components and secure the tank during removal. Common tools needed for this task include a socket wrench set, screwdrivers, pliers, and a hydraulic jack with jack stands. It's essential to have the appropriate tools on hand to streamline the removal process.
-
Disconnect Electrical Connections: Modern vehicles are equipped with various electrical connections associated with the fuel system and tank. Begin by disconnecting the negative terminal of the vehicle's battery to prevent any electrical mishaps during the removal process. Additionally, locate and disconnect any electrical connections related to the fuel pump or tank sensors.
-
Release Fuel Pressure: Before proceeding further, it's crucial to relieve the fuel pressure within the system to prevent fuel spillage and ensure a safe working environment. This can be achieved by locating the fuel pump relay or fuse in the vehicle's fuse box and removing it. Start the engine and allow it to idle until it stalls, indicating that the fuel pressure has been released.
-
Support the Tank: With the necessary safety precautions in place, use a hydraulic jack to support the gas tank from underneath. Position the jack securely beneath the tank, ensuring that it can bear the weight of the tank during removal. Once the tank is adequately supported, use jack stands to provide additional stability and security.
-
Remove Tank Fasteners: The gas tank is typically secured to the vehicle's undercarriage with fasteners such as bolts or straps. Use the appropriate tools to carefully remove these fasteners, taking care to support the tank as you loosen and detach them. It's important to work methodically and keep the tank stable throughout this process.
-
Lower the Tank: Once the fasteners have been removed, carefully lower the gas tank from its position using the hydraulic jack. Exercise caution to prevent sudden movements or tilting of the tank, as this can lead to spills or damage. Lower the tank gradually, ensuring that it clears any surrounding components or obstacles.
By following these detailed steps, you can successfully remove the gas tank from your vehicle, setting the stage for the subsequent cleaning and restoration process. This careful approach ensures that the tank is safely and effectively detached, paving the way for thorough rust removal and maintenance.
Step 3: Clean the Exterior of the Gas Tank
Cleaning the exterior of the gas tank is a crucial aspect of the rust removal process, as it sets the foundation for restoring the tank's structural integrity and aesthetic appeal. Here's a detailed guide on how to effectively clean the exterior of the gas tank:
-
Assess the Exterior: Begin by visually inspecting the exterior of the gas tank for any signs of corrosion, dirt, or grime. Pay close attention to areas where rust may have formed, as well as any accumulated debris. This initial assessment will help you identify the extent of cleaning required and plan your approach accordingly.
-
Prepare Cleaning Solutions: Depending on the condition of the gas tank's exterior, prepare a suitable cleaning solution. For general dirt and grime, a mild detergent or automotive soap diluted in water can be effective. In the case of stubborn deposits or surface rust, consider using a specialized rust remover or metal cleaner. Ensure that the cleaning solution is compatible with the material of the gas tank to avoid any damage.
-
Apply the Cleaning Solution: Using a soft-bristled brush or a clean cloth, apply the cleaning solution to the exterior of the gas tank. Work in small sections, gently scrubbing the surface to dislodge dirt and grime. For areas with visible rust, focus on applying the rust remover according to the product instructions, allowing it to penetrate and dissolve the rust effectively.
-
Rinse Thoroughly: Once the cleaning solution has been applied and the surface scrubbed, thoroughly rinse the exterior of the gas tank with clean water. This step is essential to remove any residual cleaning solution, dirt, or rust particles. Ensure that all traces of the cleaning solution are completely washed away, leaving the surface clean and ready for further treatment.
-
Inspect for Remaining Rust: After rinsing, inspect the exterior of the gas tank to determine if any residual rust or stubborn stains remain. If necessary, repeat the cleaning process or target specific areas with additional rust remover to ensure thorough removal. It's important to achieve a clean and rust-free exterior surface before proceeding with the next steps.
-
Dry the Exterior: Once the exterior of the gas tank has been thoroughly cleaned and rinsed, use a clean, dry cloth or towel to carefully dry the surface. Ensure that all moisture is removed, paying attention to seams, crevices, and any areas where water may collect. Proper drying helps prevent the formation of new rust and ensures a clean, polished exterior.
By meticulously cleaning the exterior of the gas tank, you set the stage for the subsequent steps in the rust removal process. This thorough approach not only enhances the tank's visual appeal but also prepares it for the critical task of addressing rust within the interior. With the exterior cleaned and prepped, you're ready to move forward with restoring the gas tank to its optimal condition.
Step 4: Clean the Interior of the Gas Tank
Cleaning the interior of the gas tank is a pivotal step in the process of restoring a rusty tank to optimal functionality. Over time, rust and sediment can accumulate within the tank, potentially compromising fuel quality and causing damage to the vehicle's fuel system. Here's a comprehensive guide on how to effectively clean the interior of the gas tank:
-
Inspect the Interior: Begin by visually assessing the interior of the gas tank for any signs of rust, debris, or sediment. Use a flashlight to illuminate the interior and carefully examine all surfaces, paying close attention to areas where rust may have formed. This initial inspection will help you gauge the extent of cleaning required and plan your approach accordingly.
-
Prepare Cleaning Solutions: Depending on the condition of the tank's interior, prepare a suitable cleaning solution. For general rust and sediment removal, a mixture of white vinegar and water can be highly effective. The acidic properties of vinegar help dissolve rust and loosen sediment, facilitating easier removal. Alternatively, specialized tank cleaning solutions designed to dissolve rust and debris are available and can be used according to product instructions.
-
Introduce Cleaning Solution: With the gas tank in a secure and well-ventilated area, carefully introduce the cleaning solution into the tank. Use a funnel to pour the solution, ensuring that it reaches all interior surfaces. Allow the solution to sit within the tank for a specified duration, as recommended by the product instructions or based on the severity of rust and sediment buildup.
-
Agitate and Dislodge Debris: After the cleaning solution has been introduced, agitate the tank to dislodge rust and sediment. This can be achieved by gently rocking the tank back and forth, allowing the cleaning solution to reach all areas. Additionally, consider using a tank cleaning wand or brush to scrub the interior surfaces, targeting areas with stubborn rust or deposits.
-
Drain and Rinse: Once the cleaning solution has had sufficient contact time, carefully drain the tank to remove the dissolved rust and debris. Dispose of the drained solution in accordance with local regulations. Following this, thoroughly rinse the interior of the tank with clean water to remove any remaining residue and traces of the cleaning solution.
-
Dry the Interior: After rinsing, allow the interior of the gas tank to thoroughly dry. This can be facilitated by using compressed air to remove excess moisture and promote drying. Ensure that the tank is completely dry before proceeding with reinstallation to prevent the formation of new rust.
By meticulously cleaning the interior of the gas tank, you effectively remove rust and sediment, ensuring that the tank is free from contaminants that could compromise fuel quality and system functionality. This thorough approach sets the stage for reconditioning the tank and restoring it to optimal performance, contributing to the overall longevity and reliability of the vehicle.
Read more: How To Clean Diva Cup
Step 5: Rinse and Dry the Gas Tank
After completing the cleaning process for both the exterior and interior of the gas tank, the crucial step of rinsing and drying the tank ensures that it is thoroughly cleansed and prepared for reinstallation. This step focuses on removing any remaining cleaning solution, moisture, or debris, ultimately setting the stage for the tank's rejuvenation and optimal functionality.
Rinsing the Gas Tank
Thorough rinsing is essential to eliminate any residual cleaning solution and ensure that the tank's surfaces are free from contaminants. To accomplish this, carefully introduce clean water into the tank, using a funnel to facilitate the process. The water should be circulated within the tank, allowing it to reach all interior surfaces and effectively flush out any remaining traces of the cleaning solution. This step may require multiple rounds of rinsing to guarantee that the tank is completely free from any lingering residue.
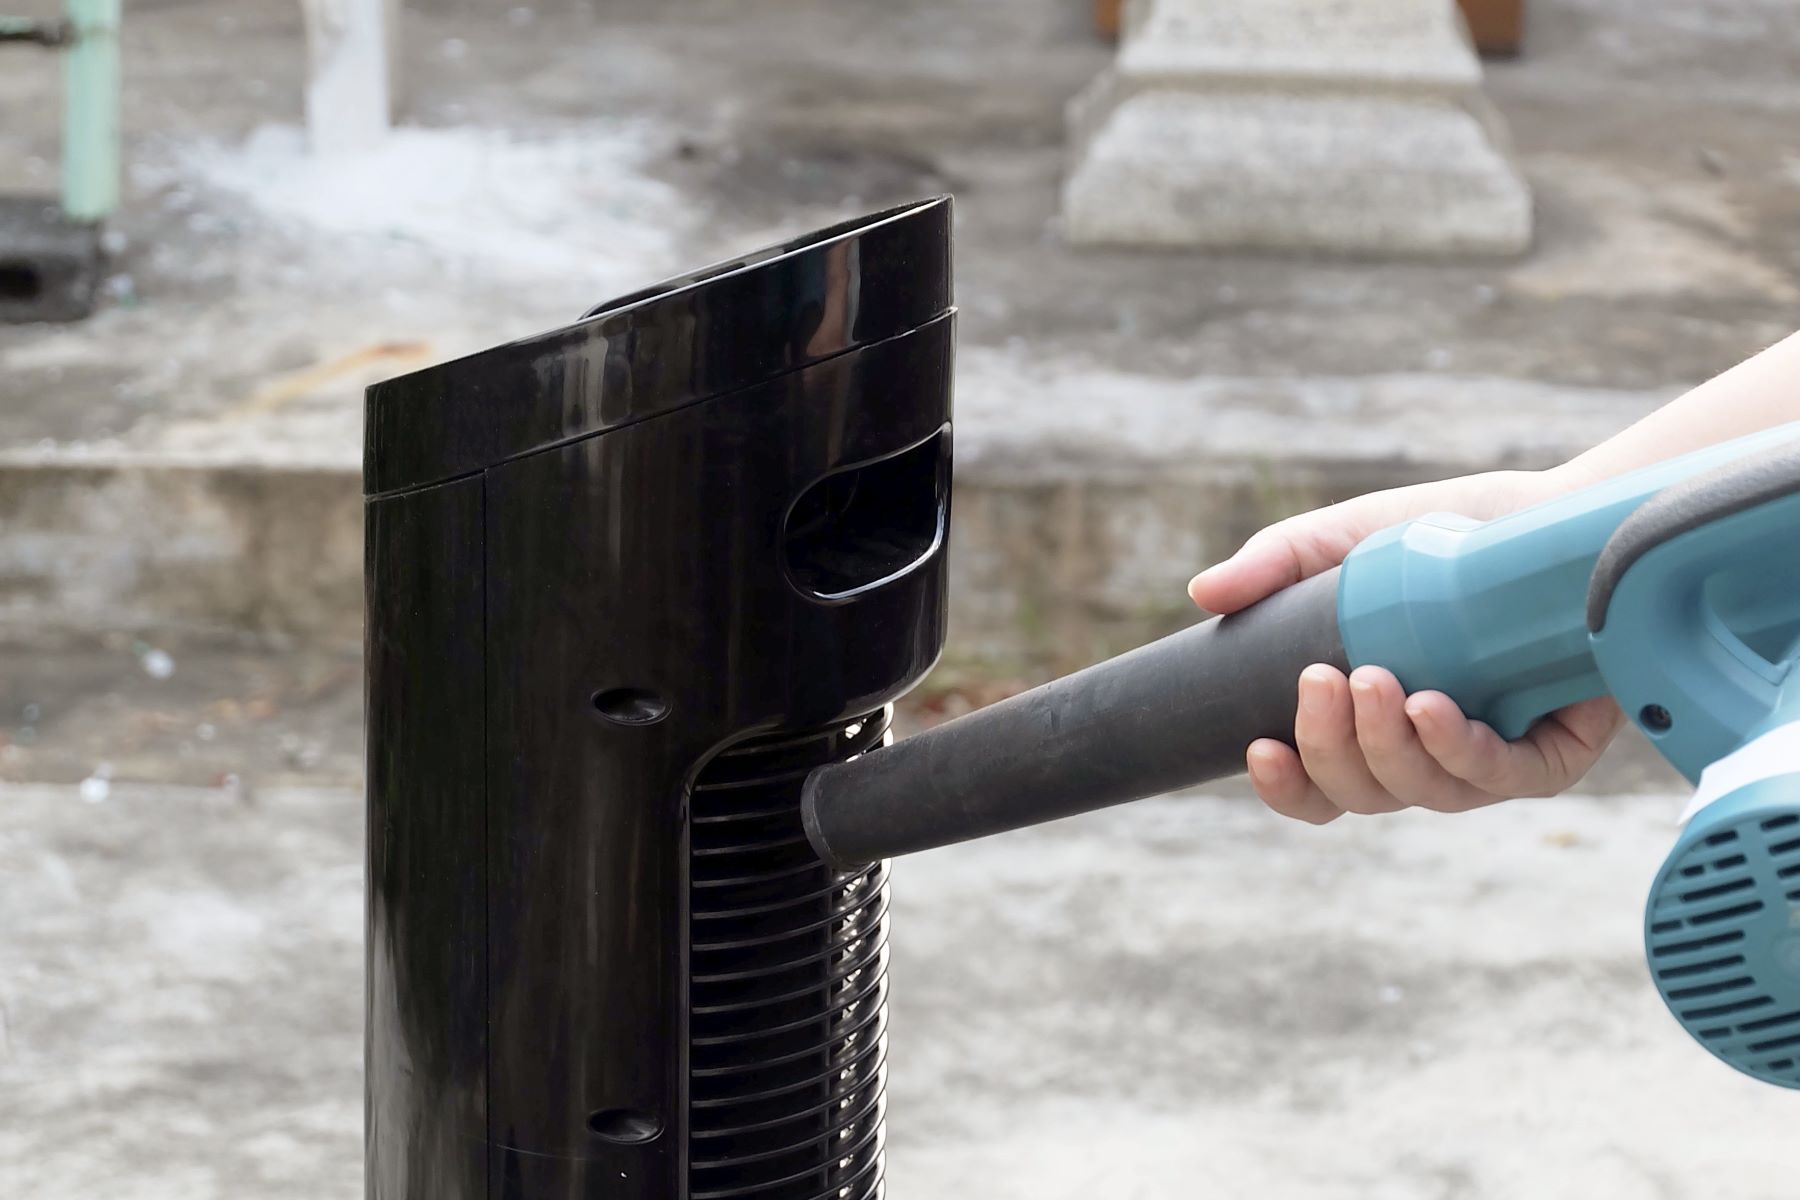
Drying the Gas Tank
Once the rinsing process is complete, the gas tank must be meticulously dried to prevent the formation of new rust and ensure that it is ready for reinstallation. To achieve thorough drying, utilize compressed air to remove excess moisture from the interior of the tank. This involves introducing controlled bursts of air into the tank, effectively expelling any remaining water and promoting rapid drying. Care should be taken to ensure that the tank is completely dry, paying attention to seams, crevices, and any areas where moisture may collect.
Ensuring Optimal Conditions
Proper rinsing and drying are critical to the overall success of the rust removal and cleaning process. By meticulously executing these steps, you safeguard the integrity of the gas tank and pave the way for its seamless reintegration into the vehicle's fuel system. The combination of thorough rinsing and effective drying ensures that the tank is free from contaminants and moisture, setting the stage for optimal performance and longevity.
By adhering to these meticulous steps, you can confidently proceed with the reinstallation of the gas tank, knowing that it has been thoroughly cleansed, rinsed, and dried. This comprehensive approach contributes to the overall maintenance and reliability of the vehicle, ensuring that the gas tank operates at its best and remains free from the detrimental effects of rust and contaminants.
Read more: How To Clean A Suede Couch
Step 6: Reinstall the Gas Tank
Reinstalling the gas tank is the final crucial step in the process of cleaning a rusty gas tank and restoring it to optimal functionality within the vehicle's fuel system. This task requires precision, attention to detail, and adherence to safety protocols to ensure that the tank is securely and seamlessly integrated. Here's a comprehensive guide on how to effectively reinstall the gas tank:
-
Prepare the Work Area: Before initiating the reinstallation process, ensure that the work area is clean, well-lit, and free from clutter. Position the vehicle on a level surface and engage the parking brake to prevent any unintended movement. Additionally, gather the necessary tools and equipment, including fasteners, gaskets, and any components required for securing the tank.
-
Position the Tank: Carefully position the gas tank beneath the vehicle, aligning it with the designated mounting points. Exercise caution to prevent any damage to the tank or surrounding components during this process. If the tank is equipped with fuel lines, carefully connect them to the corresponding fittings, ensuring a secure and leak-free connection.
-
Secure the Tank: Once the tank is properly positioned, begin securing it to the vehicle's undercarriage using the appropriate fasteners and mounting hardware. Follow the manufacturer's specifications and torque recommendations to ensure that the tank is securely anchored in place. Pay close attention to the alignment of the tank and the integrity of the connections to prevent any potential issues in the future.
-
Reconnect Electrical Components: If the gas tank is associated with electrical connections, such as those related to the fuel pump or tank sensors, carefully reconnect these components. Ensure that the connections are secure and properly insulated to prevent any electrical malfunctions or safety hazards.
-
Double-Check Connections: With the tank securely installed, double-check all connections, fasteners, and components to verify that everything is properly aligned and secured. This step is crucial in ensuring that the tank is firmly in place and that all associated elements are functioning as intended.
-
Test for Leaks: Before fully completing the reinstallation process, conduct a thorough inspection for any potential fuel leaks or abnormalities. This can be achieved by pressurizing the fuel system and carefully monitoring for any signs of leakage around the tank and associated connections. Address any issues immediately to prevent safety hazards and ensure the integrity of the fuel system.
By meticulously following these steps, you can effectively reinstall the gas tank, ensuring that it is securely integrated into the vehicle's fuel system. This comprehensive approach contributes to the overall maintenance and reliability of the vehicle, safeguarding against potential issues and ensuring that the gas tank operates at its best following the rust removal and cleaning process.
Conclusion
In conclusion, the process of cleaning a rusty gas tank is a meticulous yet rewarding endeavor that contributes to the overall maintenance and longevity of a vehicle's fuel system. By following the comprehensive steps outlined in this guide, vehicle owners can effectively address rust buildup and contaminants within the gas tank, ensuring optimal performance and reliability.
The initial steps of draining the gas tank and removing it from the vehicle set the stage for thorough cleaning and restoration. These tasks require careful attention to safety protocols and the use of appropriate tools to ensure a smooth and efficient process. By meticulously cleaning the exterior and interior of the gas tank, individuals can effectively remove rust, sediment, and contaminants, safeguarding the integrity of the fuel system.
The subsequent steps of rinsing and drying the gas tank are critical in ensuring that the tank is free from residual cleaning solution and moisture, setting the stage for its seamless reinstallation. The final step of reinstalling the gas tank involves precision and attention to detail, ensuring that the tank is securely integrated into the vehicle's fuel system.
By undertaking the task of cleaning a rusty gas tank, vehicle owners not only address existing rust issues but also contribute to the prevention of future corrosion, ultimately extending the lifespan of the tank and the overall reliability of the vehicle. This proactive approach to maintenance aligns with the principles of responsible vehicle ownership and contributes to a safer and more efficient driving experience.
In essence, the process of cleaning a rusty gas tank embodies the commitment to vehicle care and maintenance, reflecting the dedication of vehicle owners to preserving the integrity and performance of their automobiles. By following the steps outlined in this guide and approaching the task with patience and attention to detail, individuals can effectively restore a rusty gas tank to its optimal condition, ensuring that their vehicles continue to operate at their best for years to come.