Home>Home and Garden>How To Clean Diva Cup
Home and Garden
How To Clean Diva Cup
Published: February 29, 2024
Learn how to properly clean and maintain your Diva Cup at home with our expert tips. Keep your menstrual cup in top condition for long-lasting use. Ideal for home and garden enthusiasts.
(Many of the links in this article redirect to a specific reviewed product. Your purchase of these products through affiliate links helps to generate commission for Regretless.com, at no extra cost. Learn more)
Table of Contents
Introduction
Cleaning your Diva Cup is an essential part of maintaining menstrual hygiene and ensuring the longevity of this reusable menstrual product. The Diva Cup, a popular menstrual cup, offers a sustainable and eco-friendly alternative to traditional disposable menstrual products. Proper cleaning not only helps to keep the cup in pristine condition but also ensures its safety and effectiveness during each use.
In this comprehensive guide, we will walk you through the step-by-step process of cleaning your Diva Cup. Whether you are a seasoned user or a newcomer to the world of menstrual cups, understanding the proper cleaning techniques is crucial for a comfortable and worry-free experience.
By following these cleaning guidelines, you can maintain the hygiene and functionality of your Diva Cup, allowing you to confidently embrace the convenience and eco-conscious benefits that this menstrual product offers. Let's delve into the details of how to effectively clean and care for your Diva Cup to ensure a seamless menstrual cycle experience.
Read more: How To Clean A Tie
Step 1: Boiling the Diva Cup
Boiling the Diva Cup is a fundamental step in maintaining its cleanliness and ensuring that it is free from any harmful bacteria or residue. This process is recommended before and after each menstrual cycle, as well as when initially sterilizing the cup. Boiling effectively eliminates any lingering odors and helps to restore the cup to its original, hygienic state.
To begin, thoroughly wash your hands with mild soap and water to ensure that they are clean before handling the Diva Cup. Next, fill a clean pot with enough water to fully submerge the cup. It's important to use a pot that is designated for this purpose and not one that is used for cooking, as this helps to maintain hygiene and prevent cross-contamination.
Place the pot on the stove and bring the water to a rolling boil. Once the water reaches a vigorous boil, carefully lower the Diva Cup into the pot, ensuring that it is fully submerged. Let the cup boil for 5-7 minutes to effectively sanitize it. During this process, ensure that the cup does not come into direct contact with the bottom of the pot to prevent damage.
After the boiling time is complete, use tongs or a heat-resistant utensil to carefully remove the Diva Cup from the pot. Allow it to cool naturally at room temperature before proceeding to the next step. It's important to avoid using cold water to cool the cup, as sudden temperature changes can potentially damage the silicone material.
Once the Diva Cup has cooled, thoroughly rinse it with water to remove any residual boiling water. Inspect the cup to ensure that it is clean and free from any debris or discoloration. If necessary, gently scrub the cup with a mild, unscented, and oil-free soap to remove any stubborn stains or residue.
By following these steps, you can effectively sanitize and prepare your Diva Cup for use. Boiling the cup not only eliminates bacteria and odors but also helps to maintain its integrity, ensuring a safe and comfortable experience during your menstrual cycle. This simple yet crucial step is an integral part of caring for your Diva Cup and promoting menstrual hygiene.
Step 2: Using Diva Cup Cleanser
In addition to boiling, using a specialized Diva Cup cleanser is an effective way to maintain the cleanliness and hygiene of your menstrual cup. Diva Cup cleansers are specifically formulated to gently yet thoroughly clean the cup without compromising its silicone material or causing irritation. This step is particularly important for removing any residual buildup or odor that may not be fully eliminated through boiling alone.
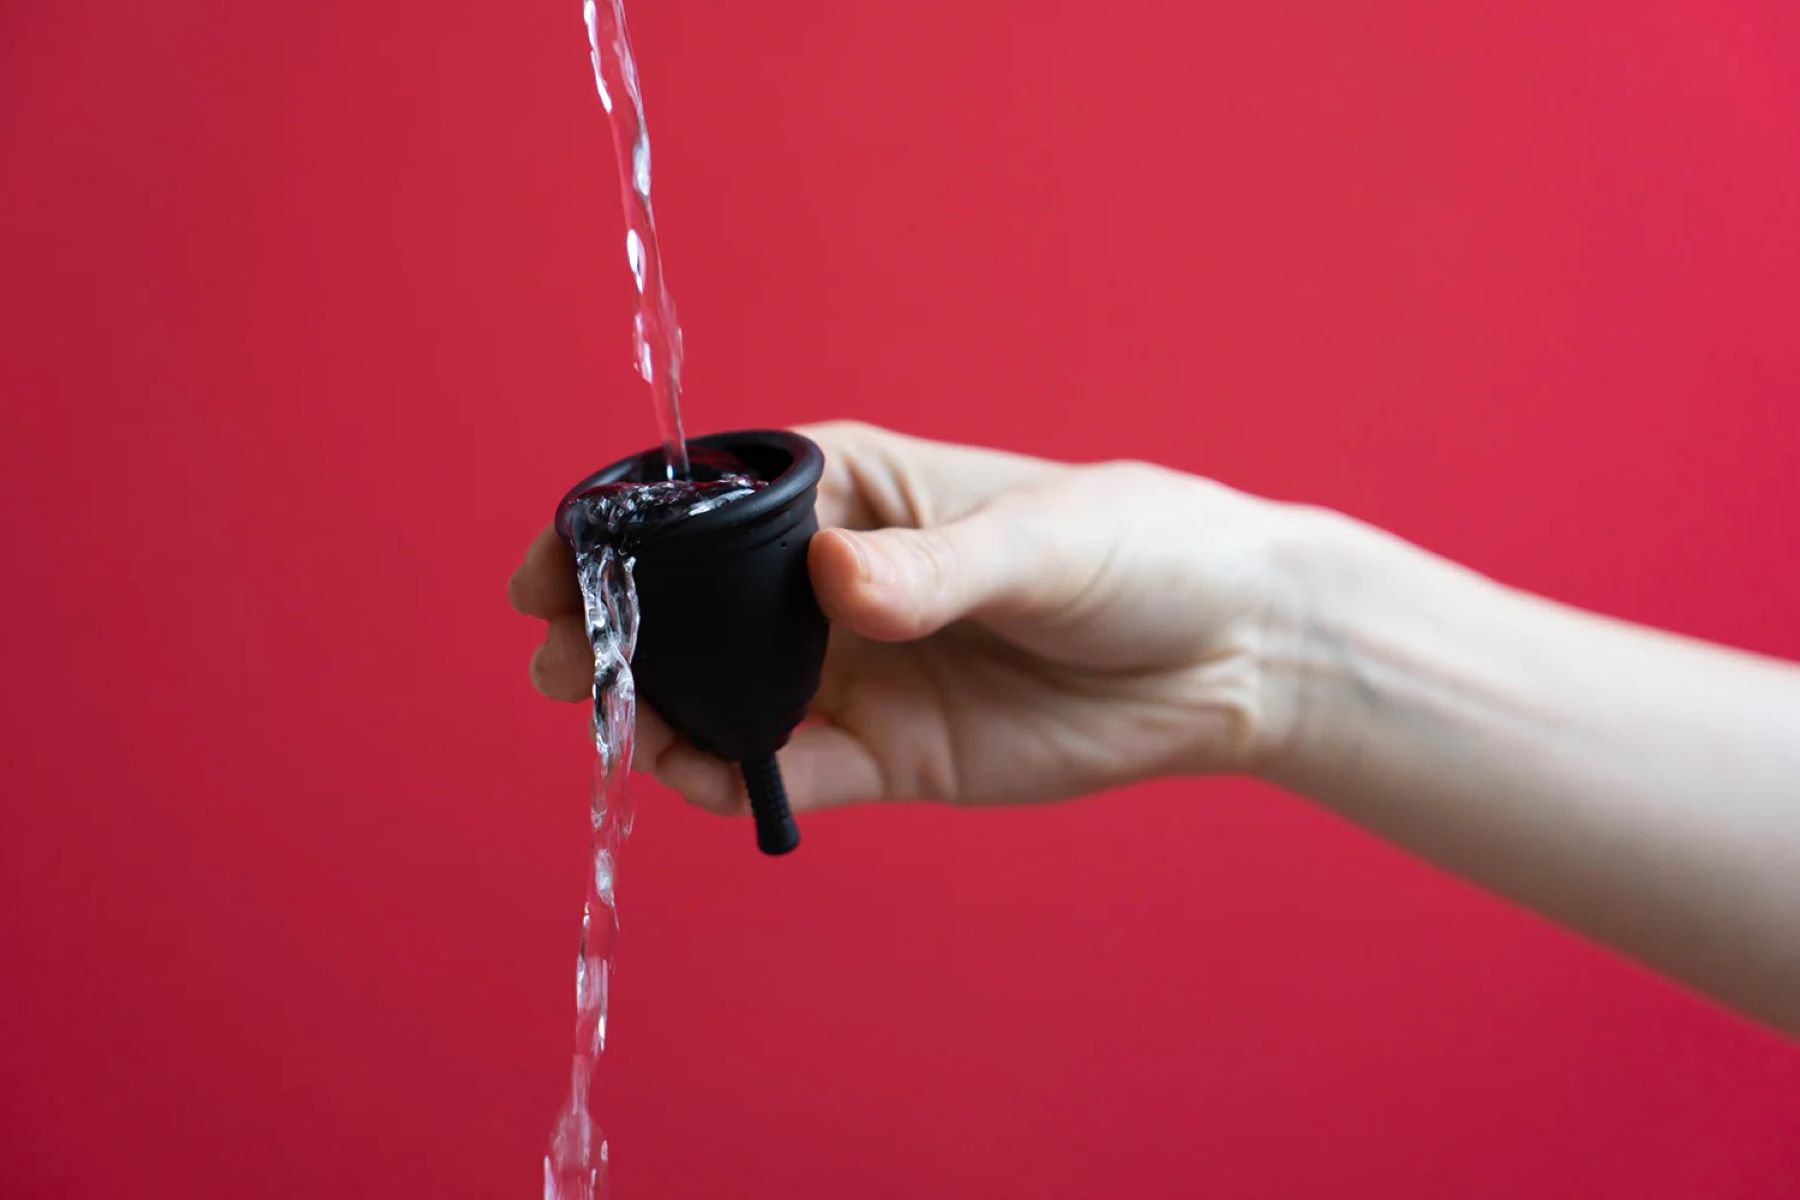
To begin, ensure that your hands are clean by washing them with mild soap and water. Once your hands are thoroughly cleansed, carefully remove the Diva Cup from its storage pouch or container. Rinse the cup with warm water to remove any surface debris or discharge.
Next, apply a small amount of Diva Cup cleanser to the cup. Gently massage the cleanser onto the cup, ensuring that it covers the entire surface. The gentle yet effective formula of the cleanser helps to break down and remove any residual menstrual fluid, leaving the cup clean and refreshed.
After applying the cleanser, thoroughly rinse the Diva Cup with warm water to remove any traces of the cleanser. It's important to ensure that the cup is completely free from any cleanser residue, as this can cause discomfort or irritation during use.
Once the cup has been rinsed, inspect it to ensure that it is clean and free from any residue or odor. If necessary, repeat the cleansing process to achieve optimal cleanliness. After the cup has been thoroughly cleansed, pat it dry with a clean, lint-free cloth or allow it to air dry completely before returning it to its storage pouch or container.
By incorporating the use of a Diva Cup cleanser into your menstrual cup care routine, you can effectively maintain the hygiene and integrity of the cup. This specialized cleanser offers a gentle and thorough cleaning solution, ensuring that your Diva Cup remains fresh, odor-free, and ready for use during your menstrual cycle. Incorporating this step into your regular cup care routine can contribute to a comfortable and worry-free experience with your Diva Cup.
Step 3: Sterilizing the Diva Cup
Sterilizing the Diva Cup is a crucial step in maintaining its hygiene and ensuring that it is free from harmful bacteria and germs. This process is recommended before and after each menstrual cycle, as well as when initially preparing the cup for use. Sterilization effectively eliminates any lingering bacteria and helps to restore the cup to a pristine, hygienic state, promoting a safe and comfortable experience during menstruation.
To begin the sterilization process, thoroughly wash your hands with mild soap and water to ensure that they are clean before handling the Diva Cup. Next, fill a clean pot with enough water to fully submerge the cup. It's important to use a pot that is designated for this purpose and not one that is used for cooking, as this helps to maintain hygiene and prevent cross-contamination.
Place the pot on the stove and bring the water to a rolling boil. Once the water reaches a vigorous boil, carefully lower the Diva Cup into the pot, ensuring that it is fully submerged. Let the cup boil for 5-7 minutes to effectively sterilize it. During this process, ensure that the cup does not come into direct contact with the bottom of the pot to prevent damage.
After the sterilization time is complete, use tongs or a heat-resistant utensil to carefully remove the Diva Cup from the pot. Allow it to cool naturally at room temperature before proceeding to the next step. It's important to avoid using cold water to cool the cup, as sudden temperature changes can potentially damage the silicone material.
Once the Diva Cup has cooled, thoroughly rinse it with water to remove any residual boiling water. Inspect the cup to ensure that it is clean and free from any debris or discoloration. If necessary, gently scrub the cup with a mild, unscented, and oil-free soap to remove any stubborn stains or residue.
By following these steps, you can effectively sterilize and prepare your Diva Cup for use. Sterilizing the cup not only eliminates harmful bacteria but also helps to maintain its integrity, ensuring a safe and comfortable experience during your menstrual cycle. This simple yet crucial step is an integral part of caring for your Diva Cup and promoting menstrual hygiene.
Incorporating the sterilization process into your regular cup care routine can contribute to a worry-free and comfortable experience with your Diva Cup, allowing you to confidently embrace the convenience and eco-conscious benefits that this menstrual product offers.
Step 4: Drying and Storing the Diva Cup
After the thorough cleaning and sterilization of your Diva Cup, the final step involves ensuring that it is properly dried and stored to maintain its hygiene and integrity. Proper drying and storage not only help to preserve the silicone material of the cup but also ensure that it remains clean and ready for use during your next menstrual cycle.
Once the Diva Cup has been cleansed and sterilized, it's essential to allow it to air dry completely before storing it. To begin, pat the cup dry with a clean, lint-free cloth to remove any excess moisture. Ensure that the cup is completely dry both inside and out to prevent the growth of mold or mildew. It's important to avoid using towels or cloths that may leave lint or fibers on the cup, as this can compromise its cleanliness.
After patting the cup dry, place it in a well-ventilated area to air dry completely. Avoid using paper towels or tissues for drying, as these may leave behind residue or particles. Allowing the Diva Cup to air dry naturally ensures that it remains free from moisture, promoting optimal hygiene and preventing the development of any unwanted odors.
Once the cup is thoroughly dry, it's time to store it in a safe and clean container. The Diva Cup typically comes with a storage pouch for this purpose. Ensure that the storage pouch is clean and completely dry before placing the cup inside. If the original pouch is not available, you can use a breathable, cotton pouch or a designated container specifically designed for storing menstrual cups.
When storing the Diva Cup, ensure that it is placed in a clean and dry environment away from direct sunlight. Avoid storing the cup in airtight containers or plastic bags, as this can trap moisture and compromise its cleanliness. Additionally, storing the cup in a cool, dry place helps to maintain its silicone material and prevents any potential damage.
By following these steps for drying and storing your Diva Cup, you can ensure that it remains hygienic, clean, and ready for use during your next menstrual cycle. Proper drying and storage contribute to the longevity of the cup, allowing you to confidently embrace the convenience and eco-conscious benefits that the Diva Cup offers.
Incorporating these practices into your menstrual cup care routine ensures that your Diva Cup remains in optimal condition, promoting a comfortable and worry-free experience with this sustainable menstrual product.
Conclusion
In conclusion, maintaining the cleanliness and hygiene of your Diva Cup is essential for a comfortable and worry-free menstrual cycle experience. By following the step-by-step cleaning and care guidelines outlined in this comprehensive guide, you can ensure that your Diva Cup remains in optimal condition, ready for use during each menstrual cycle.
Proper cleaning techniques, including boiling, using a specialized Diva Cup cleanser, and sterilization, are fundamental in eliminating bacteria, odors, and residue, thereby promoting menstrual hygiene. These practices not only contribute to the longevity of the cup but also ensure its safety and effectiveness.
Furthermore, the thorough drying and proper storage of the Diva Cup are crucial steps in maintaining its cleanliness and integrity. Allowing the cup to air dry completely and storing it in a clean, breathable container help to prevent the growth of mold or mildew, ensuring that the cup remains hygienic and ready for use when needed.
By incorporating these cleaning and care practices into your menstrual cup routine, you can confidently embrace the convenience and eco-conscious benefits that the Diva Cup offers. The sustainable nature of this reusable menstrual product, coupled with proper cleaning and care, allows for a comfortable and environmentally friendly approach to managing menstruation.
In essence, the proper cleaning and care of your Diva Cup not only promote menstrual hygiene but also contribute to a sustainable and eco-friendly lifestyle. By following these guidelines, you can maintain the hygiene and functionality of your Diva Cup, ensuring a seamless and worry-free menstrual cycle experience.
Embracing the use of the Diva Cup, coupled with diligent cleaning and care practices, empowers individuals to make environmentally conscious choices while prioritizing their menstrual health and well-being. With these practices in place, you can confidently navigate your menstrual cycle, knowing that your Diva Cup is clean, hygienic, and ready to support you throughout each phase of your cycle.