Home>Technology and Computers>How To Fix Stick Drift Xbox One
Technology and Computers
How To Fix Stick Drift Xbox One
Published: February 28, 2024
Learn how to fix stick drift on your Xbox One controller with our comprehensive guide. Get back to gaming without any technical issues. Discover the best solutions for technology and computer problems.
(Many of the links in this article redirect to a specific reviewed product. Your purchase of these products through affiliate links helps to generate commission for Regretless.com, at no extra cost. Learn more)
Table of Contents
Introduction
Dealing with stick drift on your Xbox One controller can be a frustrating experience. Stick drift occurs when the analog sticks on the controller register movement even when they are not being touched. This issue can significantly impact your gaming experience, causing your in-game character to move erratically or the camera to spin uncontrollably. Fortunately, there are several methods to address stick drift and restore your controller's functionality.
In this article, we will explore practical solutions to fix stick drift on your Xbox One controller. From understanding the root cause of the problem to implementing troubleshooting techniques, we will guide you through the process of resolving stick drift issues. Whether you prefer cleaning the controller, adjusting deadzone settings, or replacing the thumbsticks, we've got you covered with step-by-step instructions and valuable insights.
Stick drift can disrupt your gaming sessions and diminish the enjoyment of your favorite titles. By addressing this issue, you can regain precise control and immerse yourself in the gaming experience without the distraction of unintended movements. So, let's dive into the methods for fixing stick drift on your Xbox One controller and get you back to gaming with confidence.
Understanding Stick Drift
Stick drift is a common issue that affects gaming controllers, including the Xbox One controller. It occurs when the analog sticks, which are responsible for controlling movement and camera angles in games, register input even when they are not being physically manipulated. This unintended movement can manifest as slight shifts or continuous motion, leading to erratic behavior within games.
The root cause of stick drift can often be attributed to wear and tear on the internal components of the controller, particularly the analog stick mechanisms. Over time, the delicate sensors and mechanisms within the analog sticks may degrade, leading to inaccurate readings and unintended input. Additionally, the accumulation of dust, debris, or residue around the analog sticks can exacerbate the issue, further compromising their functionality.
Stick drift can significantly impact gameplay, causing frustration and hindering the overall gaming experience. Gamers may find their characters veering off course, camera angles spinning uncontrollably, or aiming becoming imprecise. These disruptions can be particularly frustrating during intense gaming moments or competitive play, highlighting the importance of addressing stick drift promptly.
Recognizing the symptoms of stick drift is crucial for identifying the issue. Gamers may notice that their character moves on its own, the camera angle shifts without input, or aiming becomes inconsistent. These telltale signs indicate the presence of stick drift and prompt the need for corrective action.
Understanding the mechanics behind stick drift empowers gamers to take proactive measures to address the issue. By delving into the intricacies of controller functionality, gamers can gain valuable insights into the factors contributing to stick drift and make informed decisions regarding troubleshooting and maintenance.
In the following sections, we will explore various methods to mitigate stick drift, ranging from cleaning the controller to adjusting deadzone settings and replacing the thumbsticks. Each approach offers a unique solution to tackle stick drift, providing gamers with options to restore their controllers to optimal performance.
By comprehending the nuances of stick drift and its impact on gaming, gamers can effectively navigate the troubleshooting process and implement targeted solutions to rectify the issue. With a clear understanding of stick drift, gamers can embark on the journey to reclaim precise control and seamless gameplay, free from the disruptions caused by unintended analog stick movements.
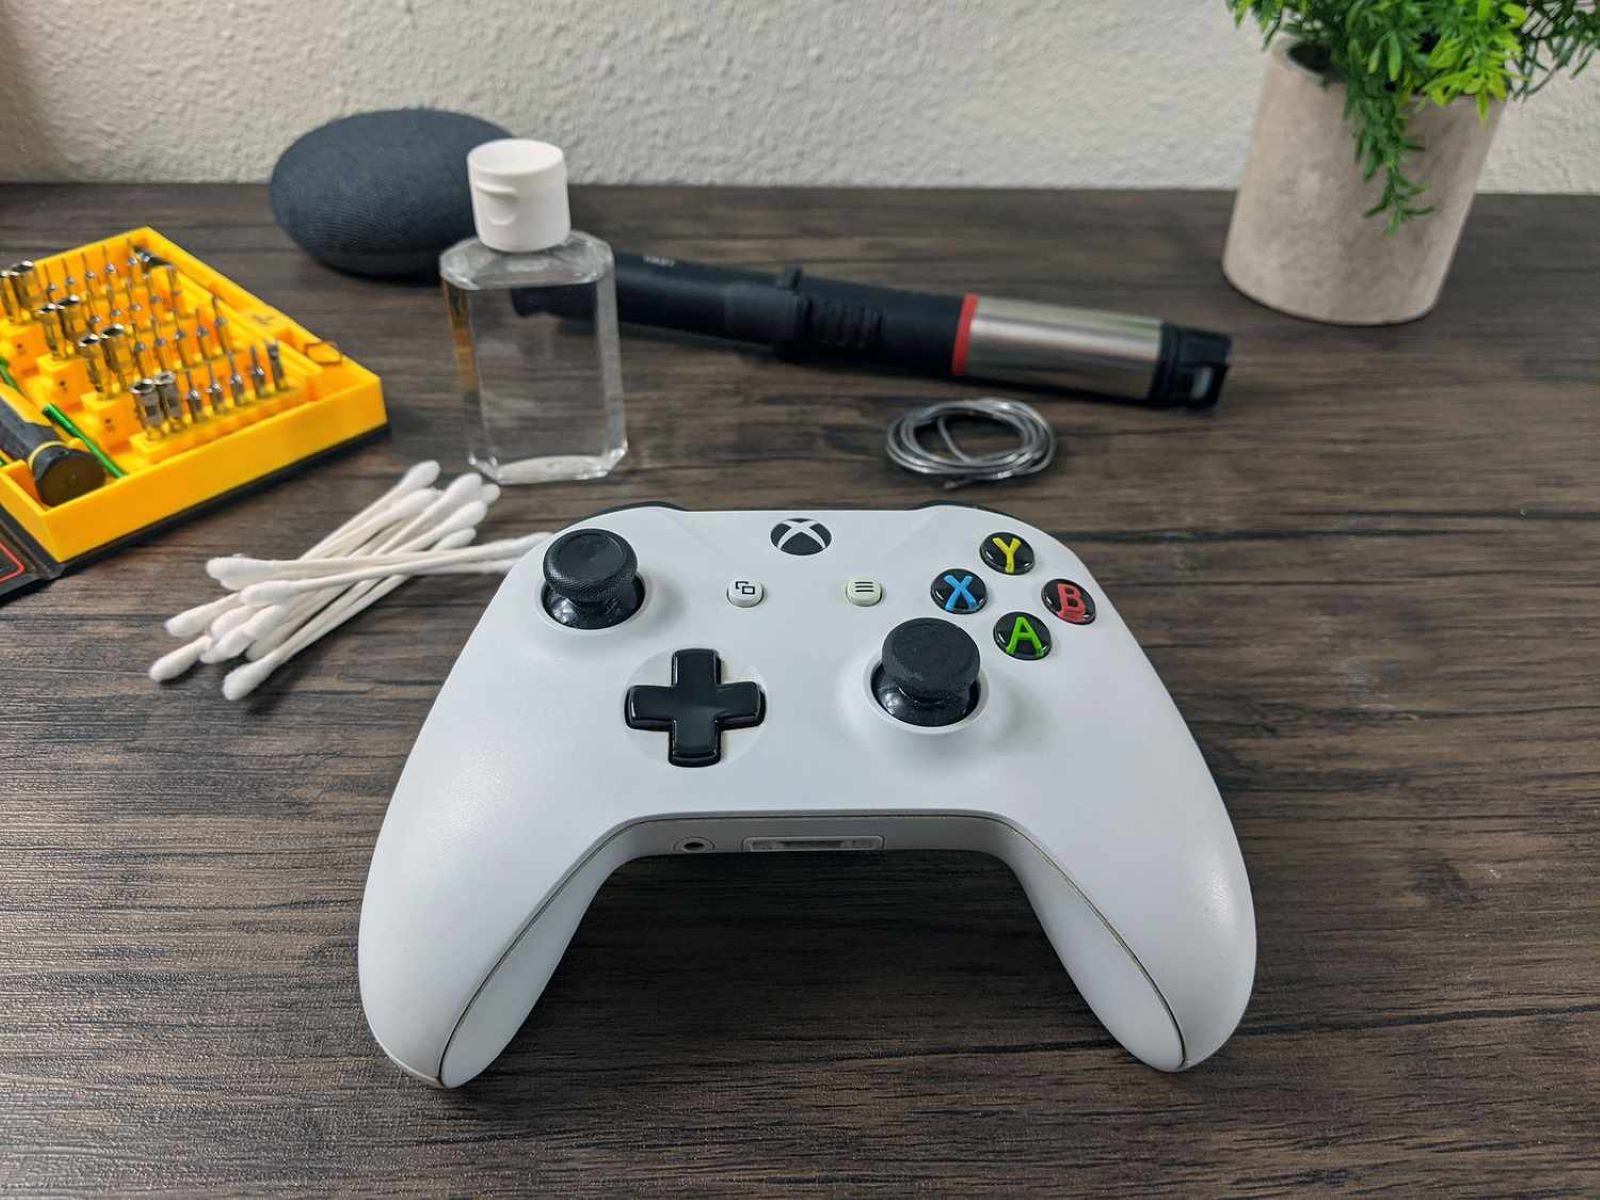
Cleaning the Controller
Cleaning the Xbox One controller is a fundamental step in addressing stick drift, especially if the issue is attributed to debris or residue interfering with the analog sticks' functionality. To begin the cleaning process, gather the necessary supplies, including a microfiber cloth, compressed air canister, cotton swabs, and isopropyl alcohol.
Start by powering off the controller and removing any batteries or rechargeable packs. This ensures safety and prevents accidental input during the cleaning process. Next, use the compressed air canister to gently blow away any loose debris around the analog sticks and other crevices of the controller. This helps dislodge and remove surface-level dust and particles that may contribute to stick drift.
Once the loose debris has been cleared, dampen a cotton swab with isopropyl alcohol and carefully swab around the base and edges of the analog sticks. The alcohol serves to dissolve and lift stubborn residues, such as oils or grime, that may be affecting the internal mechanisms of the analog sticks. Exercise caution to avoid excessive moisture, ensuring that the alcohol-dampened swab is not saturated.
After swabbing the analog sticks, use a dry cotton swab or microfiber cloth to gently remove any remaining moisture and residue. Thoroughly dry the controller to prevent any potential damage from excess moisture. Additionally, ensure that no cotton fibers are left behind, as these may interfere with the controller's functionality.
Once the cleaning process is complete, allow the controller to air dry for a few minutes before reassembling it and conducting a test to assess the effectiveness of the cleaning. Power on the controller and navigate through its functions to determine if the stick drift issue has been alleviated.
Regular maintenance and cleaning of the Xbox One controller can help prevent stick drift and ensure optimal performance. By incorporating cleaning into your controller care routine, you can mitigate the impact of debris and residue on the analog sticks, promoting smooth and accurate input during gaming sessions.
Incorporating cleaning as part of your controller maintenance routine can contribute to a more reliable and enjoyable gaming experience, free from the disruptions caused by stick drift. By investing time in maintaining your controller, you can prolong its lifespan and preserve its responsiveness, enhancing your overall gaming satisfaction.
Adjusting Deadzone Settings
Adjusting the deadzone settings on your Xbox One controller presents a strategic approach to mitigating stick drift and fine-tuning the responsiveness of the analog sticks. The deadzone refers to the central area of the analog sticks where minimal input is registered, allowing for a neutral position. By modifying the deadzone settings, gamers can customize the sensitivity of the analog sticks, compensating for any subtle drift that may occur.
To begin adjusting the deadzone settings, access the controller configuration options within the game or console settings. Navigate to the section dedicated to controller settings, where you can typically find options to customize deadzone parameters. Depending on the game or console, the deadzone settings may be categorized under controller sensitivity, calibration, or advanced options.
Once you have located the deadzone settings, you will likely encounter options to adjust the deadzone size and shape for both the left and right analog sticks. The deadzone size refers to the area in which minimal input is registered, while the deadzone shape may offer customization for circular or square deadzone configurations. These settings allow for precise calibration tailored to your preferences and gameplay requirements.
When adjusting the deadzone settings, consider making incremental changes to observe their impact on stick drift and overall responsiveness. Start by slightly increasing the deadzone size for the affected analog stick, effectively expanding the neutral zone to compensate for any unintended drift. This adjustment aims to counteract the effects of stick drift by requiring a greater degree of movement before input is registered, thereby minimizing the impact of subtle analog stick deviations.
After making the initial adjustments, proceed to test the modified deadzone settings in-game to evaluate their effectiveness. Engage in various gameplay scenarios that involve character movement, camera control, and aiming to assess the impact of the adjusted deadzone on stick drift. Pay close attention to the analog stick behavior and responsiveness, noting any improvements in mitigating unintended movements.
Throughout the testing phase, remain attentive to the balance between deadzone size and responsiveness, ensuring that the modified settings effectively address stick drift without compromising the precision and fluidity of analog stick input. Fine-tune the deadzone settings as needed, refining the parameters to achieve optimal control and minimize the impact of stick drift on your gaming experience.
By adjusting the deadzone settings, gamers can exert greater control over their Xbox One controller's analog stick behavior, mitigating the disruptive effects of stick drift and enhancing overall gameplay precision. This method offers a customizable solution that empowers gamers to tailor their controller's responsiveness to align with their preferences and gaming style, fostering a more immersive and enjoyable gaming experience.
Replacing the Thumbsticks
When stick drift persists despite cleaning and deadzone adjustments, replacing the thumbsticks emerges as a viable solution to address the underlying mechanical issues contributing to the problem. Over time, the internal components of the thumbsticks may experience wear and degradation, leading to inaccurate readings and unintended input. By replacing the thumbsticks, gamers can effectively restore precise control and mitigate the disruptive effects of stick drift on their Xbox One controller.
To initiate the thumbstick replacement process, it is essential to acquire a replacement thumbstick module designed specifically for the Xbox One controller. These replacement modules are readily available through authorized retailers, online marketplaces, or gaming accessory stores. When selecting a replacement module, ensure compatibility with the Xbox One controller model to guarantee a seamless fit and optimal functionality.
Begin by disassembling the Xbox One controller to access the internal components, including the analog sticks. Carefully remove the faceplate and any screws securing the controller housing, taking note of the disassembly process to facilitate reassembly later. Once the internal components are accessible, locate the analog stick modules and identify the specific thumbstick requiring replacement.
Using precision tools, such as a small screwdriver or prying tool, gently detach the existing thumbstick module from the controller, taking care not to damage the surrounding components. Exercise caution and patience during this step to avoid causing unintended damage to the controller housing or internal circuitry. Once the old thumbstick module is removed, carefully disconnect any attached cables or connectors to facilitate the installation of the replacement module.
Next, align the replacement thumbstick module with the corresponding mounting points and connectors within the controller. Ensure a secure and precise fit, taking care to align the module in the correct orientation to maintain proper functionality. Once the replacement module is positioned correctly, reattach any cables or connectors, securing them in place to establish a reliable connection.
After installing the replacement thumbstick module, reassemble the Xbox One controller by carefully reinstating the internal components and securing the controller housing. Follow the disassembly process in reverse, ensuring that all components are properly aligned and fastened to restore the controller to its original form.
Upon completing the reassembly, power on the controller and conduct thorough testing to evaluate the effectiveness of the thumbstick replacement. Engage in various gaming scenarios to assess the responsiveness and accuracy of the replaced thumbstick, paying close attention to any improvements in mitigating stick drift.
By replacing the thumbsticks, gamers can address the root mechanical causes of stick drift, restoring precise control and responsiveness to their Xbox One controller. This method offers a comprehensive solution to persistent stick drift issues, empowering gamers to enjoy uninterrupted gameplay free from the disruptions caused by unintended analog stick movements.
Contacting Xbox Support
If stick drift persists despite attempting cleaning, deadzone adjustments, and thumbstick replacements, reaching out to Xbox Support can provide valuable assistance in resolving the issue. Xbox Support offers dedicated customer service channels through which gamers can seek guidance, troubleshooting expertise, and potential solutions for persistent stick drift on their Xbox One controller.
To initiate contact with Xbox Support, gamers can explore various communication channels, including online support portals, live chat services, email correspondence, and phone support. Navigating to the official Xbox website presents a comprehensive resource for accessing support options, enabling gamers to select the most suitable communication method based on their preferences and urgency of the issue.
When engaging with Xbox Support, it is beneficial to provide detailed information regarding the stick drift issue, including the troubleshooting methods already attempted, the duration of the problem, and any specific observations related to the controller's behavior. Clear and concise communication empowers Xbox Support representatives to grasp the nuances of the issue and offer targeted assistance tailored to the specific circumstances.
During interactions with Xbox Support, gamers can expect to receive expert guidance on advanced troubleshooting techniques, potential firmware updates or controller calibration procedures, and recommendations for further diagnostic steps. Xbox Support representatives possess in-depth knowledge of Xbox One controller functionality and are equipped to address complex technical issues, including persistent stick drift, with precision and expertise.
In some cases, Xbox Support may facilitate the initiation of a controller repair or replacement process, particularly if the stick drift is attributed to underlying hardware issues that extend beyond the scope of user-performed troubleshooting. By leveraging the support resources provided by Xbox, gamers can navigate the process of resolving stick drift with the assurance of professional guidance and potential access to warranty-related solutions.
Contacting Xbox Support serves as a strategic recourse for gamers encountering persistent stick drift on their Xbox One controller, offering a direct pathway to comprehensive assistance and potential resolutions. By leveraging the expertise and resources available through Xbox Support, gamers can pursue effective remedies for stick drift, ultimately restoring optimal functionality to their controller and enhancing their overall gaming experience.
In summary, reaching out to Xbox Support represents a proactive approach to addressing persistent stick drift, harnessing the expertise and support infrastructure provided by Xbox to navigate complex technical issues and pursue viable solutions. Through effective communication and collaboration with Xbox Support, gamers can overcome the challenges posed by stick drift and regain precise control over their gaming experience.