Home>Arts and Culture>How To Draw An Easy Graduation Cap
Arts and Culture
How To Draw An Easy Graduation Cap
Published: February 28, 2024
Learn how to draw a simple graduation cap in this easy step-by-step tutorial. Perfect for arts and culture enthusiasts looking to create their own illustrations.
(Many of the links in this article redirect to a specific reviewed product. Your purchase of these products through affiliate links helps to generate commission for Regretless.com, at no extra cost. Learn more)
Table of Contents
Introduction
Drawing a graduation cap can be a fun and rewarding activity, whether you're creating a congratulatory card, a piece of artwork, or simply looking to hone your artistic skills. This iconic symbol of academic achievement is not only a joy to draw but also holds significant meaning, representing the culmination of hard work and dedication. In this step-by-step guide, you will learn how to draw an easy graduation cap, perfect for artists of all levels, from beginners to seasoned sketchers.
As you embark on this artistic journey, remember that there are no strict rules when it comes to creativity. Feel free to add your personal flair and style to the drawing, making it uniquely yours. So, grab your drawing materials and let's dive into the steps to create a charming graduation cap illustration that will surely impress your friends and family.
Read more: How To Draw An Easy Alligator
Materials Needed
To begin your artistic endeavor, gather the following materials:
-
Drawing Paper: Select a smooth, sturdy drawing paper that can withstand pencil and ink without tearing or wrinkling.
-
Pencil: A reliable pencil is essential for sketching the initial outline of the graduation cap. Opt for a standard HB pencil for versatility.
-
Eraser: A good quality eraser will allow you to correct any mistakes and refine your drawing with precision.
-
Ruler: A ruler will aid in creating straight and accurate lines, particularly when drawing the square shape of the cap.
-
Fine-line Pen or Marker (Optional): If you prefer to outline your drawing with ink, a fine-line pen or marker can provide a bold and defined look to your artwork.
-
Coloring Materials (Optional): If you wish to add color to your graduation cap, gather colored pencils, markers, or any other preferred coloring tools.
-
Shading Tools (Optional): For those interested in adding depth and dimension to their drawing, shading tools such as blending stumps or a tortillon can be utilized.
With these materials at hand, you are well-equipped to embark on the creative process of drawing an easy and delightful graduation cap. Now, let's move on to the first step of bringing this iconic symbol to life on paper.
Step 1: Draw a Square
To begin drawing a graduation cap, the first step is to create the square academic cap, also known as the mortarboard. This classic square shape forms the base of the cap and sets the foundation for the rest of the illustration. Follow these simple guidelines to sketch a proportional and visually appealing square:
-
Positioning the Square: Start by determining the placement of the square on your drawing paper. Visualize where you want the cap to be situated and lightly mark the corners of the square with a pencil. A ruler can be used to ensure straight and even lines.
-
Drawing the Square: Using your pencil and ruler, carefully connect the marked points to form a square. Maintain uniformity in the length of each side to achieve a balanced shape. The size of the square can vary based on your preference, but it is typically proportional to the size of the cap wearer's head.
-
Refining the Lines: Once the basic square shape is drawn, assess the lines and make any necessary adjustments to ensure that the corners are sharp and the sides are straight. This step is crucial in achieving a polished and professional-looking square.
Remember, precision is key in this initial stage, as it sets the stage for the subsequent details of the graduation cap. Take your time to ensure that the square is well-defined and accurately positioned on the paper. With the square in place, you are now ready to move on to the next step of adding the tassel, a distinctive feature of the graduation cap.
By mastering the art of drawing a square, you have taken the first step toward creating a captivating graduation cap illustration. With this foundational element in place, the subsequent steps will build upon this structure, ultimately resulting in a charming and lifelike representation of this cherished symbol of academic accomplishment.
Step 2: Add the Tassel
With the square base of the graduation cap sketched out, the next step is to incorporate the iconic tassel, a distinctive and symbolic element of the cap. The tassel, often made of silky threads, hangs from the center of the cap's top, adding a touch of elegance and tradition to the design. Follow these simple guidelines to artfully add the tassel to your graduation cap illustration:
-
Positioning the Tassel: Begin by identifying the midpoint of the top edge of the square. Lightly mark this point with a small dot using your pencil. This serves as the anchor point for the tassel and ensures its centered placement on the cap.
-
Drawing the Tassel: From the marked midpoint, extend a short, vertical line upwards to represent the attachment point of the tassel to the cap. This line should be approximately the same length as the desired tassel height. Next, draw a small, circular shape at the top of the line to indicate the gathering point of the tassel threads. This circular shape will serve as the base from which the individual tassel strands emanate.
-
Creating the Tassel Strands: From the circular base, extend several curved lines downwards to form the tassel strands. These lines should flow gracefully and vary slightly in length to convey a natural and fluid appearance. The number of strands can vary based on personal preference, with three to five strands being a common choice for simplicity and balance.
-
Refining the Tassel: Once the tassel strands are drawn, assess their positioning and adjust their curvature as needed to achieve a visually pleasing arrangement. Ensure that the strands are evenly spaced and that their lengths are harmonious, contributing to a balanced and aesthetically pleasing tassel.
By skillfully incorporating the tassel into your graduation cap illustration, you infuse this timeless symbol with depth and character, capturing the essence of academic achievement and celebration. The addition of the tassel brings a sense of movement and elegance to the cap, elevating its visual impact and imbuing it with a touch of tradition and significance.
With the tassel artfully integrated into the design, your graduation cap illustration is well on its way to becoming a captivating and meaningful representation of this cherished symbol of academic accomplishment. As you proceed to the next step, drawing the brim of the cap, you are one step closer to completing a delightful and impressive artwork that pays homage to the spirit of graduation and scholarly success.
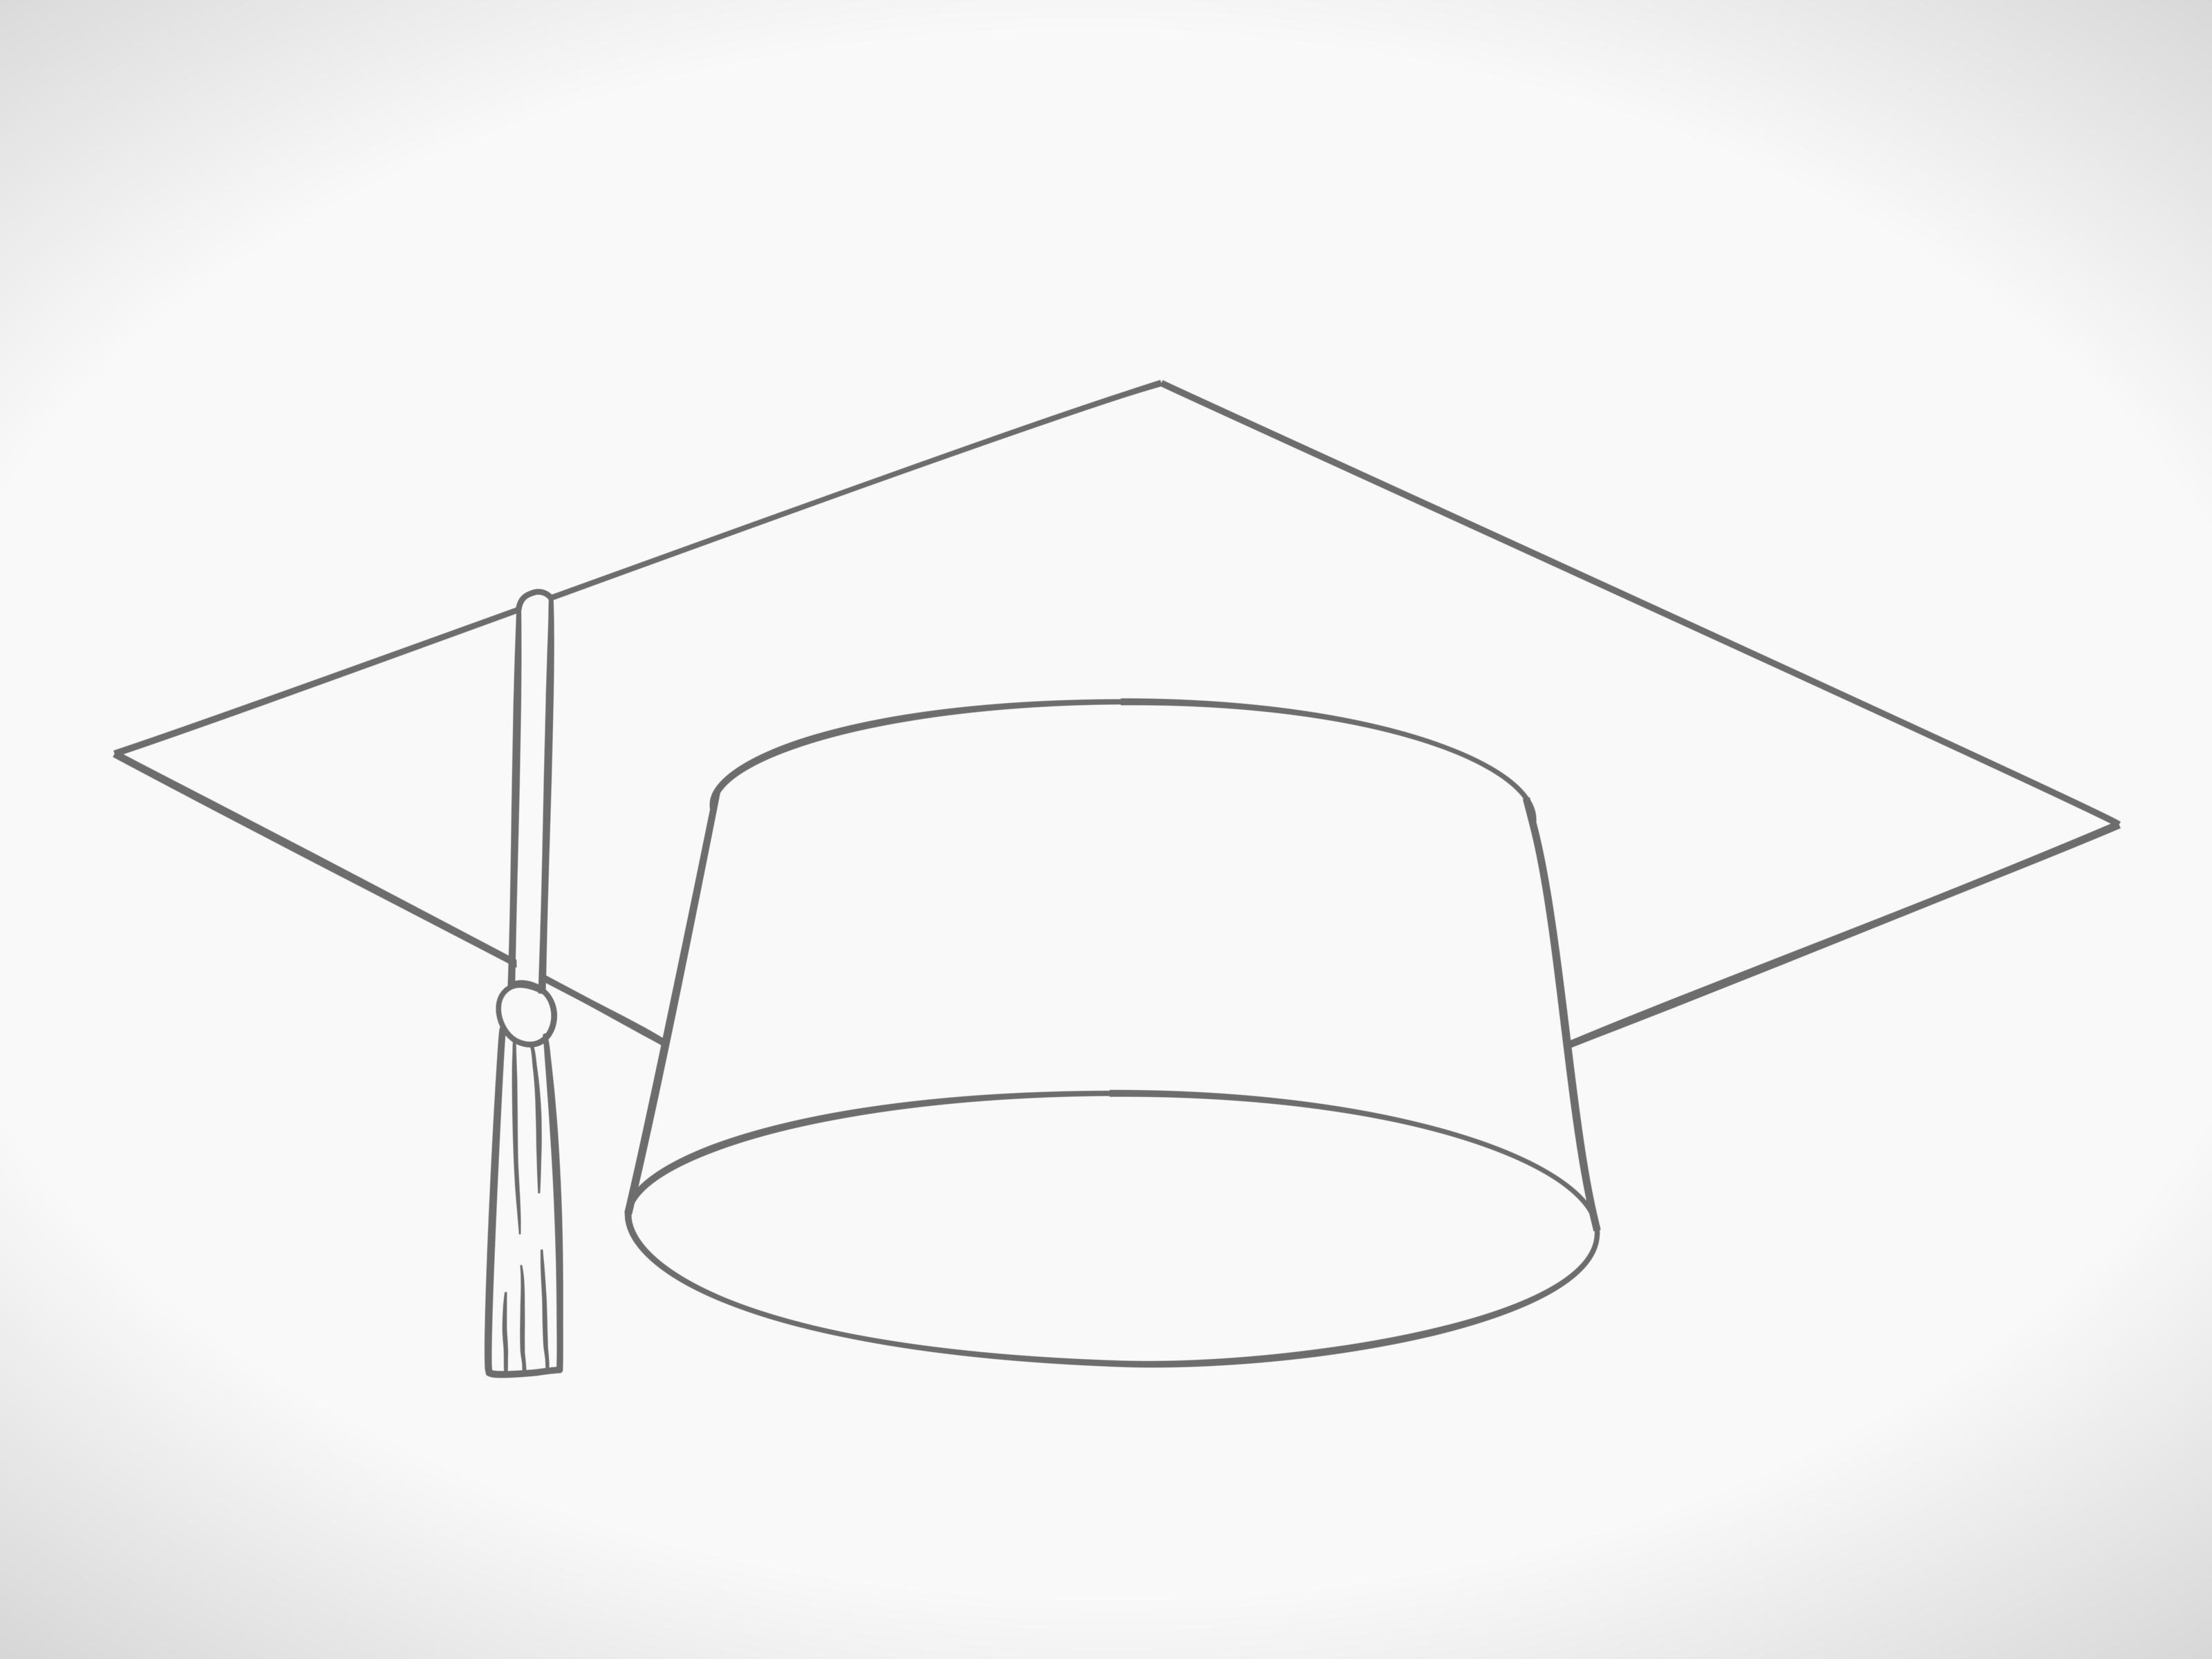
Step 3: Draw the Brim
Drawing the brim of the graduation cap is a pivotal step that adds dimension and structure to the overall illustration. The brim, also known as the board, frames the square cap, lending it a distinguished and polished appearance. Follow these detailed guidelines to skillfully draw the brim and elevate your graduation cap illustration to new heights:
-
Defining the Brim's Thickness: Begin by determining the desired thickness of the brim. This will influence the visual prominence of the cap and can vary based on personal preference. Using your pencil, carefully outline the thickness of the brim along the top edge of the square cap. Ensure that the lines are straight and parallel to the square's edges, maintaining a consistent width throughout.
-
Extending the Brim: Once the top edge of the brim is defined, extend the lines outward from each corner of the square, creating an even overhang around the entire perimeter. The length of the overhang can vary, but a proportional and balanced extension typically enhances the cap's aesthetic appeal. Pay close attention to symmetry and ensure that the overhang is uniform on all sides, contributing to a harmonious and polished look.
-
Refining the Brim's Corners: With the basic outline of the brim in place, focus on refining the corners to achieve a crisp and defined appearance. Ensure that the corners are sharp and well-defined, adding a touch of sophistication to the cap's structure. Attention to detail in this step contributes to a professional and polished finish, elevating the overall quality of the illustration.
-
Adding Depth and Dimension: To enhance the visual impact of the brim, consider incorporating subtle shading or hatching along the underside of the overhang. This technique creates the illusion of depth, adding a three-dimensional quality to the cap and accentuating its structural form. Carefully apply shading to the underside of the brim, gradually darkening the area to create a subtle but impactful visual effect.
By skillfully drawing the brim of the graduation cap, you infuse the illustration with a sense of refinement and elegance, elevating it to a level of sophistication that captures the essence of academic achievement and celebration. The addition of the brim frames the cap with a touch of tradition and significance, enhancing its visual impact and imbuing it with a timeless charm.
With the brim artfully integrated into the design, your graduation cap illustration is well on its way to becoming a captivating and meaningful representation of this cherished symbol of academic accomplishment. As you proceed to the next step, adding details to the cap, you are one step closer to completing a delightful and impressive artwork that pays homage to the spirit of graduation and scholarly success.
Read more: How To Draw An Easy Farm
Step 4: Add Details
With the foundational elements of the graduation cap sketched out, it's time to infuse the illustration with intricate details that will bring the cap to life on paper. Adding these subtle nuances will enhance the visual appeal of the artwork and contribute to a more realistic and captivating representation of this iconic symbol of academic achievement.
Embellishing the Tassel:
Begin by refining the tassel, paying attention to the individual strands and their flow. Consider adding delicate lines to suggest the texture and movement of the tassel threads, creating a sense of softness and elegance. By carefully shaping and defining the strands, you can imbue the tassel with a lifelike quality, enhancing its visual impact and adding depth to the overall illustration.
Enhancing the Brim:
To further elevate the cap's appearance, focus on refining the brim with precision and attention to detail. Consider adding subtle lines or shading along the top surface of the brim to convey its texture and structure. This technique adds a touch of realism to the cap, accentuating its polished and distinguished look. Additionally, refining the corners of the brim with subtle shading or precise lines can contribute to a more refined and professional finish, enhancing the cap's overall visual appeal.
Personalizing the Cap:
As you add details to the graduation cap, consider incorporating personal touches or customizations to make the illustration uniquely yours. Whether it's adding decorative patterns to the brim, incorporating initials or symbols, or infusing the tassel with vibrant colors, these personalized elements can infuse the artwork with individuality and creativity. Embracing these personal flourishes allows you to imbue the cap with a sense of character and charm, making it a truly special and meaningful representation of academic accomplishment.
By skillfully adding these intricate details to the graduation cap illustration, you transform it into a captivating and personalized artwork that pays homage to the spirit of graduation and scholarly success. These subtle embellishments contribute to a more refined and visually engaging representation of the graduation cap, capturing the essence of academic achievement and celebration with artistry and finesse.
As you proceed to the final step of coloring and shading the cap, you are one step closer to completing a delightful and impressive artwork that celebrates the significance of this cherished symbol.
Step 5: Color and Shade
Coloring and shading the graduation cap is the final step in bringing the illustration to life with vibrancy and depth. This stage allows you to infuse the artwork with personality and visual impact, creating a captivating representation of this iconic symbol of academic achievement.
When selecting colors for the cap, consider traditional hues such as black, navy, or deep maroon to evoke the classic appearance of graduation attire. Alternatively, you can explore a spectrum of colors to reflect individuality and creativity, infusing the cap with a personalized touch. Begin by carefully applying the chosen colors to the square cap, ensuring even coverage and smooth transitions between shades. Pay close attention to the brim, tassel, and any personalized details, using a combination of bold and subtle colors to enhance the overall aesthetic.
Shading plays a crucial role in adding dimension and realism to the illustration. Utilize shading techniques to create depth and form, enhancing the three-dimensional quality of the cap. Consider the direction of light and shadow, applying gradual shading to the underside of the brim and the tassel to convey a sense of volume and presence. By skillfully blending light and dark tones, you can imbue the cap with a lifelike quality, elevating its visual impact and creating a compelling sense of realism.
For those seeking to further refine their artwork, consider employing blending tools such as blending stumps or tortillons to achieve seamless transitions between shades, resulting in a polished and professional finish. These tools allow for precise blending and smudging, contributing to a cohesive and visually striking representation of the graduation cap.
As you immerse yourself in the process of coloring and shading, embrace the opportunity to express creativity and individuality, infusing the cap with a sense of character and charm. Whether you opt for a traditional color palette or explore unconventional hues, the act of coloring and shading allows you to breathe life into the illustration, culminating in a captivating and meaningful artwork that celebrates the significance of this cherished symbol of academic accomplishment.
With the completion of the coloring and shading stage, your graduation cap illustration stands as a testament to creativity and artistry, capturing the essence of academic achievement and celebration with finesse and flair. As you admire the finished artwork, revel in the satisfaction of bringing this iconic symbol to life on paper, a fitting tribute to the spirit of graduation and scholarly success.
Conclusion
In conclusion, mastering the art of drawing an easy graduation cap is not only a delightful creative endeavor but also a meaningful tribute to the spirit of academic achievement and celebration. Through each step of the drawing process, from sketching the square base to adding intricate details and infusing the illustration with color and shading, you have embarked on a journey of artistic expression and skill development.
As you reflect on the completed graduation cap illustration, take pride in the craftsmanship and attention to detail that have brought this iconic symbol to life on paper. The square cap, adorned with a graceful tassel and refined brim, stands as a testament to your artistic abilities and dedication to the craft. The personalized touches and vibrant colors infuse the artwork with individuality and creativity, making it a truly special representation of academic accomplishment.
Beyond the technical aspects of drawing, creating a graduation cap illustration holds deeper significance. It serves as a visual homage to the perseverance, hard work, and dedication that culminate in the milestone of graduation. The cap symbolizes the pursuit of knowledge, the triumph of scholarly pursuits, and the commencement of new beginnings. By capturing this symbolism through art, you honor the spirit of academic success and the joy of graduation.
Moreover, the process of drawing a graduation cap fosters a sense of creativity, patience, and attention to detail. It encourages artistic exploration and the expression of personal style, allowing for individual interpretations and unique flourishes. Whether it's the subtle nuances of shading or the choice of vibrant colors, each decision contributes to the overall impact of the artwork, reflecting the artist's vision and creativity.
As you share your graduation cap illustration with others, whether as a heartfelt congratulatory gesture or a showcase of artistic talent, it serves as a visual celebration of academic accomplishment and the pursuit of knowledge. It embodies the pride and joy associated with graduation, resonating with individuals who have embarked on similar academic journeys.
In essence, drawing an easy graduation cap transcends the act of creating a mere illustration; it encapsulates the spirit of academic achievement, the joy of scholarly success, and the boundless creativity that artistry affords. It stands as a testament to the significance of graduation and the enduring symbolism of the cap as a cherished emblem of scholarly accomplishment and new beginnings.