Home>Arts and Culture>How To Draw A Bow
Arts and Culture
How To Draw A Bow
Modified: March 13, 2024
Learn the art of drawing a bow with step-by-step instructions and tips. Enhance your skills in arts and culture with this easy tutorial.
(Many of the links in this article redirect to a specific reviewed product. Your purchase of these products through affiliate links helps to generate commission for Regretless.com, at no extra cost. Learn more)
Table of Contents
Introduction
Drawing a bow can be a rewarding and enjoyable artistic endeavor. Whether you are an aspiring artist, a hobbyist, or simply looking to enhance your drawing skills, mastering the art of drawing a bow can be a fulfilling experience. The graceful curves and intricate details of a bow make it a captivating subject to sketch or illustrate. Whether you are aiming to depict a traditional longbow, a sleek modern compound bow, or an elegant ribbon bow, the process of drawing a bow involves attention to detail and a keen eye for form.
In this comprehensive guide, we will explore the step-by-step process of drawing a bow, from outlining its basic shape to adding intricate details and textures. By following these instructions, you will gain valuable insights into the techniques and nuances of drawing a bow, allowing you to create stunning and lifelike representations.
As we delve into the art of drawing a bow, it is important to approach the process with patience and a willingness to refine your skills. Whether you are using traditional pencil and paper or digital drawing tools, the techniques outlined in this guide can be adapted to suit your preferred medium. With a dash of creativity and a sprinkle of imagination, you can bring your bow drawings to life, infusing them with character and charm.
So, grab your drawing supplies and let's embark on this artistic journey together. Whether you are a seasoned artist or a novice enthusiast, drawing a bow offers a delightful opportunity to hone your artistic abilities and unleash your creativity onto the canvas. Let's pick up our metaphorical pencils and dive into the enchanting world of drawing bows.
Read more: How To Hold A Violin Bow
Materials Needed
Before embarking on the artistic endeavor of drawing a bow, it is essential to gather the necessary materials to ensure a smooth and enjoyable drawing experience. Whether you prefer traditional sketching tools or digital drawing equipment, having the right materials at your disposal can significantly enhance the quality of your artwork. Here are the essential materials needed to begin your bow-drawing journey:
-
Drawing Paper or Sketchbook: A high-quality drawing paper or sketchbook provides a sturdy and reliable surface for sketching and illustrating the intricate details of a bow. Opt for a paper weight that suits your preferred drawing medium, whether it be pencil, pen, or digital stylus.
-
Drawing Pencils: A set of drawing pencils with varying lead hardness, such as HB, 2B, 4B, and 6B, allows for precise line work and shading. The different lead grades offer versatility in creating both delicate outlines and rich, expressive tones.
-
Eraser: A soft, kneaded eraser or precision eraser allows for the correction of mistakes and the refinement of details without damaging the drawing surface. An eraser shield or fine eraser pen can also be useful for erasing small, intricate areas.
-
Ruler or Straight Edge: When drawing the straight lines and symmetrical elements of a bow, a ruler or straight edge can aid in achieving precision and accuracy in your artwork.
-
Reference Images: While not a physical material, having reference images of bows can provide valuable visual guidance and inspiration. Whether sourced from online resources, books, or personal photography, reference images can inform your understanding of bow anatomy and design.
-
Drawing Tablet and Stylus (Optional): For digital artists, a drawing tablet and stylus offer a versatile and intuitive platform for creating bow illustrations. The pressure sensitivity and customizable settings of a drawing tablet can elevate the digital drawing experience.
-
Blending Tools (Optional): If working with traditional drawing mediums, blending tools such as blending stumps or tortillons can be employed to achieve smooth transitions and subtle gradients in shading.
By assembling these essential materials, you are well-equipped to commence your bow-drawing journey with confidence and creativity. Whether you prefer the tactile sensation of traditional drawing or the digital precision of modern tools, the right materials can empower you to bring your artistic vision to life on the canvas. Now that we have our materials in hand, let's proceed to the next step of drawing a bow.
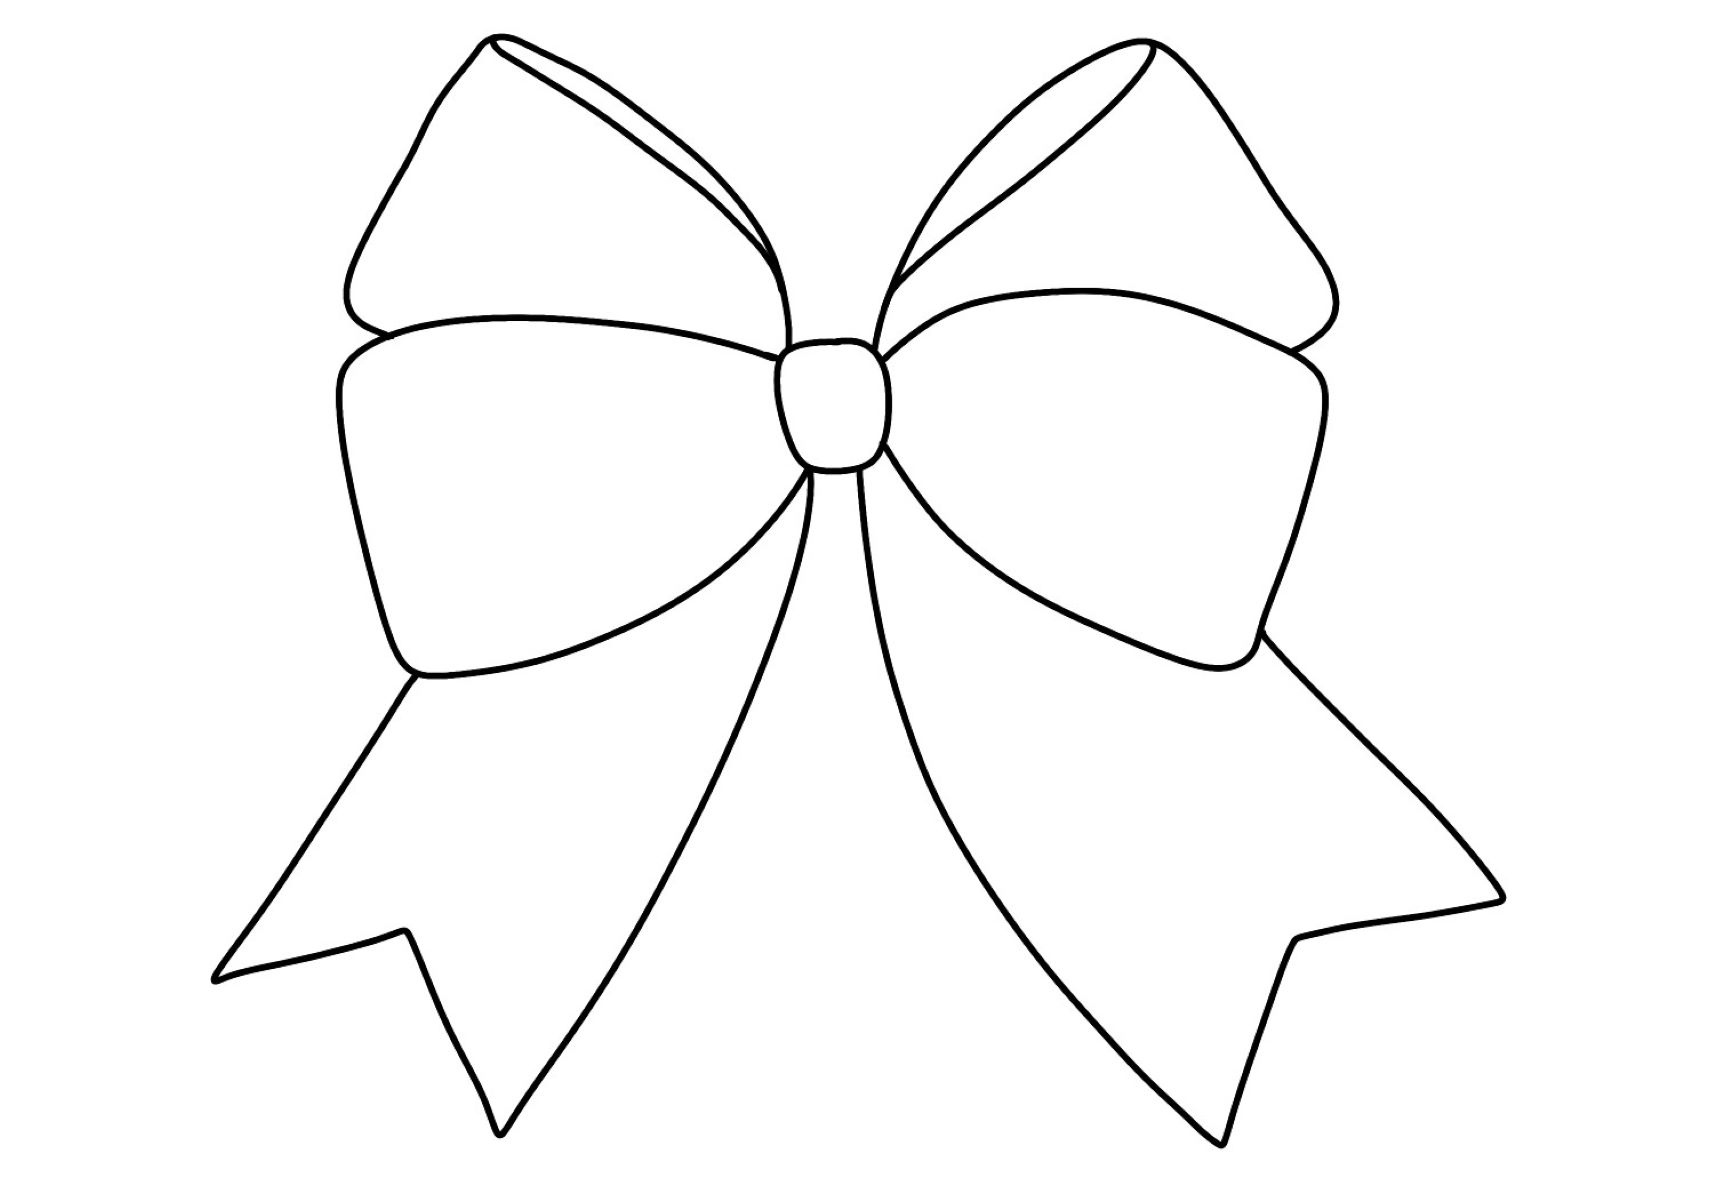
Step 1: Draw the Bow's Outline
To begin the process of drawing a bow, it is essential to establish the foundational outline that will serve as the framework for the intricate details to come. Whether you are depicting a classic archery bow, a decorative ribbon bow, or a modern compound bow, the initial outline sets the stage for capturing the distinctive shape and character of the bow.
Start by visualizing the overall shape of the bow and its components. If drawing a traditional archery bow, envision the graceful curve of the limbs, the tapering form of the handle, and the elegant arc of the bowstring. For a decorative ribbon bow, consider the loops, tails, and folds that contribute to its ornate appearance. In the case of a modern compound bow, observe the geometric precision of the cams, limbs, and riser.
Using a light and precise hand, sketch the basic outline of the bow on your drawing surface. If working with traditional drawing tools, begin with a well-sharpened pencil of medium hardness, such as HB or 2B, to establish the initial lines. Pay close attention to proportions and symmetry, ensuring that the bow's components align harmoniously.
When drawing the bow's outline, consider the perspective from which you are depicting it. Whether viewed from the front, side, or at an angle, the perspective will influence the curvature and proportions of the bow. Take note of any distinctive features, such as decorative embellishments or ergonomic contours, and incorporate them into the outline with precision and care.
For digital artists using a drawing tablet, leverage the flexibility of digital sketching tools to refine the outline with ease. Experiment with different brush sizes and opacities to create a clean and expressive outline that captures the essence of the bow's form.
As you progress through this initial stage, remember that the outline serves as the scaffolding upon which the subsequent details and textures will be built. Embrace the opportunity to infuse the outline with fluidity and grace, laying the groundwork for a captivating and lifelike representation of the bow.
With the bow's outline taking shape, we are poised to venture into the next phase of drawing, where we will add intricate details to breathe life into our artistic creation. Let's proceed to the next step and continue our artistic journey of drawing a bow.
Step 2: Add Details to the Bow
With the foundational outline of the bow sketched onto the drawing surface, the next step involves infusing the artwork with intricate details that lend depth and character to the bow. Whether capturing the ornate embellishments of a decorative ribbon bow, the technical components of a modern compound bow, or the organic textures of a traditional archery bow, adding details is a pivotal stage in elevating the visual impact of the artwork.
Begin by focusing on the specific features of the bow, such as the riser, limbs, and string for a modern compound bow, or the loops, tails, and folds for a decorative ribbon bow. For a traditional archery bow, consider the curvature of the limbs, the grip of the handle, and the subtle nuances of the bowstring. Paying attention to these details allows for a more nuanced and authentic representation of the bow.
When adding details, precision and observation are paramount. Take the time to study reference images of bows, observing the intricacies of their design and construction. Notice the subtle contours, patterns, and textures that contribute to the visual appeal of the bow, and endeavor to replicate these details with finesse and accuracy.
For traditional artists working with pencils, varying the pressure and stroke of the pencil can create depth and dimension in the details. Employ hatching, cross-hatching, and stippling techniques to convey different textures, such as the smooth sheen of a ribbon bow, the sleek metallic surfaces of a modern bow, or the organic grain of a wooden archery bow.
Digital artists can leverage the versatility of digital drawing tools to meticulously render details with precision. Experiment with brush textures, layering, and blending modes to emulate the tactile qualities of different bow materials, whether it be satin ribbon, polished metal, or natural wood.
As the details of the bow come into focus, consider the interplay of light and shadow to accentuate its form. Enhance the three-dimensional quality of the bow by strategically shading areas that recede from the light source and highlighting those that catch the light, adding depth and realism to the artwork.
By infusing the bow with intricate details, the artwork begins to transcend mere representation, evolving into a captivating and evocative portrayal of this timeless symbol. With the details meticulously rendered, the bow emerges as a compelling focal point, brimming with personality and charm.
As we immerse ourselves in the art of adding details to the bow, we pave the way for the final stages of drawing, where shading and texture will further enrich the artwork. Let's continue our artistic journey by delving into the next step of drawing a bow.
Step 3: Draw the Bowstring
Drawing the bowstring is a crucial step in capturing the essence of a bow, as it not only adds functional authenticity but also contributes to the visual dynamism of the artwork. Whether depicting the taut string of an archery bow, the delicate ribbon of a decorative bow, or the high-performance cable of a modern compound bow, rendering the bowstring requires attention to detail and an understanding of its role in the overall composition.
Begin by visualizing the trajectory of the bowstring, considering its tension and curvature in relation to the bow's limbs. If drawing a traditional archery bow, envision the graceful arc of the bowstring as it spans the length of the limbs, conveying the potential energy stored within. For a decorative ribbon bow, observe the elegant loops and twists of the bowstring, which contribute to its decorative allure. In the case of a modern compound bow, take note of the complex cable system and pulleys that define the bowstring's path.
When sketching the bowstring, precision and symmetry are paramount. Whether employing traditional drawing tools or digital mediums, strive to achieve a smooth and consistent line that accurately represents the bowstring's trajectory. Pay attention to the tension of the string, conveying its resilience and potential for kinetic energy when drawn.
For traditional artists, utilizing a fine-tipped pencil or pen can facilitate the creation of a clean and defined bowstring. Employing subtle variations in line weight can convey the three-dimensionality of the string, accentuating its presence within the composition. Additionally, consider the interaction of the bowstring with the bow's components, ensuring that it seamlessly integrates with the overall structure.
Digital artists can leverage the precision of digital drawing tools to meticulously render the bowstring, utilizing vector-based lines or customizable brush settings to achieve a polished and dynamic representation. Experimenting with opacity and layering can impart a sense of translucency and depth to the bowstring, enhancing its visual impact within the artwork.
As the bowstring takes shape, consider the interplay of light and shadow to imbue it with dimension and realism. Strategic shading and highlighting can accentuate the curvature and tension of the string, further enhancing its visual presence within the composition.
With the bowstring sketched and refined, the artwork gains a sense of kinetic energy and purpose, as the taut string becomes a focal point of the composition. By meticulously rendering the bowstring, the artwork transcends mere representation, evolving into a captivating and evocative portrayal of this essential component of the bow.
As we immerse ourselves in the art of drawing the bowstring, we pave the way for the final stages of drawing, where shading and texture will further enrich the artwork. Let's continue our artistic journey by delving into the next step of drawing a bow.
Read more: How To Make A Bow Using Wrapping Paper
Step 4: Add Shading and Texture
As we approach the final phase of drawing a bow, the addition of shading and texture serves as the transformative touch that elevates the artwork to a new level of depth and realism. Through the strategic application of light and shadow, as well as the nuanced portrayal of tactile surfaces, the bow evolves from a mere outline into a captivating and lifelike representation.
Shading plays a pivotal role in conveying the three-dimensional form of the bow, accentuating its contours and volumes. Whether working with traditional drawing tools or digital mediums, consider the direction and intensity of light sources within the composition. By observing the interplay of light and shadow on the bow, you can strategically apply shading to create depth and dimension. For a traditional archery bow, consider the curvature of the limbs and the recesses of the handle, utilizing shading to evoke a sense of solidity and form. In the case of a decorative ribbon bow, shading can accentuate the folds and creases, imbuing the bow with a sense of softness and pliancy. Similarly, for a modern compound bow, shading can emphasize the sleek surfaces and mechanical components, enhancing the bow's technical allure.
Texture, on the other hand, adds a tactile quality to the bow, allowing the viewer to visually experience its materiality. Whether portraying the smooth luster of a satin ribbon, the grainy texture of wood, or the metallic sheen of modern materials, texture enriches the visual narrative of the artwork. For traditional artists, employing techniques such as cross-hatching and stippling can simulate various textures, infusing the bow with a sense of touchable realism. Digital artists can explore the use of texture brushes and layering to create convincing tactile surfaces, enhancing the sensory appeal of the bow.
By skillfully integrating shading and texture, the bow transcends its two-dimensional representation, emerging as a compelling and immersive focal point within the artwork. The interplay of light and shadow, coupled with the portrayal of tactile surfaces, imbues the bow with a palpable presence, inviting the viewer to appreciate its form and materiality.
With shading and texture meticulously applied, the artistic journey of drawing a bow culminates in a captivating and evocative portrayal, where the grace and elegance of this timeless symbol are brought to life on the canvas. As we conclude this artistic endeavor, let the bow stand as a testament to the creative prowess and technical skill honed throughout the drawing process.
Conclusion
In the culmination of our artistic exploration, drawing a bow has unfolded as a captivating and enriching endeavor, inviting us to delve into the intricacies of form, detail, and expression. As we reflect on the journey from outlining the bow's graceful silhouette to infusing it with intricate details, drawing the taut bowstring, and finally applying shading and texture, we have witnessed the transformation of a mere concept into a compelling and lifelike representation.
Through the artful strokes of our pencils or the digital finesse of our styluses, we have breathed life into the bow, imbuing it with character, elegance, and a palpable sense of presence. The process of drawing a bow has not only honed our technical skills but has also nurtured our ability to observe, interpret, and translate the essence of an object onto the canvas.
As we conclude this artistic journey, let the bow serve as a testament to the creative prowess and dedication that we have invested in our craft. Whether it be a traditional archery bow steeped in heritage and functionality, a decorative ribbon bow exuding charm and festivity, or a modern compound bow embodying precision and innovation, each rendition reflects our unique perspective and artistic sensibilities.
Drawing a bow transcends the act of representation; it becomes a celebration of form, a symphony of details, and a testament to the enduring allure of this timeless symbol. As we partake in the art of drawing, we not only capture the physical attributes of the bow but also imbue it with intangible qualities – grace, dynamism, and a touch of the human spirit.
In the realm of art, every stroke, every line, and every shade carries the imprint of our creativity, inviting the viewer to share in the experience of our artistic expression. As we conclude this artistic odyssey of drawing a bow, let us carry forward the lessons learned, the skills honed, and the memories created, infusing our future endeavors with the same passion and dedication that have brought this bow to life on the canvas.