Home>Arts and Culture>How To Draw A Rat
Arts and Culture
How To Draw A Rat
Published: March 5, 2024
Learn how to draw a rat with easy step-by-step instructions. Explore your artistic skills and create adorable rat drawings with our helpful guide. Perfect for art enthusiasts and beginners in arts and culture.
(Many of the links in this article redirect to a specific reviewed product. Your purchase of these products through affiliate links helps to generate commission for Regretless.com, at no extra cost. Learn more)
Table of Contents
Introduction
Drawing is a wonderful way to express creativity and bring imagination to life. Whether you're an experienced artist or just starting out, learning to draw a rat can be a fun and rewarding experience. Rats are fascinating creatures, known for their intelligence and agility, and capturing their likeness on paper can be a delightful challenge.
In this step-by-step guide, you will learn how to draw a rat in a simple and approachable manner. By following these instructions and using your artistic flair, you can create a charming rat illustration that showcases your skills and creativity.
So, gather your drawing materials, find a comfortable space, and let's embark on this artistic journey together. Whether you're drawing for pleasure, honing your artistic abilities, or seeking a new creative outlet, this guide will help you bring a cute and endearing rat to life on the page. Let's dive in and unleash our artistic talents as we embark on this delightful drawing adventure.
Read more: How To Draw Bowser
Materials Needed
To begin your rat-drawing adventure, you'll need a few essential materials to bring your artistic vision to life. Here's a list of items that will help you create a charming rat illustration:
-
Drawing Paper: Select a smooth, sturdy paper that can withstand pencil and eraser use without tearing or smudging. A standard sketch pad or drawing paper will work well for this project.
-
Pencils: Gather a range of pencils, including HB, 2B, and 4B, to achieve varying shades and lines in your drawing. These pencils will allow you to add depth and dimension to your rat illustration.
-
Eraser: A good quality eraser is essential for correcting mistakes and refining details in your drawing. Look for a soft eraser that won't damage the paper's surface.
-
Sharpener: Keep a sharp pencil point by having a reliable pencil sharpener on hand. This will ensure that you can achieve precise lines and details in your rat illustration.
-
Reference Images: While drawing from imagination is a valuable skill, having reference images of rats can provide helpful visual cues and details. You can use these references to capture the unique features and characteristics of a rat in your drawing.
-
Drawing Board: If you prefer drawing on a firm surface, a drawing board or a smooth, flat surface to place your paper on can provide stability and support while you work on your rat illustration.
-
Optional: Colored Pencils or Markers: If you want to add a pop of color to your rat drawing, consider having colored pencils or markers on hand. These can be used to add vibrant details or create a more stylized interpretation of your rat illustration.
Gathering these materials will set the stage for an enjoyable and successful rat-drawing experience. With these tools at your disposal, you'll be well-equipped to bring a charming rat to life on paper, showcasing your artistic talents and attention to detail. Now that you have your materials ready, let's move on to the next steps of drawing a delightful rat illustration.
Step 1: Draw the Body
To begin drawing a rat, start by sketching the basic outline of its body. Using a light pencil, create a rounded shape for the rat's body, resembling a slightly elongated oval. This initial shape will serve as the foundation for the rat's form and posture. Keep the lines light and fluid, allowing for adjustments as you refine the body's proportions and contours.
Next, add a smaller oval shape towards the rear of the body to represent the rat's hindquarters. This secondary shape should overlap with the main body outline, creating a seamless transition. Pay attention to the relative size and positioning of the hindquarters, ensuring that they complement the overall structure of the rat's body.
As you progress, consider the rat's posture and stance. Are you envisioning a rat standing upright, crouching, or in motion? Tailor the body's shape and posture to reflect your desired portrayal of the rat. Whether it's a curious rat exploring its surroundings or a relaxed rat at rest, the body's form should convey the intended demeanor.
Once you are satisfied with the body's basic structure, refine the lines and contours to define the rat's physique. Add subtle curves and contours to capture the rat's natural shape, paying attention to the gentle tapering towards the hindquarters. This attention to detail will bring depth and realism to your rat illustration, laying the groundwork for the subsequent steps in the drawing process.
Remember, drawing the body sets the stage for the rat's overall appearance and character. Take your time to establish the foundational body shape, ensuring that it aligns with your artistic vision. With the body sketched out, you're ready to proceed to the next steps and continue bringing your rat illustration to life.
Step 2: Add the Head and Ears
With the body outline in place, it's time to focus on adding the distinctive features of the rat, starting with its head and ears. Begin by sketching a slightly tapered oval shape at the front of the body to represent the rat's head. This shape should seamlessly connect to the body, creating a fluid transition. Pay attention to the size and positioning of the head in relation to the body, ensuring a harmonious and proportionate representation.
Next, visualize the placement of the rat's ears. Rats are known for their prominent ears, which are a defining characteristic of their appearance. To capture this feature, draw two elongated ovals on either side of the rat's head, extending slightly above the head's outline. The ears should be positioned with a slight outward angle, adding a sense of alertness and expressiveness to the rat's portrayal.
As you refine the head and ears, consider the subtle details that contribute to the rat's likeness. Add gentle curves and contours to the head, shaping it to convey the rat's natural charm and character. Similarly, refine the ears by adding internal lines to suggest the inner structure and texture. These details will infuse your rat illustration with depth and realism, capturing the endearing qualities of these remarkable creatures.
Take a moment to assess the overall harmony of the head and ears with the body, ensuring that they complement each other in form and expression. Adjust the proportions and angles as needed, refining the details to achieve a cohesive and captivating portrayal of the rat.
By adding the head and ears, you've brought a significant aspect of the rat's identity to life on the page. These features contribute to the rat's distinct appearance and personality, setting the stage for the next steps in refining your rat illustration. With the head and ears sketched in, you're ready to move forward and continue shaping your charming rat drawing.
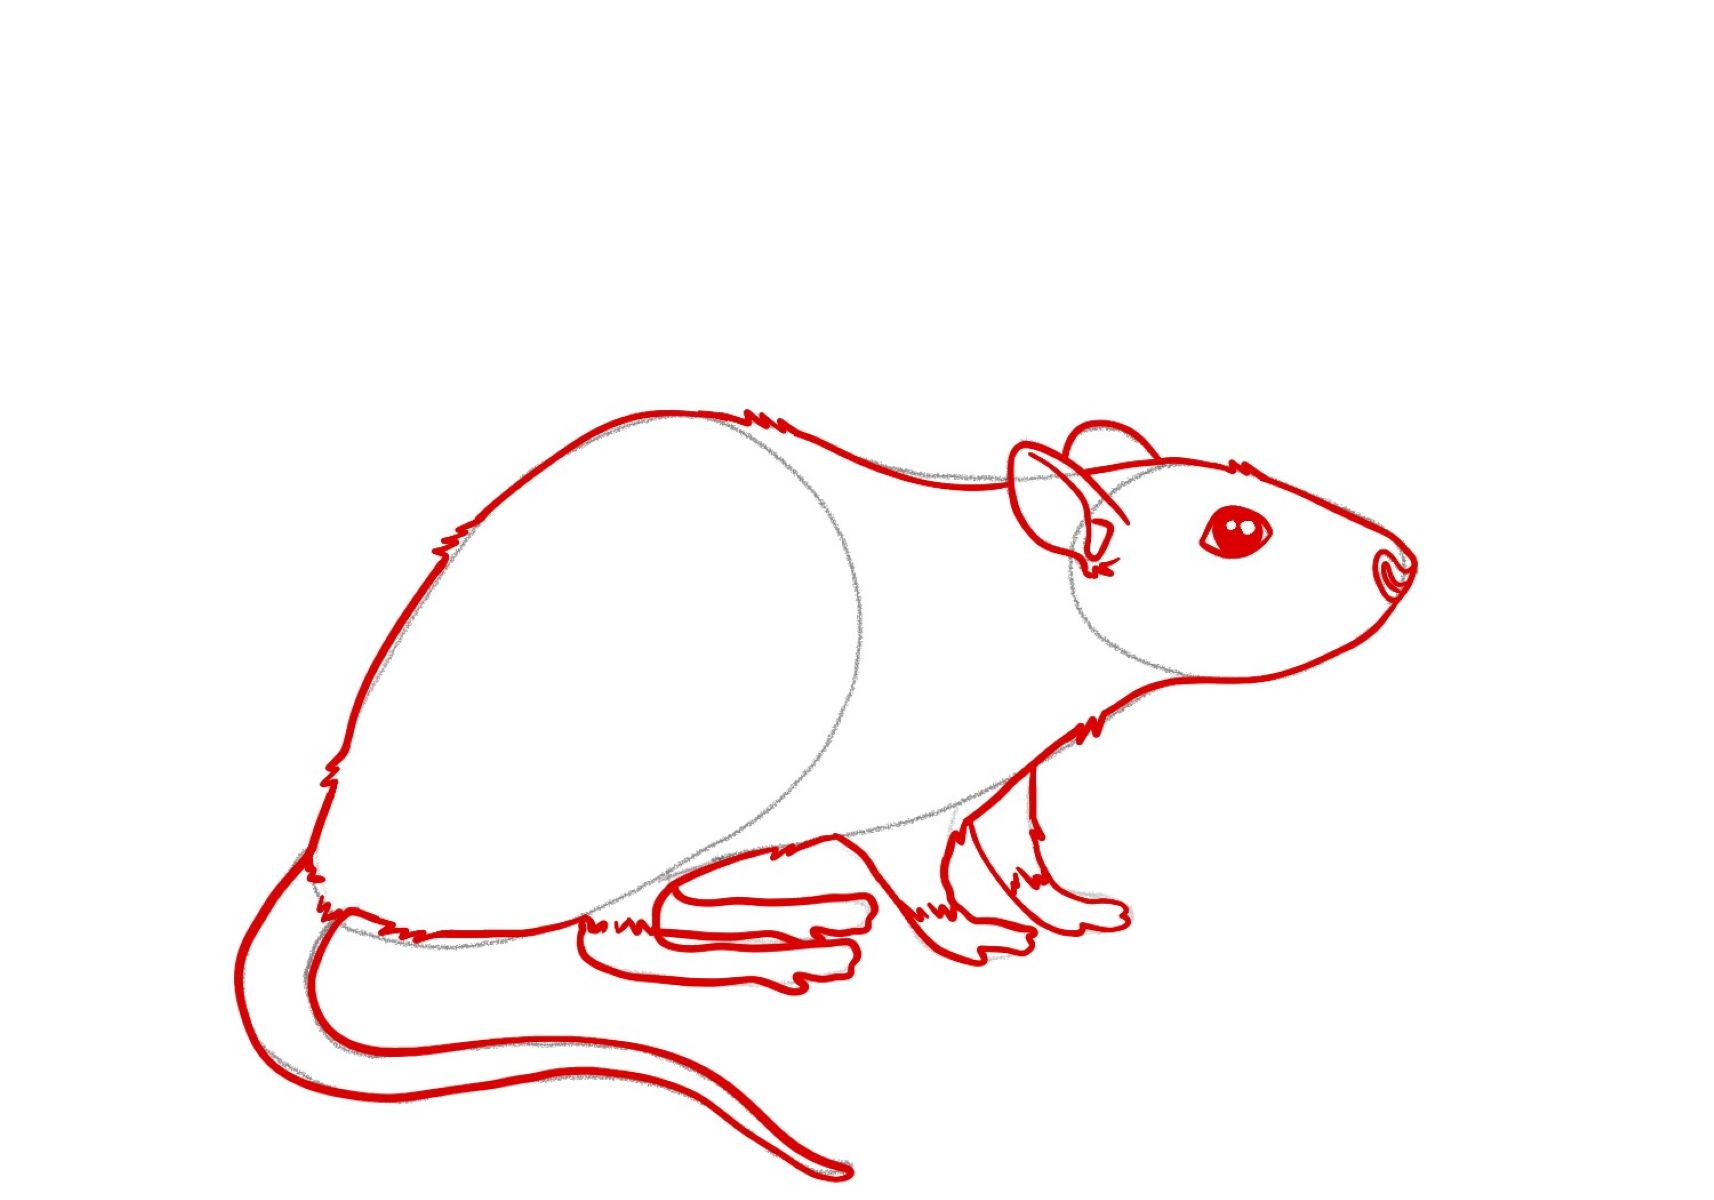
Step 3: Draw the Eyes and Nose
As you continue to bring your rat illustration to life, the next crucial step is to focus on capturing the expressive features of the rat's face: the eyes and nose. These elements play a pivotal role in conveying the rat's personality and adding depth to your drawing.
Begin by visualizing the placement of the rat's eyes. Rats are known for their bright, expressive eyes that exude curiosity and intelligence. To depict this characteristic, sketch two small, circular shapes on the rat's head, positioning them towards the upper part of the head and slightly to the sides. Consider the direction of the gaze and the spacing between the eyes, ensuring a balanced and engaging expression. Adding a small highlight within each eye can infuse them with a lively, animated quality, bringing your rat illustration to life.
Next, shift your focus to the rat's nose, another defining feature that contributes to its endearing appearance. Draw a tiny, rounded triangle shape at the center of the rat's face, slightly below and between the eyes. This shape represents the rat's nose and adds a delightful touch of realism to your illustration. Pay attention to the size and placement of the nose, ensuring that it harmonizes with the overall facial structure and complements the rat's expression.
As you refine the eyes and nose, consider the subtle details that enhance the rat's likeness. Add delicate lines and shading to the eyes to convey depth and expressiveness, capturing the rat's inquisitive nature. Similarly, refine the nose by adding subtle contours and textures, infusing it with a sense of charm and character.
By focusing on the eyes and nose, you're infusing your rat illustration with personality and vitality, capturing the essence of these remarkable creatures. These features contribute to the rat's distinct appearance and endearing qualities, setting the stage for the final steps in completing your charming rat drawing.
With the eyes and nose sketched in, you're ready to proceed to the subsequent steps and continue refining your delightful rat illustration.
Read more: How To Draw A Bike
Step 4: Add the Tail
As we continue to bring our rat illustration to life, the addition of the tail plays a crucial role in capturing the distinctive features of these remarkable creatures. Rats are known for their long, slender tails, which are an integral part of their anatomy and contribute to their agility and balance. By focusing on the tail, we can further enhance the realism and charm of our rat drawing.
To begin, visualize the positioning and curvature of the rat's tail in relation to its body. Rats use their tails for various purposes, including communication, balance, and navigation, making it an essential aspect of their physicality. With a light pencil, sketch a graceful, curved line extending from the hindquarters of the rat's body. The tail should flow naturally from the body, reflecting the rat's agility and poise.
As you refine the tail, consider the subtle details that contribute to its lifelike portrayal. Add gentle curves and contours to capture the natural shape and texture of the tail, infusing it with a sense of fluidity and movement. Rats often use their tails to convey emotions and intentions, so pay attention to the tail's posture and expression, reflecting the rat's demeanor and personality.
Furthermore, consider the length of the tail in proportion to the rat's body, ensuring that it aligns harmoniously with the overall composition. Whether the rat's tail is held aloft in a gesture of curiosity or gracefully trailing behind, its portrayal adds depth and character to the illustration.
As you refine the tail, consider the subtle details that contribute to its lifelike portrayal. Add gentle curves and contours to capture the natural shape and texture of the tail, infusing it with a sense of fluidity and movement. Rats often use their tails to convey emotions and intentions, so pay attention to the tail's posture and expression, reflecting the rat's demeanor and personality.
By adding the tail, we are infusing our rat illustration with a vital element of the rat's identity, capturing its grace and agility. This feature contributes to the rat's distinct appearance and adds a touch of dynamism to the overall composition, bringing our charming rat drawing closer to completion.
With the tail sketched in, we are ready to proceed to the final steps and add the finishing touches to our delightful rat illustration.
Step 5: Add Details and Fur
As we approach the final stage of our rat-drawing journey, adding intricate details and capturing the texture of fur will elevate our illustration to a new level of realism and charm. Rats boast a unique coat of fur that contributes to their endearing appearance, and by focusing on these details, we can bring our rat illustration to life with depth and character.
Begin by visualizing the texture and pattern of the rat's fur. Rats exhibit a range of fur types, from sleek and glossy to soft and fluffy, and capturing this diversity adds authenticity to our illustration. Using a series of short, overlapping lines, gently layer the fur texture across the rat's body, paying attention to the direction of the fur growth. This technique creates a sense of volume and softness, enhancing the tactile quality of the rat's fur.
As you refine the fur texture, consider the interplay of light and shadow on the rat's coat. By adding subtle shading and highlights, you can imbue the fur with depth and dimension, creating a lifelike portrayal. Pay attention to the areas where light would naturally fall and where shadows would form, accentuating the contours of the rat's body and enhancing its three-dimensional presence on the page.
Furthermore, focus on adding intricate details to the rat's features, such as the eyes, nose, and ears. Refine the eyes by adding reflective highlights and subtle shading to convey a sense of liveliness and expression. Add delicate lines and contours to the nose, capturing its texture and charm. Finally, infuse the ears with a sense of depth and dimension by incorporating subtle shading and internal details, bringing them to life with a touch of realism.
As you immerse yourself in the process of adding details and fur to your rat illustration, allow your artistic intuition to guide you. Embrace the opportunity to infuse your drawing with personality and vitality, capturing the essence of these remarkable creatures. With each stroke of the pencil, you are breathing life into your rat illustration, creating a captivating portrayal that celebrates the beauty and charm of these endearing animals.
By focusing on the intricate details and fur texture, we are enriching our rat illustration with a sense of authenticity and allure. These elements contribute to the rat's distinct appearance and add a touch of whimsy to the overall composition, bringing our delightful rat drawing to a satisfying culmination.
Now that we have added the details and fur, our rat illustration stands as a testament to our artistic vision and creative prowess, showcasing the beauty and allure of these remarkable creatures.
Conclusion
In conclusion, the process of drawing a rat has been a delightful journey filled with creativity and artistic expression. From sketching the body and adding the head, ears, eyes, nose, and tail to infusing intricate details and fur texture, each step has contributed to the creation of a charming and lifelike rat illustration. As we reflect on this artistic endeavor, it's evident that capturing the essence of a rat on paper involves a blend of observation, imagination, and attention to detail.
Through this step-by-step guide, we've ventured into the world of rat illustration, exploring the nuances of form, expression, and texture. Drawing a rat is not merely a technical exercise; it's an opportunity to celebrate the unique qualities of these remarkable creatures. From their inquisitive eyes to their graceful tails, rats embody a sense of curiosity and agility that has been translated onto the page through our artistic interpretation.
As we conclude this artistic journey, it's important to recognize the value of patience and creative exploration. Drawing a rat is not about achieving perfection; rather, it's about embracing the process of discovery and self-expression. Each stroke of the pencil has allowed us to breathe life into our rat illustration, infusing it with personality, vitality, and a touch of whimsy.
Furthermore, this creative endeavor serves as a reminder of the beauty and diversity present in the animal kingdom. Rats, often misunderstood and underappreciated, possess a unique charm that has been captured through our artistic portrayal. By immersing ourselves in the intricacies of rat anatomy and behavior, we've gained a deeper appreciation for these fascinating creatures and the role they play in the natural world.
As we bid farewell to this artistic exploration, let our rat illustration stand as a testament to the joy of creativity and the power of artistic expression. Whether you're an experienced artist or a novice enthusiast, the process of drawing a rat has offered a glimpse into the wonders of the natural world and the boundless possibilities of artistic interpretation. May this journey inspire further artistic endeavors and a renewed appreciation for the beauty that surrounds us.
In the end, our rat illustration is not just a drawing; it's a celebration of creativity, curiosity, and the enduring spirit of artistic exploration. With each stroke of the pencil, we've brought a charming rat to life on the page, and in doing so, we've enriched our own artistic journey with a newfound sense of wonder and appreciation for the world around us.