Home>Arts and Culture>How To Draw A Sphere
Arts and Culture
How To Draw A Sphere
Published: March 5, 2024
Learn how to draw a realistic sphere with step-by-step instructions. Enhance your arts and culture skills with this easy tutorial.
(Many of the links in this article redirect to a specific reviewed product. Your purchase of these products through affiliate links helps to generate commission for Regretless.com, at no extra cost. Learn more)
Table of Contents
Introduction
Drawing a sphere may seem like a daunting task, but with the right techniques and a bit of practice, it can become an enjoyable and rewarding artistic endeavor. The ability to depict a three-dimensional sphere on a two-dimensional surface is a fundamental skill for artists, whether they specialize in realism, illustration, or even animation. By mastering the art of drawing a sphere, you can gain a deeper understanding of light, shadow, and form, which are essential elements in creating compelling artwork.
In this comprehensive guide, we will explore the step-by-step process of drawing a realistic sphere, complete with shading and highlights. Whether you are a seasoned artist looking to refine your skills or a beginner eager to learn the basics of drawing, this tutorial will provide you with valuable insights and practical techniques to bring your sphere to life on paper.
Through this journey, you will discover the importance of observation and how to translate what you see into a convincing representation. We will delve into the materials needed, the initial steps of drawing a circle, and the intricate process of adding shading and highlights to infuse depth and dimension into your sphere. Additionally, we will explore the final touches that can elevate your drawing from a simple outline to a captivating and realistic portrayal of a spherical object.
By the end of this tutorial, you will have gained a newfound appreciation for the art of drawing spheres and developed the skills to create stunning renditions that showcase your artistic prowess. So, grab your drawing tools and let's embark on this creative journey to master the art of drawing a sphere.
Read more: How To Draw Bowser
Materials Needed
To embark on the artistic endeavor of drawing a realistic sphere, you will need a selection of essential materials that will aid in bringing your creation to life. These materials are not only practical but also play a crucial role in honing your artistic skills and understanding of light and form. Here's a comprehensive list of the materials you will require:
-
Drawing Paper: Select a smooth, heavyweight paper that is suitable for pencil and shading techniques. The paper should have enough tooth to hold multiple layers of graphite or charcoal, allowing you to achieve rich tonal values and smooth blending.
-
Drawing Pencils: Invest in a range of graphite pencils, including H, HB, B, and 2B, to facilitate the creation of varied tones and textures. These pencils will enable you to achieve precise lines, subtle shading, and bold contrasts, essential for rendering the spherical form convincingly.
-
Blending Stumps or Tortillons: These cylindrical tools are invaluable for blending and smudging graphite or charcoal, enabling seamless transitions between light and shadow on your sphere.
-
Kneaded Eraser: A kneaded eraser is a versatile tool that can be molded into various shapes to lift graphite or charcoal from the paper, create highlights, and soften edges, allowing for precise control over the drawing process.
-
Light Source: Ensure you have a consistent and adjustable light source, such as a desk lamp, to observe the interplay of light and shadow on your reference sphere or object. Adequate lighting is essential for accurate observation and interpretation of form.
-
Reference Sphere or Object: Having a physical sphere or object to observe and study the interaction of light and shadow will greatly enhance your understanding of form and help you capture realistic details in your drawing.
-
Drawing Board or Surface: A sturdy drawing board or surface provides a stable foundation for your artwork and allows for comfortable and controlled drawing movements.
-
Optional: Charcoal Pencils or Sticks: If you prefer working with charcoal, consider including charcoal pencils or sticks in your materials. Charcoal offers rich, deep blacks and can be smudged for dramatic, expressive effects.
By gathering these materials, you will be well-equipped to embark on the journey of drawing a sphere with confidence and precision. Each item serves a specific purpose in the artistic process, contributing to the development of your skills and the creation of a compelling and lifelike representation of a spherical form. Now that we have assembled our materials, let's delve into the step-by-step process of bringing our sphere to life on paper.
Step 1: Draw a Circle
The first step in drawing a realistic sphere is to establish the foundation by creating a perfectly proportioned circle. This initial outline will serve as the framework upon which the three-dimensional form of the sphere will be constructed. To begin, select a suitable drawing pencil, such as an HB or 2B, and ensure that your drawing paper is securely positioned on a stable surface.
Start by lightly sketching a precise circle using gentle, fluid motions. It's important to maintain a light touch at this stage, as the initial circle serves as a guide and may require adjustments as you progress. If needed, you can utilize a compass or a circular template to achieve a symmetrical and well-defined circle.
As you draw the circle, focus on achieving smooth and even lines, paying close attention to the curvature and overall shape. Take your time to refine the circle, ensuring that it is free from any irregularities or distortions. Remember, precision in this foundational step will contribute to the overall realism and accuracy of your sphere.
Once the initial circle is in place, take a moment to evaluate its proportions and make any necessary adjustments. Observing the circle from different angles and distances can provide valuable insights into its symmetry and overall appearance. Refining the circle at this stage will set the stage for the subsequent steps of adding shading and highlights to transform it into a convincing sphere.
With the circle sketched and refined, you have successfully laid the groundwork for the creation of a realistic sphere. The precision and attention to detail invested in drawing the circle will serve as the building blocks for the subsequent stages of shading, adding highlights, and infusing depth into your sphere. Now that the foundation is established, we can proceed to the next crucial steps in bringing our sphere to life on paper.
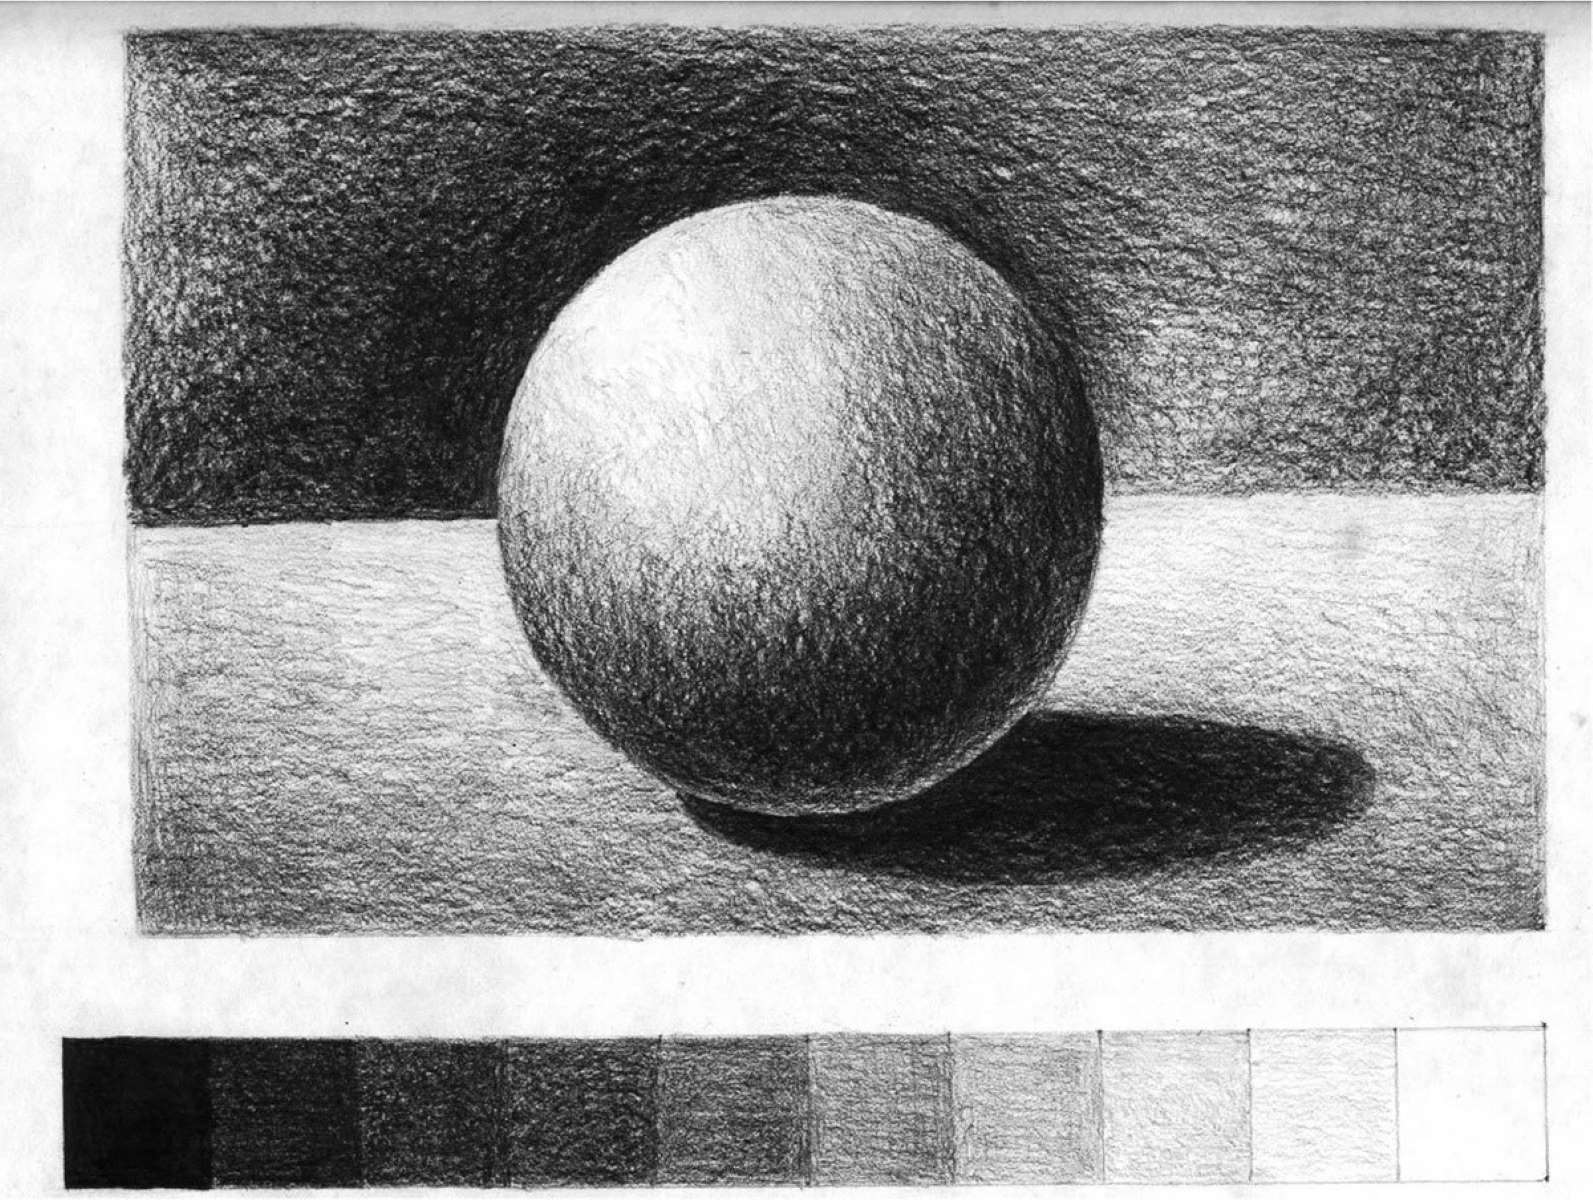
Step 2: Add Shading
With the foundational circle in place, the next pivotal step in the process of drawing a realistic sphere is to add shading. Shading plays a fundamental role in creating the illusion of depth, volume, and form, transforming a flat circle into a three-dimensional representation of a spherical object. This step involves the careful observation of light and shadow, as well as the gradual buildup of tonal values to convey the spherical form convincingly.
Begin by identifying the primary light source in your composition. Understanding the direction and intensity of the light will inform the placement of shadows and highlights on the sphere. With a well-defined light source, you can envision how the light interacts with the spherical surface, creating areas of illumination and shadow.
Using a soft graphite pencil, such as a 2B or 4B, start by lightly shading the area of the sphere that is opposite to the primary light source. This region, known as the core shadow, represents the darkest part of the sphere where the light is obstructed. Gradually build up the shading, paying attention to the gradual transition from the core shadow to the mid-tones and eventually the illuminated areas.
As you add shading, consider the curvature of the sphere and the way light wraps around its form. The transition from shadow to light should be smooth and gradual, capturing the subtle shifts in tonal values. Utilize hatching, cross-hatching, or stippling techniques to create depth and texture, ensuring that the shading follows the contours of the circle, reinforcing the illusion of a spherical shape.
To refine the shading and enhance the sense of volume, use blending stumps or tortillons to gently smudge and blend the graphite, softening harsh lines and creating seamless transitions between light and shadow. This blending process contributes to the realism of the sphere, simulating the smooth gradation of light on a curved surface.
Throughout the shading process, continually reference your light source and observe how it influences the distribution of light and shadow on the sphere. By carefully studying the interplay of light and form, you can refine the shading to capture the nuanced variations in tonal values, bringing depth and dimension to your drawing.
As you progress through the shading stage, remember that patience and attention to detail are key. The gradual buildup of tonal values and the meticulous observation of light and shadow will culminate in a compelling and lifelike representation of a spherical form. With shading skillfully applied, the sphere begins to emerge from the page, exuding a sense of realism and presence.
The addition of shading marks a significant milestone in the transformation of a simple circle into a convincing sphere. The careful consideration of light and form, coupled with the precise application of shading techniques, sets the stage for the subsequent step of adding highlights to further enhance the three-dimensional illusion. With the shading process complete, our sphere is well on its way to becoming a captivating and realistic artistic creation.
Step 3: Add Highlights
As we continue our journey of bringing a realistic sphere to life on paper, the addition of highlights marks a pivotal stage in enhancing the three-dimensional illusion and capturing the reflective properties of the spherical surface. Highlights play a crucial role in conveying the interaction of light with the form, infusing the sphere with a sense of luminosity and depth. By strategically placing highlights, we can elevate our drawing from a mere representation to a captivating portrayal of a spherical object.
To commence the process of adding highlights, it is essential to revisit the established light source in our composition. By understanding the direction and intensity of the light, we can identify the areas of the sphere that would be most prominently illuminated. These regions, often referred to as the highlight areas, are where the light directly interacts with the spherical surface, creating points of heightened luminosity and contrast.
Armed with this knowledge, select a kneaded eraser as your tool for adding highlights. The malleable nature of the kneaded eraser allows for precise shaping and manipulation, enabling you to sculpt and refine the highlights with a delicate touch. Begin by gently lifting graphite from the highlight areas, gradually revealing the lighter tones of the paper beneath. This process creates a stark contrast between the illuminated regions and the surrounding shaded areas, accentuating the spherical form and enhancing the sense of volume.
As you carefully sculpt the highlights, consider the curvature of the sphere and the manner in which light interacts with its surface. The placement of highlights should align with the form of the sphere, following the contours and emphasizing the reflective properties of the imagined surface. By observing real-life spherical objects and studying how light interacts with them, you can gain valuable insights into the nuanced distribution of highlights and their impact on the overall realism of the drawing.
Refine the highlights with precision, ensuring that they complement the shading and contribute to the cohesive portrayal of the spherical form. The interplay of highlights and shadows creates a dynamic visual contrast, evoking a sense of depth and dimension that breathes life into the drawing. Through the strategic application of highlights, the sphere begins to exude a captivating luminosity, inviting the viewer to marvel at its realistic portrayal.
With the addition of highlights, our sphere transcends the confines of a two-dimensional surface, embracing the illusion of depth and luminosity. The careful orchestration of light and form, coupled with the deliberate placement of highlights, culminates in a drawing that captivates the imagination and showcases the artist's mastery of depicting spherical objects. As we conclude the process of adding highlights, our sphere stands as a testament to the transformative power of light and the artist's ability to capture its radiance on paper.
Read more: How To Draw A Bike
Step 4: Final Touches
With the foundational elements of the sphere meticulously rendered through the steps of drawing a circle, adding shading, and incorporating highlights, the stage is set for the final touches that will elevate the drawing to its full potential. This pivotal phase involves refining details, enhancing contrasts, and ensuring a cohesive integration of all elements to achieve a compelling and realistic portrayal of a spherical form.
As we approach the final touches, it is essential to conduct a comprehensive assessment of the drawing, scrutinizing the interplay of light and shadow, the symmetry of the sphere, and the overall visual impact. This critical evaluation allows for the identification of areas that may require refinement or adjustment, ensuring that the sphere exudes a sense of balance and harmony.
One aspect of the final touches involves refining the transitions between light and shadow, ensuring that the tonal gradations are seamless and convey a sense of volume and depth. By delicately adjusting the shading and highlights, the spherical form can be further accentuated, enhancing its three-dimensional presence on the paper.
Additionally, attention to detail in capturing subtle variations in texture and surface characteristics contributes to the overall realism of the sphere. Whether it's a glossy sheen, a matte surface, or subtle imperfections, infusing these nuanced details adds depth and authenticity to the portrayal, inviting the viewer to engage with the drawing on a deeper level.
Refinement of the edges and contours of the sphere further refines its form, ensuring that the transitions between the curved surface and the surrounding space are well-defined and visually compelling. This meticulous attention to the delineation of the sphere's boundaries reinforces its solidity and presence, anchoring it within the composition with confidence.
Furthermore, the final touches encompass the evaluation and adjustment of tonal contrasts, ensuring that the interplay of light and shadow creates a dynamic and captivating visual impact. By fine-tuning the tonal values and contrasts, the sphere can exude a heightened sense of realism, drawing the viewer into its captivating illusion of form and luminosity.
As the final touches are meticulously applied, the sphere undergoes a transformation, transcending its initial representation to become a captivating and lifelike portrayal of a three-dimensional object. The culmination of precision, attention to detail, and artistic finesse results in a drawing that captivates the imagination and showcases the artist's mastery in capturing the essence of a spherical form.
In the realm of art, the final touches serve as the culmination of the artist's vision and skill, breathing life into the creation and imbuing it with a sense of authenticity and presence. With the completion of the final touches, our journey of drawing a sphere comes to fruition, yielding a masterpiece that stands as a testament to the artist's ability to translate observation and technique into a compelling work of art.
Conclusion
In the realm of art, the process of drawing a sphere transcends the mere depiction of a geometric form; it embodies a profound exploration of light, shadow, form, and artistic expression. Through the meticulous steps of drawing a circle, adding shading, incorporating highlights, and applying final touches, we have embarked on a transformative journey that has culminated in the creation of a captivating and realistic portrayal of a spherical object.
Drawing a sphere serves as a testament to an artist's ability to observe, interpret, and translate the complexities of three-dimensional form onto a two-dimensional surface. It requires a keen understanding of light behavior, a discerning eye for subtle nuances, and a mastery of shading and rendering techniques. The process of bringing a sphere to life on paper is a testament to the artist's dedication to honing their craft and capturing the essence of realism.
As we reflect on the journey of drawing a sphere, we recognize the significance of patience, precision, and artistic intuition. Each step, from the initial sketch of the circle to the delicate sculpting of highlights, has contributed to the creation of a drawing that not only captures the physical attributes of a sphere but also evokes a sense of wonder and fascination.
Furthermore, the process of drawing a sphere serves as a foundational exercise for artists across various disciplines, from traditional drawing and painting to digital art and animation. The skills honed in this endeavor, such as understanding light sources, creating convincing forms, and mastering tonal values, are invaluable assets that extend beyond the sphere itself, enriching an artist's repertoire and enhancing their ability to depict a wide range of subjects with depth and realism.
In conclusion, the journey of drawing a sphere is a testament to the artist's unwavering commitment to excellence, their reverence for the interplay of light and form, and their ability to breathe life into a seemingly simple geometric shape. It is a celebration of artistry, observation, and the transformative power of creativity. As we conclude this tutorial, we carry with us a newfound appreciation for the intricacies of rendering a sphere and the boundless potential for artistic expression it represents.