Sports
How To Regrip Golf Clubs
Published: March 4, 2024
Learn how to regrip golf clubs and improve your game with our step-by-step guide. Get expert tips and advice on regripping your golf clubs. Perfect for sports enthusiasts!
(Many of the links in this article redirect to a specific reviewed product. Your purchase of these products through affiliate links helps to generate commission for Regretless.com, at no extra cost. Learn more)
Table of Contents
Introduction
Regripping your golf clubs is an essential aspect of maintaining your equipment and ensuring optimal performance on the course. Over time, the grips on your clubs can wear down, affecting your ability to maintain a secure hold and execute precise shots. By learning how to regrip your golf clubs, you can not only save money on professional regripping services but also customize the feel and performance of your clubs to better suit your playing style.
In this comprehensive guide, we will walk you through the step-by-step process of regripping your golf clubs, providing valuable insights and tips to help you achieve professional-quality results. Whether you are a seasoned golfer or a beginner looking to take ownership of your equipment maintenance, mastering the art of regripping will empower you to keep your clubs in top condition and elevate your game on the fairways.
By following the instructions outlined in this guide, you will gain a deeper understanding of the regripping process and develop the confidence to tackle this essential task with precision and efficiency. From gathering the necessary materials to properly installing new grips and allowing them to set, each step plays a crucial role in ensuring that your regripped clubs feel comfortable and reliable in your hands.
As you embark on this regripping journey, remember that attention to detail and patience are key virtues. By investing the time and effort to regrip your golf clubs with care, you can enjoy the rewarding experience of revitalizing your equipment and setting the stage for improved performance on the golf course. So, let's dive into the process and equip ourselves with the knowledge and skills to regrip golf clubs like seasoned professionals.
Read more: How To Throw A Frisbee Golf Disc
Step 1: Gather Necessary Materials
Before diving into the regripping process, it's crucial to gather all the essential materials to ensure a smooth and efficient experience. Here's a comprehensive list of the necessary items you'll need:
-
New Grips: Select high-quality golf grips that suit your preferences in terms of size, texture, and feel. Grips come in various materials, such as rubber, cord, or synthetic compounds, so choose ones that align with your playing style and comfort.
-
Grip Tape: This double-sided adhesive tape is used to secure the new grips onto the club shafts. Opt for grip tape specifically designed for golf club regripping to ensure a secure and durable bond.
-
Grip Solvent: A specialized grip solvent is essential for lubricating the grip tape and allowing for easy installation of the new grips. It also facilitates proper alignment and ensures a strong, lasting bond between the grips and the club shafts.
-
Utility Knife or Grip Remover: You'll need a utility knife or a dedicated grip remover tool to safely and effectively remove the old grips from the club shafts. Carefully cutting and peeling off the old grips without damaging the shafts is crucial for a successful regripping process.
-
Grip Clamp: A grip clamp, also known as a vise clamp, is used to hold the club securely in place during the regripping process. This tool provides stability and allows for precise application of the new grips and grip tape.
-
Clean Cloth: Keep a clean, lint-free cloth on hand to wipe down the club shafts and ensure they are free from any residue or debris before installing the new grips.
-
Bucket or Bowl: Prepare a bucket or bowl filled with grip solvent for soaking the grip tape and lubricating the inside of the new grips during installation.
-
Ventilation: Since grip solvent can emit strong fumes, ensure you have proper ventilation in the regripping area to minimize exposure to the solvent's odor.
By gathering these essential materials, you'll be well-prepared to embark on the regripping journey with confidence and efficiency. Having everything within reach will streamline the process and contribute to the successful revitalization of your golf clubs.
Step 2: Remove Old Grips
Removing the old grips from your golf clubs is a crucial step in the regripping process, and it requires precision and care to avoid damaging the club shafts. Whether the grips are worn, slick, or simply no longer suit your preferences, effectively removing them sets the stage for revitalizing your clubs with new, high-performance grips.
To begin, secure the club in a vise clamp to provide stability and facilitate a controlled grip removal process. With the club firmly held in place, use a utility knife or a dedicated grip remover tool to carefully cut through the old grip along its length. Exercise caution to avoid cutting into the shaft beneath the grip, as this could compromise the structural integrity of the club.
Once the initial incision is made, gently peel back the old grip, taking care to avoid any excessive force that could potentially damage the shaft's finish. If the grip proves stubborn or resistant, applying a small amount of grip solvent beneath the grip can help loosen its adhesive bond, making it easier to remove.
As you continue peeling away the old grip, be mindful of any adhesive residue left on the shaft. Use a clean cloth dampened with grip solvent to wipe away any remaining adhesive, ensuring that the shaft surface is clean and free from any lingering residue. This meticulous cleaning process sets the stage for a smooth and secure bond when installing the new grips.
Once the old grip and adhesive residue are completely removed, take a moment to inspect the club shaft for any signs of wear or damage. This is an opportune time to assess the condition of the shaft and address any concerns before proceeding with the regripping process.
By methodically removing the old grips with precision and attention to detail, you pave the way for a seamless transition to the next phase of regripping. With the club shafts now free from their worn grips and meticulously cleaned, you are ready to embark on the subsequent steps, bringing new life and enhanced performance to your golf clubs.
Step 3: Clean Club Shafts
After successfully removing the old grips and ensuring that the club shafts are free from any adhesive residue, the next critical step in the regripping process is to thoroughly clean the club shafts. This meticulous cleaning not only promotes a strong and secure bond between the shafts and the new grips but also contributes to the overall aesthetics and feel of the revitalized clubs.
Begin the cleaning process by inspecting the club shafts under adequate lighting to identify any lingering debris, oils, or contaminants that may have accumulated over time. Even seemingly minor blemishes or residues can hinder the adhesion of the new grips, making it essential to achieve a pristine surface for optimal regripping results.
Using a clean, lint-free cloth and a mild solvent, such as isopropyl alcohol, carefully wipe down the entire length of each club shaft. This gentle yet thorough cleaning action effectively removes any remaining traces of adhesive solvent, oils, or dirt, ensuring that the shafts are impeccably clean and ready to receive the new grips.
In addition to the external cleaning, it's equally important to address the interior of the club shafts, particularly if any grip solvent or residue has seeped inside during the previous steps. To accomplish this, utilize a specialized shaft cleaning brush or a clean cloth wrapped around a narrow, flexible tool to reach inside the shaft and remove any internal contaminants.
As you meticulously clean the club shafts, take the opportunity to inspect them for any signs of wear, corrosion, or damage. Any imperfections or irregularities should be addressed before proceeding with the regripping process, as they can impact the performance and longevity of the new grips.
By dedicating time and attention to thoroughly clean the club shafts, you set the stage for a successful regripping experience, ensuring that the new grips adhere securely and seamlessly to the revitalized clubs. This meticulous cleaning process not only enhances the visual appeal of the clubs but also contributes to their overall performance and longevity, underscoring the importance of this often overlooked yet essential step in regripping golf clubs.
Step 4: Apply Grip Tape
With the club shafts meticulously cleaned and prepared, the next pivotal step in the regripping process involves the precise application of grip tape. This double-sided adhesive tape serves as the foundation for securing the new grips onto the club shafts, providing a stable and durable bond that enhances the overall feel and performance of the clubs.
Begin by selecting the appropriate width of grip tape that matches the diameter of the club shafts. Cut the grip tape into strips of suitable length, ensuring that each strip fully covers the area where the grip will be installed. Opting for high-quality grip tape designed specifically for golf club regripping is essential, as it offers superior adhesion and durability, contributing to the longevity of the regripped clubs.
Carefully peel off the backing from one side of the grip tape, exposing the adhesive surface. Align the edge of the grip tape with the top of the club shaft and gradually wrap it around the shaft in a spiral motion, ensuring a smooth and even application. As you progress, gently press the grip tape against the shaft to secure it in place, smoothing out any wrinkles or air bubbles to achieve a seamless bond.
Continue wrapping the grip tape around the shaft until you reach the bottom, ensuring that the entire area where the grip will be installed is uniformly covered. Once the first strip of grip tape is applied, repeat the process for the remaining club shafts, maintaining consistent tension and alignment to achieve uniform coverage and optimal adhesion.
As you complete the application of grip tape on each club shaft, take a moment to inspect the wraps for any irregularities or gaps. Address any areas that may require additional tape to ensure comprehensive coverage and a secure foundation for the new grips. This meticulous attention to detail during the grip tape application sets the stage for a successful and enduring bond between the shafts and the new grips.
By skillfully applying grip tape with precision and care, you establish a reliable and robust base for the subsequent installation of the new grips. This foundational step plays a pivotal role in ensuring that the regripped clubs deliver enhanced comfort, control, and performance on the golf course, underscoring the significance of this essential phase in the regripping process.
Read more: How To Increase Golf Swing Speed
Step 5: Apply Grip Solvent
Applying grip solvent is a critical step in the regripping process, as it facilitates the seamless installation of the new grips onto the club shafts while ensuring a secure and enduring bond. Grip solvent serves multiple essential functions, including lubricating the grip tape, allowing for proper alignment of the grips, and ultimately enabling a strong and reliable connection between the grips and the club shafts.
To begin, prepare a bucket or bowl filled with grip solvent, ensuring that it is adequate for soaking the grip tape and lubricating the inside of the new grips during installation. The solvent's lubricating properties play a pivotal role in easing the process of sliding the grips onto the club shafts, minimizing resistance and allowing for precise positioning.
With the grip solvent at the ready, carefully pour a small amount inside each new grip, ensuring that the interior surface is thoroughly coated. This step is crucial for preparing the grips to effortlessly slide onto the club shafts, as the lubricated interior reduces friction and facilitates a smooth, snug fit.
Next, dip the end of the club shaft into the bucket or bowl of grip solvent, allowing the grip tape to become thoroughly saturated. This soaking action serves to activate the adhesive properties of the grip tape, ensuring that it forms a robust and enduring bond with the inside of the new grip.
As the club shaft is withdrawn from the grip solvent, the lubricated grip tape is now primed for the seamless installation of the new grip. With the grip tape and shaft adequately lubricated, carefully slide the new grip onto the club shaft, ensuring that it aligns with the desired orientation and positioning.
As the grip is maneuvered onto the shaft, the lubricated surfaces enable effortless adjustment and alignment, ensuring that the grip is securely and precisely positioned. This process is pivotal for achieving a consistent and comfortable feel across all regripped clubs, enhancing the overall cohesion and performance of the set.
By skillfully applying grip solvent to facilitate the installation of the new grips, you ensure that the regripped clubs boast a secure, uniform, and enduring connection between the grips and the club shafts. This meticulous process sets the stage for a professional-quality regripping outcome, underscoring the significance of applying grip solvent with precision and care.
Step 6: Install New Grips
With the club shafts meticulously prepared and the grip tape and solvent in place, the pivotal moment arrives to install the new grips onto the golf clubs. This step demands precision, patience, and attention to detail to ensure that the grips are securely and uniformly positioned, setting the stage for enhanced comfort and performance on the course.
Begin by selecting the first new grip and carefully aligning it with the club shaft, ensuring that it sits flush and straight. With the lubricated interior of the grip and the saturated grip tape facilitating smooth maneuverability, gently slide the grip onto the shaft, maintaining consistent pressure to achieve a snug and secure fit. As the grip progresses along the shaft, monitor its alignment and positioning, making any necessary adjustments to ensure that it aligns with the desired orientation.
Once the grip is fully installed, take a moment to assess its placement and uniformity, ensuring that it sits evenly and securely on the club shaft. Repeat this meticulous process for each remaining club, maintaining a consistent approach to achieve uniformity and cohesion across the entire set.
As the final grip is installed, take a moment to inspect the entire set of regripped clubs, ensuring that each grip is uniformly positioned and securely bonded to the shaft. This comprehensive assessment underscores the importance of meticulous installation, as it directly impacts the comfort, control, and performance offered by the regripped clubs.
By skillfully installing the new grips with precision and care, you ensure that each club is revitalized with a secure, comfortable, and enduring grip, tailored to your preferences and playing style. This transformative step marks the culmination of the regripping process, setting the stage for a revitalized and personalized set of golf clubs ready to elevate your performance and enjoyment on the fairways.
Step 7: Let Grips Dry
After successfully installing the new grips onto your golf clubs, the final step in the regripping process involves allowing the grips to thoroughly dry and set in place. This crucial phase is essential for ensuring that the grips form a secure and enduring bond with the club shafts, setting the stage for optimal performance and comfort during your future rounds of golf.
As the newly installed grips are saturated with grip solvent, it is imperative to allow sufficient time for the solvent to evaporate and the grips to securely adhere to the club shafts. This drying period is essential for achieving a stable and reliable connection, preventing any slippage or movement of the grips during use.
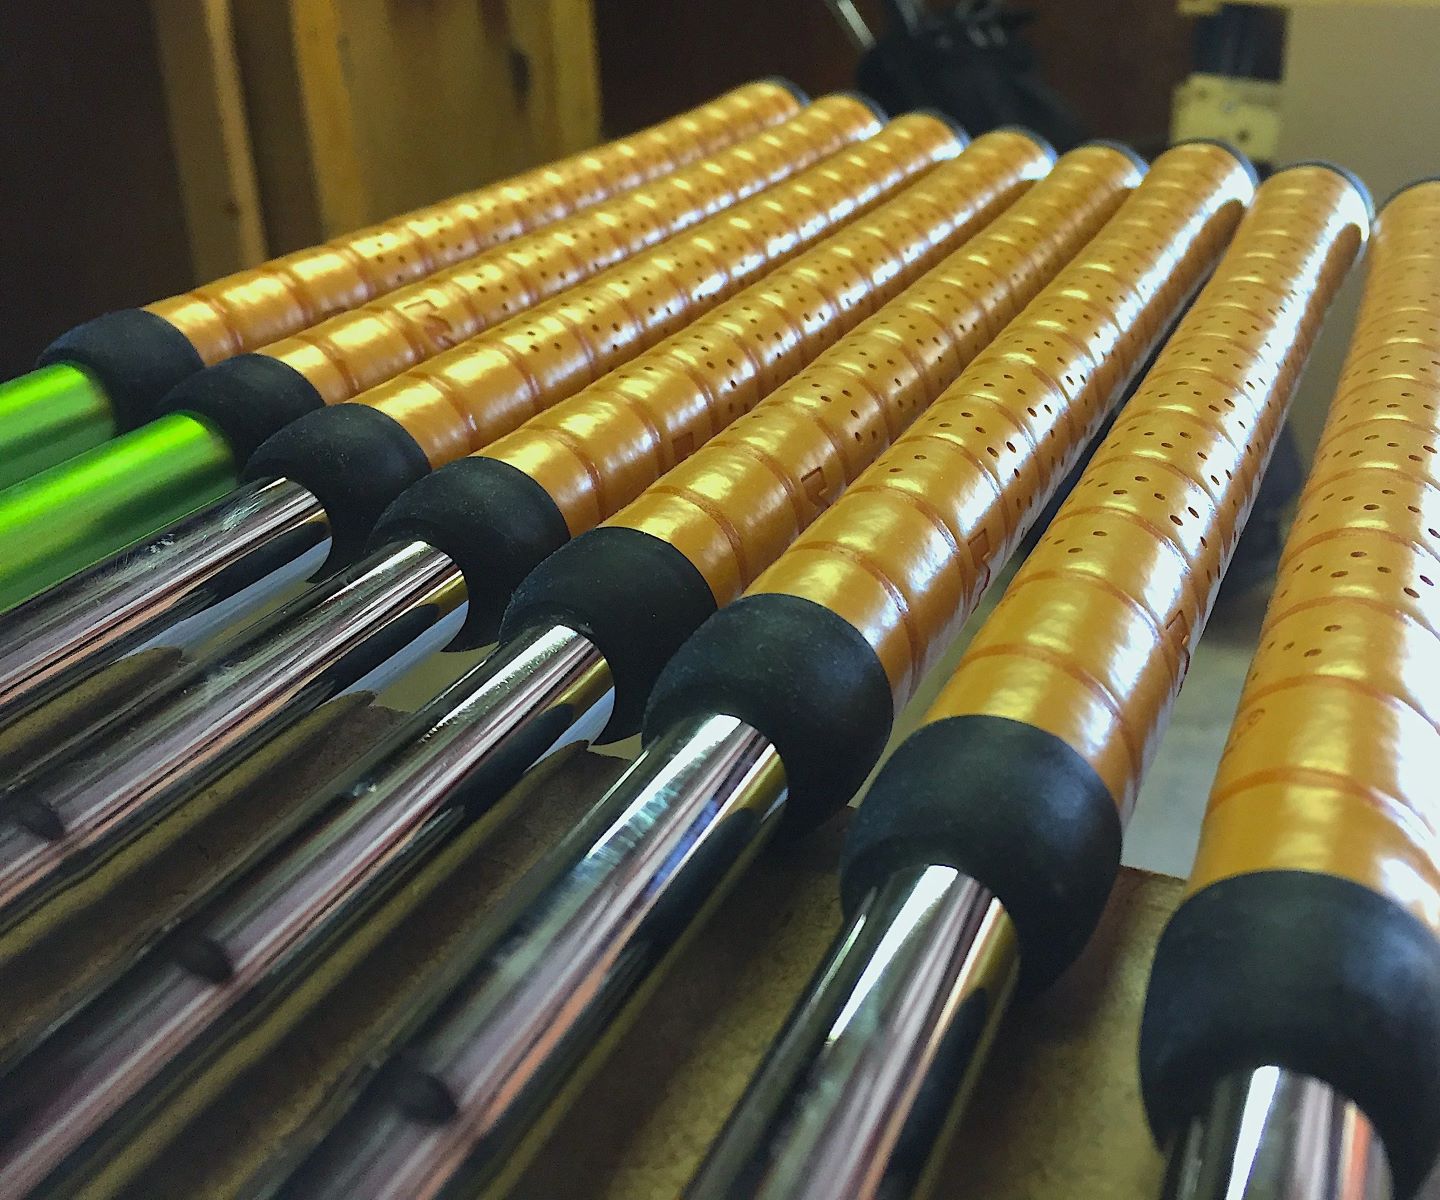
To facilitate the drying process, it is advisable to position the regripped clubs in a well-ventilated area, allowing for adequate air circulation to promote the evaporation of the grip solvent. Placing the clubs in a horizontal position, such as on a rack or stand, ensures that the grips remain level and undisturbed as they dry, contributing to a uniform and consistent bond across all the clubs.
The duration of the drying period may vary depending on factors such as ambient temperature, humidity levels, and the specific grip solvent used. As a general guideline, allowing the grips to dry for at least 24 hours is recommended to ensure that the solvent has fully evaporated, and the grips have firmly adhered to the club shafts.
During this waiting period, it is important to resist the temptation to use the regripped clubs prematurely, as doing so could compromise the integrity of the bond between the grips and the shafts. Patience is key during this phase, as allowing the grips to thoroughly dry and set ensures that they are primed for reliable and consistent performance on the golf course.
As the drying period elapses, take the opportunity to inspect the regripped clubs, ensuring that the grips exhibit no signs of slippage or movement. This visual assessment provides reassurance that the grips have securely adhered to the club shafts, setting the stage for a seamless transition back into your golfing routine.
By allowing the grips to thoroughly dry and set, you ensure that the regripped clubs are primed for optimal performance and comfort, reflecting the meticulous care and attention to detail invested in the regripping process. This final phase marks the culmination of your efforts, heralding the arrival of a revitalized and personalized set of golf clubs ready to accompany you on your future golfing endeavors.
Conclusion
In conclusion, mastering the art of regripping golf clubs empowers golfers to take ownership of their equipment maintenance and elevate their performance on the fairways. By following the comprehensive steps outlined in this guide, golfers can confidently embark on the regripping journey, revitalizing their clubs with precision and care.
The process begins with gathering the necessary materials, including new grips, grip tape, grip solvent, and essential tools, ensuring that every aspect of the regripping process is meticulously prepared. Removing the old grips with precision and cleaning the club shafts thoroughly set the stage for the seamless installation of the new grips, promoting a secure and enduring bond.
Applying grip tape and solvent with precision and care facilitates the installation of the new grips, ensuring that they are uniformly positioned and securely bonded to the club shafts. This foundational step plays a pivotal role in enhancing the overall feel and performance of the regripped clubs, reflecting the dedication to achieving professional-quality results.
Allowing the grips to thoroughly dry and set marks the culmination of the regripping process, underscoring the importance of patience and attention to detail. This final phase ensures that the regripped clubs are primed for optimal performance and comfort, reflecting the meticulous care invested in the regripping process.
In essence, regripping golf clubs is not merely a maintenance task but a transformative experience that allows golfers to customize the feel and performance of their equipment. By mastering this essential skill, golfers can breathe new life into their clubs, setting the stage for enhanced confidence and enjoyment on the golf course.
As golfers embrace the regripping process, they gain a deeper appreciation for the intricacies of their equipment and the impact it has on their game. The revitalized clubs, tailored to their preferences and playing style, become trusted companions on the fairways, reflecting the dedication and craftsmanship invested in their maintenance.
Ultimately, regripping golf clubs transcends the realm of maintenance, evolving into a journey of personalization and empowerment. By honing this skill, golfers not only enhance the longevity and performance of their equipment but also cultivate a deeper connection with the tools of their trade, fostering a sense of pride and ownership in their golfing endeavors.