Home>Technology and Computers>Unveiling The Secrets: Testing Fluorescent Light Ballast With A Multimeter!
Technology and Computers
Unveiling The Secrets: Testing Fluorescent Light Ballast With A Multimeter!
Published: February 15, 2024
Learn how to test fluorescent light ballast using a multimeter. Discover the technology and computer skills needed to unveil the secrets of this essential electrical component.
(Many of the links in this article redirect to a specific reviewed product. Your purchase of these products through affiliate links helps to generate commission for Regretless.com, at no extra cost. Learn more)
Table of Contents
Introduction
Fluorescent light ballasts are crucial components in the operation of fluorescent lights, responsible for regulating the electrical current that passes through the bulbs. A malfunctioning ballast can lead to flickering lights, buzzing sounds, or even complete failure of the lighting system. However, diagnosing issues with a fluorescent light ballast can be challenging without the right tools and knowledge.
In this comprehensive guide, we will delve into the intricacies of testing fluorescent light ballasts using a multimeter. By understanding the fundamentals of ballasts and learning how to effectively utilize a multimeter, you can troubleshoot and identify potential issues with these essential components. Whether you are a DIY enthusiast or a professional electrician, mastering the art of testing fluorescent light ballasts can save time, money, and hassle in the long run.
Join us as we demystify the process of testing fluorescent light ballasts, empowering you to tackle lighting issues with confidence and precision. Let's embark on this enlightening journey to unravel the secrets of fluorescent light ballast testing with a multimeter!
Understanding Fluorescent Light Ballasts
Fluorescent light ballasts serve as the backbone of fluorescent lighting systems, playing a pivotal role in regulating the flow of electrical current to the bulbs. These essential components are designed to provide the initial surge of power required to ignite the gas within the fluorescent tubes and then maintain a steady current to keep the lights illuminated.
There are two main types of fluorescent light ballasts: magnetic and electronic. Magnetic ballasts, the traditional choice, rely on inductive coils to regulate the electrical current. While these ballasts have been widely used for decades, they are gradually being replaced by electronic ballasts, which offer greater energy efficiency and reduced flickering.
Understanding the key functions of a fluorescent light ballast is crucial for troubleshooting and maintenance. The ballast serves multiple purposes, including limiting the electrical current to prevent the tubes from overheating, providing the initial voltage spike to start the ionization process, and stabilizing the current flow to ensure consistent illumination.
In addition to their functional significance, fluorescent light ballasts come in various configurations to accommodate different types of fluorescent tubes. For instance, some ballasts are specifically designed for T8 tubes, while others are compatible with T12 or T5 tubes. Understanding the specific requirements of the lighting system is essential when diagnosing potential issues with the ballast.
It's important to note that a malfunctioning ballast can manifest in various ways, such as flickering lights, buzzing noises, or a complete failure to illuminate. Identifying the symptoms of a faulty ballast is the first step toward resolving the issue and restoring the functionality of the lighting system.
By gaining a comprehensive understanding of the role and significance of fluorescent light ballasts, you can effectively diagnose and address potential problems that may arise. With this foundational knowledge in place, you are ready to explore the practical aspects of testing fluorescent light ballasts using a multimeter.
Using a Multimeter for Testing
When it comes to troubleshooting electrical components, a multimeter is an indispensable tool that provides valuable insights into the performance and integrity of various circuitry. In the context of testing fluorescent light ballasts, a multimeter serves as a reliable instrument for measuring voltage, current, and resistance, allowing you to assess the functionality of the ballast with precision.
Before delving into the actual testing process, it's essential to understand the key functions of a multimeter and how it can be effectively utilized for diagnosing issues with fluorescent light ballasts. A multimeter typically offers several measurement functions, including voltage, current, and resistance settings, which are all relevant to the testing process.
To begin the testing procedure, the multimeter is set to the appropriate measurement mode based on the specific parameters being evaluated. For testing fluorescent light ballasts, the voltage and resistance settings are particularly crucial. By selecting the voltage measurement mode, you can assess the electrical potential across different points of the ballast, providing insights into the power supply and circuit connectivity.
Furthermore, the resistance measurement mode enables you to evaluate the continuity and integrity of the ballast's internal components. This is especially valuable for identifying potential faults, such as short circuits or open circuits, which can impede the proper functioning of the ballast.
In addition to these measurement functions, a multimeter with a capacitance setting can also be beneficial for testing electronic ballasts, as it allows for the assessment of capacitance levels within the circuitry. This capability is especially relevant when dealing with modern electronic ballasts, which rely on capacitors for energy storage and voltage regulation.
When using a multimeter to test fluorescent light ballasts, it's important to exercise caution and adhere to proper safety protocols, as you will be working with live electrical circuits. Ensuring that the power to the lighting system is safely disconnected before initiating the testing process is paramount to prevent accidents and electrical hazards.
By harnessing the capabilities of a multimeter, you can gain valuable insights into the operational status of fluorescent light ballasts, enabling you to pinpoint potential issues and take appropriate measures to rectify any faults. With a solid grasp of the multimeter's functionalities and the relevance of its measurement modes, you are well-equipped to embark on the practical steps of testing fluorescent light ballasts with confidence and precision.
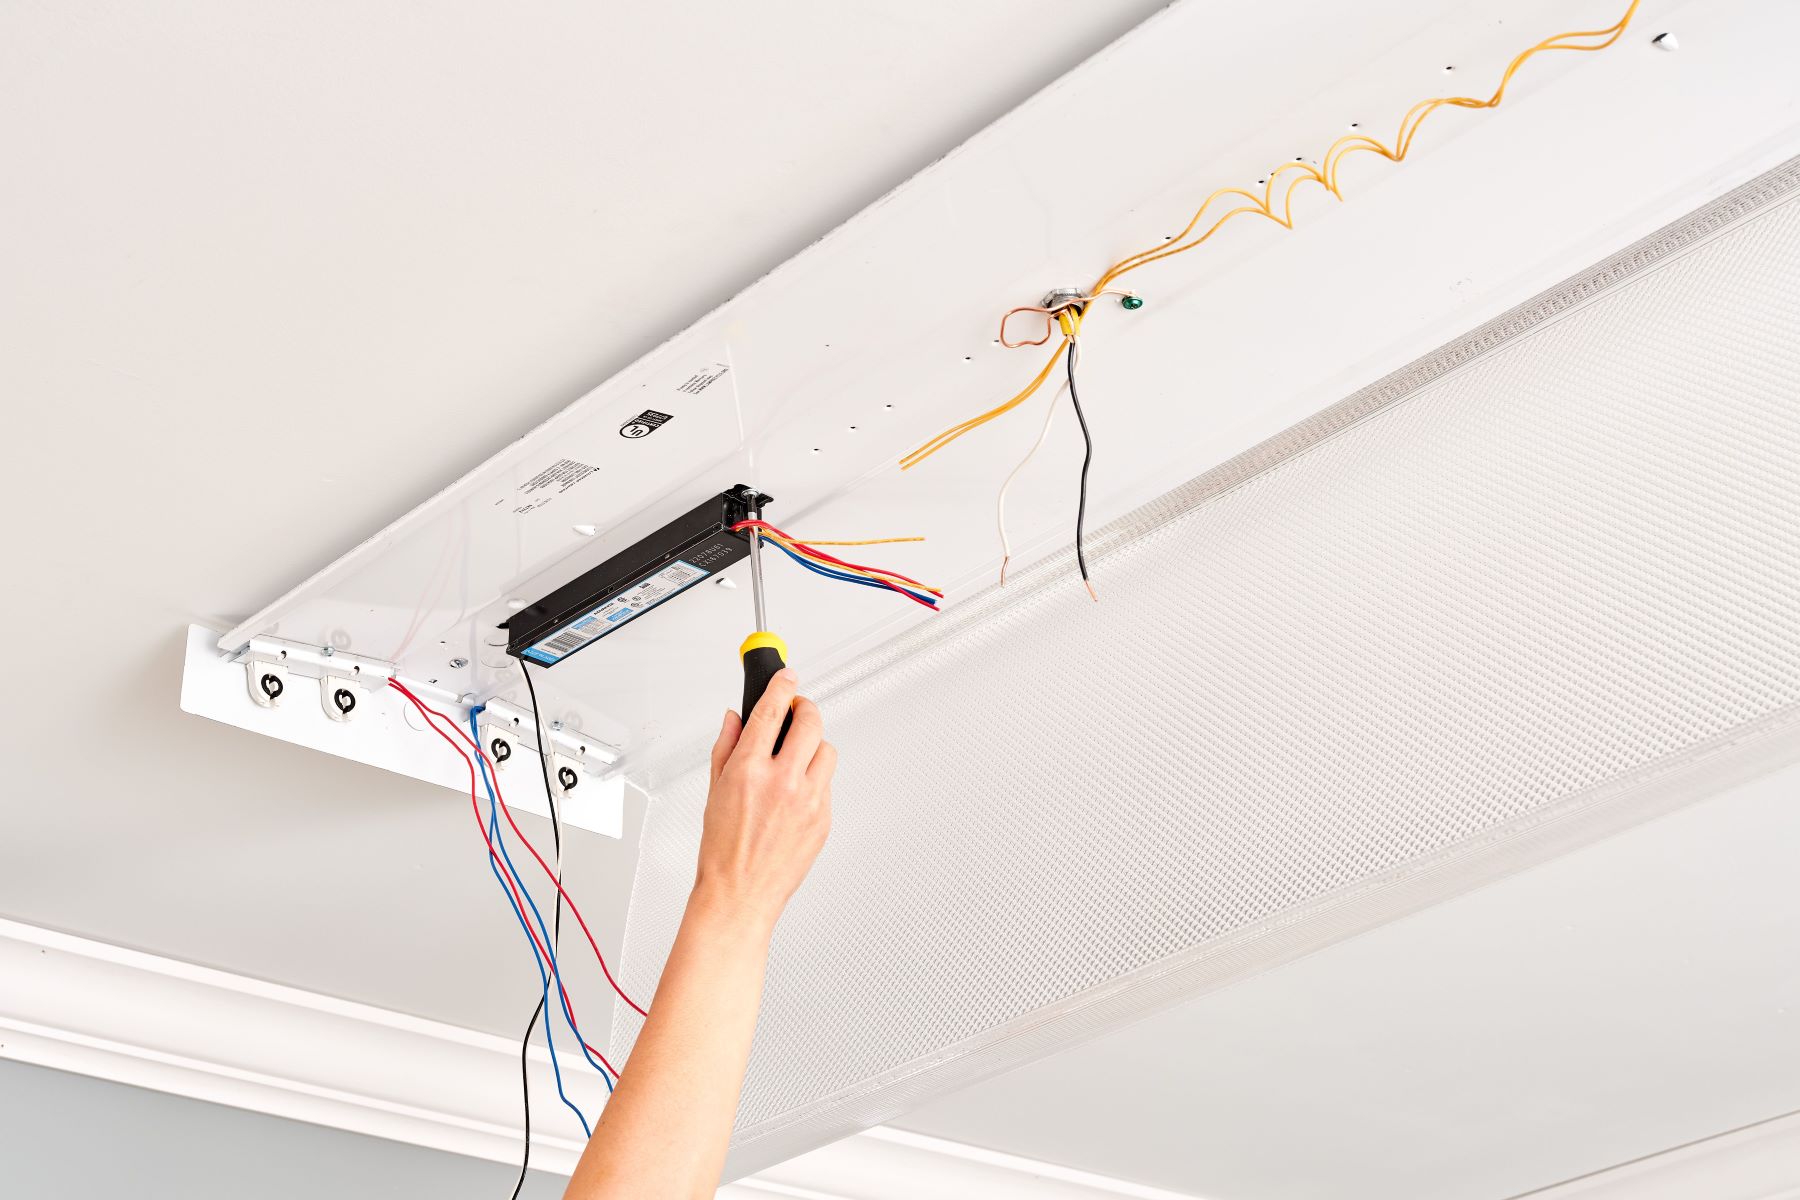
Steps to Test Fluorescent Light Ballast
-
Safety Precautions: Before initiating the testing process, ensure that the power to the fluorescent lighting system is completely turned off. This is a critical safety measure to prevent the risk of electric shock or injury while handling the ballast and conducting tests.
-
Locate the Ballast: Depending on the type of fluorescent fixture, the ballast may be situated within the light fixture itself or in a separate casing. Carefully access the interior of the fixture to expose the ballast, taking note of its positioning and the wiring connections.
-
Disconnect Power Supply: Once the ballast is accessible, it is essential to disconnect the power supply to the ballast and the associated lighting circuit. This can be achieved by turning off the circuit breaker or removing the fuse that supplies power to the lighting system.
-
Identify Wiring Configuration: Take note of the wiring connections to and from the ballast. It is crucial to document or mark the wiring configuration to ensure proper reconnection after the testing process is complete.
-
Set Multimeter to Voltage Mode: Configure the multimeter to the voltage measurement mode. This will allow you to assess the electrical potential across the ballast and verify the presence of the expected voltage levels.
-
Test for Voltage: With the multimeter leads, carefully measure the voltage across the input and output terminals of the ballast. Compare the measured voltage with the specifications provided by the manufacturer to determine if the ballast is receiving and delivering the appropriate electrical potential.
-
Assess Continuity and Resistance: Switch the multimeter to the resistance measurement mode and proceed to test the continuity and resistance of the ballast's internal components. By probing the relevant terminals, you can evaluate the integrity of the ballast's circuitry and identify any anomalies such as open circuits or excessive resistance.
-
Inspect for Physical Damage: Visually inspect the ballast for any signs of physical damage, such as burn marks, discoloration, or visible wear. These indicators can point to potential issues within the ballast that may affect its functionality.
-
Document Findings: Record the measurements and observations obtained during the testing process. This documentation can serve as a reference for further analysis or when seeking professional assistance for resolving any identified issues.
-
Reconnect Power and Test: After completing the testing procedure, reconnect the power supply to the lighting system and observe the behavior of the fluorescent lights. If the ballast is functioning properly, the lights should illuminate without flickering or unusual behavior.
By following these systematic steps and leveraging the capabilities of a multimeter, you can effectively test the integrity and functionality of a fluorescent light ballast. This process equips you with valuable insights into the operational status of the ballast and empowers you to take informed actions to address any identified issues.
Conclusion
In conclusion, mastering the art of testing fluorescent light ballasts with a multimeter is a valuable skill that empowers individuals to diagnose and address potential issues within lighting systems. By gaining a comprehensive understanding of the underlying principles of fluorescent light ballasts and harnessing the capabilities of a multimeter, one can effectively troubleshoot and rectify faults that may compromise the functionality of the ballast.
The journey of testing fluorescent light ballasts begins with a solid grasp of the fundamental functions and significance of these essential components. Understanding the distinct roles of magnetic and electronic ballasts, as well as their specific applications with different types of fluorescent tubes, lays the groundwork for comprehensive troubleshooting. Recognizing the symptoms of a malfunctioning ballast, such as flickering lights or buzzing noises, serves as a crucial starting point for initiating the testing process.
Utilizing a multimeter as the primary diagnostic tool, individuals can delve into the practical aspects of testing fluorescent light ballasts with precision and accuracy. By configuring the multimeter to the appropriate measurement modes, including voltage, resistance, and, in the case of electronic ballasts, capacitance, one can gain valuable insights into the operational status of the ballast. The systematic steps involved in testing, from assessing voltage levels to evaluating continuity and resistance, provide a comprehensive overview of the ballast's functionality.
Furthermore, the emphasis on safety protocols cannot be overstated, as working with live electrical circuits requires utmost caution and adherence to safety measures. Prioritizing the disconnection of power to the lighting system before commencing the testing process is paramount to mitigate the risk of accidents and ensure a secure testing environment.
By following the systematic steps outlined in this guide, individuals can confidently navigate the process of testing fluorescent light ballasts, documenting their findings and taking informed actions to address any identified issues. Whether it involves assessing voltage levels, evaluating continuity, or inspecting for physical damage, the testing procedure equips individuals with the knowledge and insights necessary to maintain the optimal performance of fluorescent lighting systems.
In essence, the ability to test fluorescent light ballasts with a multimeter not only facilitates the identification of potential faults but also empowers individuals to take proactive measures in ensuring the reliability and longevity of lighting systems. This newfound proficiency in troubleshooting ballasts serves as a valuable asset for DIY enthusiasts, professional electricians, and anyone seeking to enhance their understanding of electrical components. With the secrets of fluorescent light ballast testing unveiled, individuals are poised to tackle lighting issues with confidence and precision, ultimately illuminating the path to a brighter and more informed approach to maintenance and repair.