Lifestyle
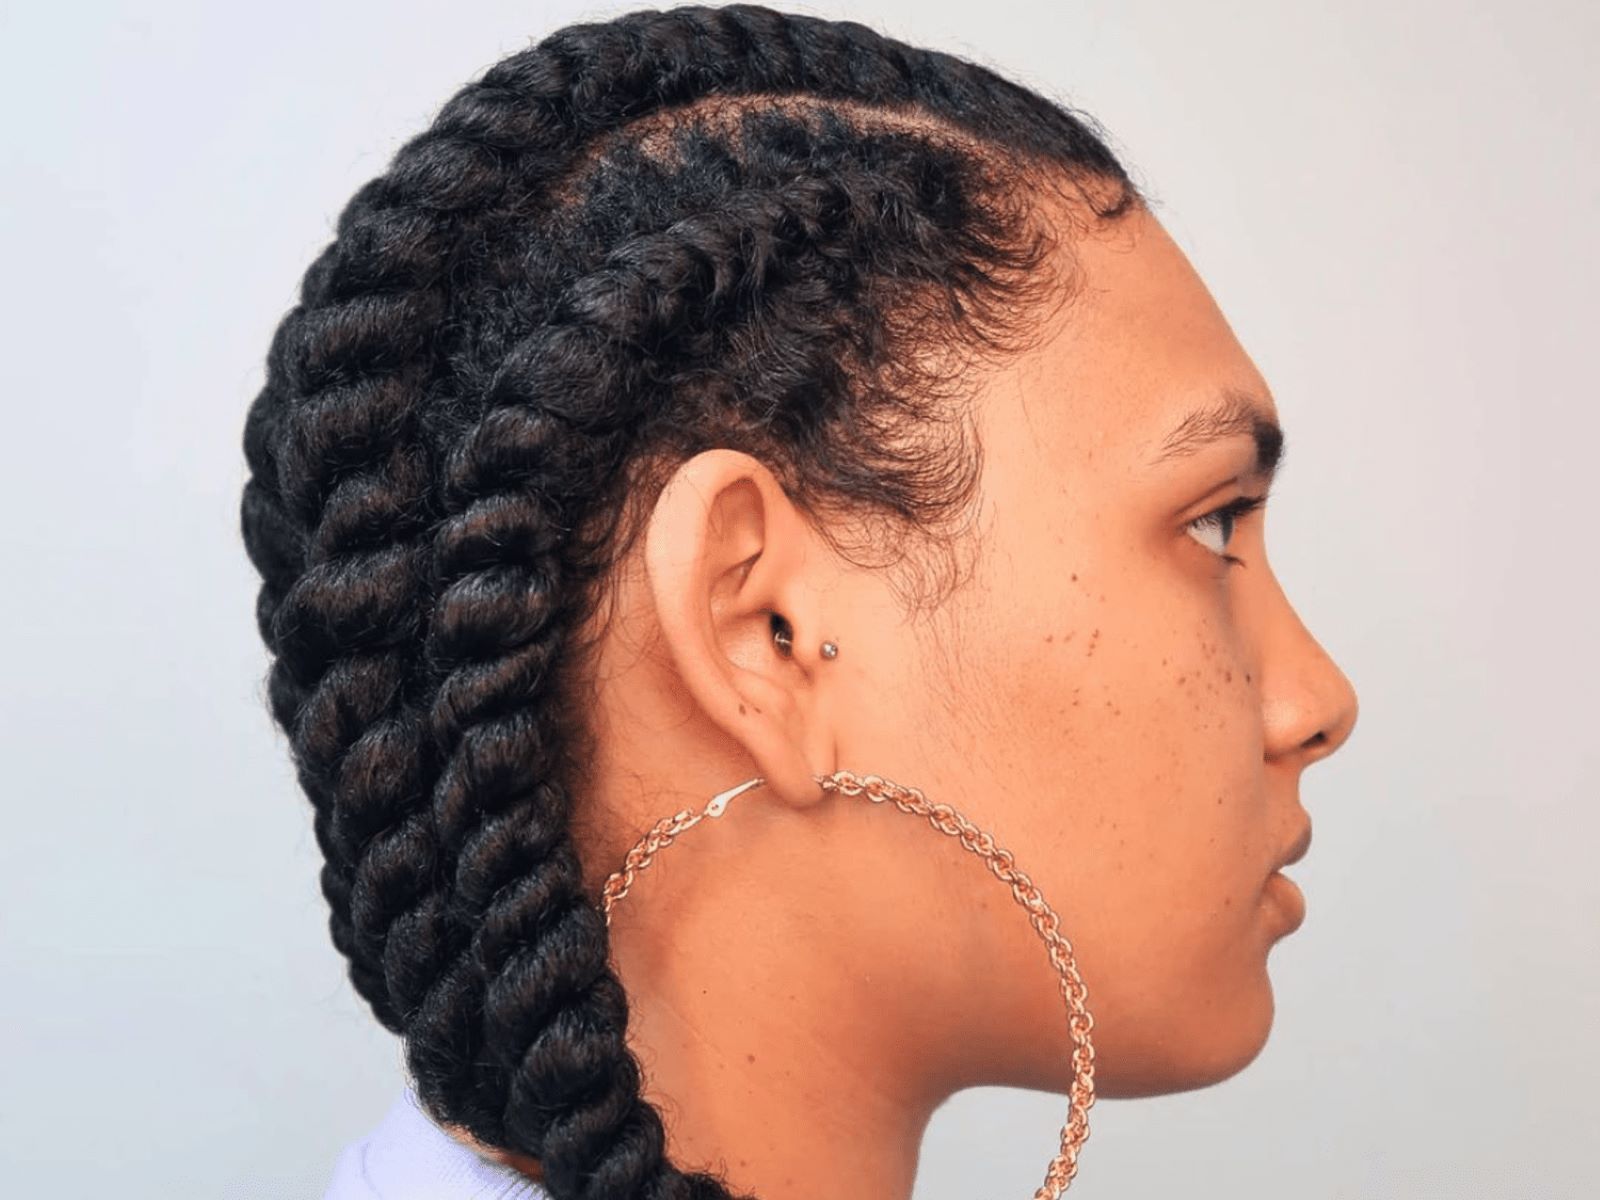
How To Create A Flat Twist Hairstyle
Published: March 6, 2024
Learn how to create a stylish flat twist hairstyle with our easy step-by-step guide. Elevate your lifestyle with this trendy and versatile look.
(Many of the links in this article redirect to a specific reviewed product. Your purchase of these products through affiliate links helps to generate commission for Regretless.com, at no extra cost. Learn more)
Table of Contents
Introduction
Creating a flat twist hairstyle is a fantastic way to showcase your unique style and personality. Whether you're looking for a chic and elegant look or a more casual and carefree vibe, flat twists offer versatility and flair. This timeless hairstyle is not only visually appealing but also practical, as it can protect your natural hair and promote healthy growth.
Flat twists are a popular choice for individuals with natural hair, as they provide a stunning alternative to traditional braids or cornrows. This technique involves twisting sections of hair close to the scalp, resulting in a sleek and polished appearance. Additionally, flat twists can be adorned with accessories, beads, or cuffs to add a touch of individuality and charm.
In this comprehensive guide, we will walk you through the step-by-step process of creating a flawless flat twist hairstyle. Whether you're a beginner or a seasoned hairstyling enthusiast, this tutorial will equip you with the knowledge and skills to achieve stunning results. From preparing your hair to adding the final touches, each step is designed to help you master the art of flat twisting with confidence and finesse.
Get ready to embark on a journey of creativity and self-expression as we delve into the intricacies of crafting a captivating flat twist hairstyle. With the right techniques and a dash of creativity, you'll be able to elevate your look and exude confidence with this timeless and elegant hairstyle. So, let's dive in and discover the secrets to mastering the art of flat twisting!
Step 1: Prepare Your Hair
Before embarking on the flat twist journey, it's crucial to ensure that your hair is properly prepared to achieve the best results. Here's a detailed breakdown of the essential steps to prepare your hair for the flat twist hairstyle:
-
Cleanse and Condition: Start by cleansing your hair with a gentle shampoo to remove any product buildup or impurities. Follow up with a nourishing conditioner to hydrate and detangle your locks, making them more manageable for the styling process.
-
Detangle Thoroughly: Using a wide-tooth comb or a detangling brush, gently comb through your hair to remove any knots or tangles. This step is crucial for creating smooth and uniform flat twists without any snags or uneven sections.
-
Moisturize and Seal: Apply a leave-in conditioner or moisturizing cream to infuse your hair with moisture and enhance its elasticity. Follow up by sealing in the moisture with a natural oil such as coconut oil or jojoba oil to lock in the hydration and promote hair health.
-
Part Your Hair: Using a rat-tail comb, create clean and precise partings to section your hair according to your desired flat twist pattern. Whether you opt for a simple side part or a more intricate geometric design, precise partings are essential for achieving a polished and professional look.
-
Gather Your Tools: Ensure that you have all the necessary tools at your disposal, including hair clips, a tail comb, and styling products such as edge control or hair gel. Having everything within reach will streamline the styling process and prevent any interruptions.
By meticulously preparing your hair with these fundamental steps, you'll set the stage for a seamless and enjoyable flat twist styling experience. With your hair cleansed, moisturized, and neatly sectioned, you're now ready to dive into the next phase of the flat twist journey.
Step 2: Section Your Hair
Creating well-defined sections is a pivotal aspect of achieving a flawless flat twist hairstyle. Properly sectioning your hair not only facilitates the twisting process but also contributes to the overall neatness and symmetry of the style. Here's a detailed exploration of the essential steps involved in sectioning your hair for the flat twist hairstyle:
-
Determine Your Desired Pattern: Before diving into the sectioning process, it's important to envision the desired flat twist pattern. Whether you prefer a classic symmetrical look, an intricate crisscross design, or a combination of various patterns, having a clear vision will guide your sectioning efforts.
-
Use a Rat-Tail Comb: A rat-tail comb is a valuable tool for creating precise partings and sections. Its fine-toothed design allows for accurate separation of the hair, ensuring that each section is uniform and well-defined. Begin by parting your hair in the desired pattern, whether it's straight lines, diagonal sections, or a combination of both.
-
Secure Sections with Hair Clips: As you create each section, use hair clips to secure the remaining hair out of the way. This prevents any interference or confusion during the sectioning process and allows you to focus on one area at a time. Additionally, securing the sections keeps the hair organized and prevents accidental blending of adjacent sections.
-
Maintain Consistent Section Sizes: Consistency is key when sectioning your hair for flat twists. Aim to create sections of similar size and shape throughout the entire head, ensuring a balanced and harmonious end result. Whether you're working with small, medium, or large sections, maintaining uniformity contributes to the overall polished look of the hairstyle.
-
Consider Your Styling Goals: Take into account your desired end result when sectioning your hair. If you plan to incorporate accessories, beads, or cuffs into the flat twists, consider how the sections will accommodate these embellishments. Creating strategic sections can enhance the visual impact of the hairstyle and provide ample space for creative adornments.
By meticulously following these steps and paying attention to detail, you'll lay the foundation for a successful flat twist hairstyle. Well-defined and carefully crafted sections set the stage for the twisting process, ensuring that each flat twist is executed with precision and artistry. With your hair expertly sectioned, you're now poised to embark on the next phase of the flat twist journey, bringing you one step closer to achieving a stunning and personalized hairstyle.
Step 3: Begin Twisting
With your hair expertly prepared and meticulously sectioned, you're now ready to embark on the captivating process of twisting your hair into sleek and stylish flat twists. This pivotal step is where the magic happens, as you transform individual sections of hair into elegant and intricate twists that frame your face and exude charm and sophistication.
To begin the twisting process, follow these essential steps to ensure precision and finesse:
-
Apply Styling Product: Start by applying a small amount of styling product, such as edge control or hair gel, to the root of the first section. This helps to smooth the hair and provides grip for the twisting motion, resulting in a sleek and polished appearance.
-
Divide the Section: Divide the section of hair into two equal parts, ensuring that the division is clean and precise. This sets the stage for the twisting action and allows for a seamless integration of the two strands.
-
Cross Over and Twist: Take the right-hand section and cross it over the left-hand section, creating an X-shaped formation at the roots. Hold the crossed sections firmly between your fingers to maintain tension and control.
-
Incorporate Additional Hair: As you continue twisting, gradually incorporate small sections of hair from the scalp into each strand before crossing them over. This technique creates a tight and secure twist that hugs the scalp and showcases a sleek and uniform appearance.
-
Repeat the Process: Continue crossing the sections over each other while incorporating additional hair until you reach the ends. Maintain a consistent and steady twisting motion, ensuring that each twist is uniform and well-defined from root to tip.
-
Secure the End: Once you've twisted the entire section, secure the end with a small hair elastic or a hair clip to prevent unraveling. This final touch ensures that your hard work is preserved, and the twist remains intact throughout the day.
By following these detailed steps and infusing each twist with care and precision, you'll witness the gradual transformation of your hair into stunning flat twists that accentuate your natural beauty and individuality. The twisting process is an artful and meditative experience, allowing you to channel your creativity and express your unique style through each carefully crafted twist.
As you navigate through the intricate process of twisting your hair into flat twists, remember to embrace the journey and savor the opportunity to create a personalized and captivating hairstyle. With each twist, you're one step closer to achieving a stunning and timeless look that reflects your personality and flair. So, immerse yourself in the art of twisting and revel in the transformative power of this elegant hairstyling technique.
Step 4: Secure the Ends
As you approach the culmination of the twisting process, securing the ends of each flat twist is essential to ensure longevity and preserve the integrity of your meticulously crafted hairstyle. This final step adds a layer of polish and professionalism, preventing the twists from unraveling and maintaining their sleek and refined appearance throughout the day.
To effectively secure the ends of your flat twists, follow these detailed steps to complete the styling process with finesse and precision:
-
Select a Secure Fastening Method: Choose a suitable fastening method to secure the ends of your flat twists. Small hair elastics, also known as rubber bands, are a popular choice for neatly securing the twisted ends. Alternatively, you can opt for hair clips or bobby pins to hold the ends in place, especially if you prefer a more versatile and adjustable option.
-
Gently Gather the Ends: Once you've completed the twisting motion and reached the ends of the section, gather the remaining hair in a smooth and controlled manner. Avoid tugging or pulling on the hair, as this can disrupt the uniformity of the twist and compromise its sleek appearance.
-
Twist and Tuck Method: For a seamless and polished finish, consider employing the twist and tuck method to secure the ends of your flat twists. Simply coil the twisted ends around your finger to form a small loop, then tuck the tail of the twist underneath the loop to create a secure and visually appealing finish. This technique adds a touch of elegance to your flat twists while ensuring that the ends remain intact throughout the day.
-
Apply a Light Holding Product: To reinforce the security of the ends and add a layer of longevity to your flat twists, consider applying a light holding product, such as a styling mousse or a gentle hair gel, to the twisted ends. This helps to set the twists in place and minimizes the risk of unraveling, especially in humid or windy conditions.
-
Inspect and Adjust: Once the ends are secured, take a moment to inspect each flat twist and make any necessary adjustments to ensure uniformity and consistency. Smooth out any stray hairs or uneven sections, and ensure that each twist is neatly fastened and aligned with the overall styling pattern.
By meticulously securing the ends of your flat twists, you'll elevate the overall aesthetic of your hairstyle and ensure that your hard work withstands the demands of daily activities. This final touch not only enhances the longevity of your flat twists but also adds a touch of sophistication and refinement to your overall look, allowing you to exude confidence and style with every twist.
With the ends of your flat twists securely fastened, you've successfully completed the intricate and rewarding process of crafting a stunning flat twist hairstyle. Each twist reflects your creativity and individuality, serving as a testament to your artistry and flair. Embrace the elegance and versatility of flat twists as you showcase your unique style to the world, knowing that your meticulously secured ends will keep your hairstyle looking impeccable throughout the day.
Read more: How To Create A Chain Drawing
Step 5: Final Touches and Styling
As you approach the culmination of the flat twist styling process, the final touches and styling play a pivotal role in elevating the overall aesthetic of your hairstyle. This phase allows you to add personal flair, finesse any remaining details, and ensure that your flat twists exude a polished and professional appearance. Here's a detailed exploration of the essential steps involved in adding the final touches and styling your flat twist hairstyle:
-
Refine the Edges: Use a small amount of edge control or styling gel to smooth and refine the edges of your flat twists. This step adds a layer of sleekness and precision, ensuring that the hairline appears neat and well-defined. Gently brush or smooth down any stray hairs or flyaways to achieve a clean and polished look.
-
Accessorize with Elegance: Consider embellishing your flat twists with stylish accessories such as beads, cuffs, or hairpins. Strategically place these adornments along the twists to add a touch of individuality and charm to your hairstyle. Whether you opt for subtle and understated accents or bold and eye-catching embellishments, accessorizing your flat twists allows you to infuse your personal style into the final look.
-
Incorporate Creative Styling: Experiment with creative styling techniques to enhance the visual impact of your flat twists. You can create intricate patterns by interweaving multiple twists, forming elegant updos, or incorporating twists into a half-up, half-down style. Embrace your creativity and explore different styling options to showcase the versatility of flat twists and express your unique personality.
-
Set the Style: To ensure that your flat twists maintain their sleek and refined appearance throughout the day, consider using a light-hold styling spray or mist to set the style in place. This final touch adds a layer of longevity to your hairstyle, minimizing frizz and maintaining the integrity of the twists, especially in varying weather conditions.
-
Embrace Individuality: Embrace the individuality of each flat twist and celebrate the unique character of your hairstyle. Take a moment to appreciate the artistry and creativity that went into crafting each twist, knowing that your personal touch has transformed your hair into a stunning and timeless work of art.
By incorporating these final touches and styling techniques, you'll bring your flat twist hairstyle to its full potential, exuding confidence and sophistication with every twist. Embrace the opportunity to infuse your personal style into the final look, knowing that your meticulously styled flat twists reflect your creativity and individuality. With the final touches in place, you're ready to showcase your stunning flat twist hairstyle to the world, radiating elegance and charm with every twist and turn.
Conclusion
In conclusion, mastering the art of creating a flat twist hairstyle is a transformative and empowering journey that allows individuals to express their unique style and embrace the natural beauty of their hair. From the meticulous preparation of the hair to the intricate twisting process and the final touches of styling, each step contributes to the creation of a stunning and personalized hairstyle that exudes elegance and sophistication.
As we reflect on the comprehensive guide to crafting flat twists, it becomes evident that this timeless hairstyling technique offers a myriad of benefits beyond its visual appeal. Flat twists provide a protective and low-maintenance styling option for individuals with natural hair, promoting healthy growth and minimizing the need for daily manipulation. Additionally, the versatility of flat twists allows for creative expression, whether through intricate patterns, stylish accessories, or innovative styling techniques.
The journey of creating flat twists transcends the realm of hairstyling, serving as a form of self-expression and a celebration of individuality. Each twist represents a canvas for personal creativity, allowing individuals to infuse their unique flair and personality into their hairstyle. Whether adorned with beads and cuffs or styled into elegant updos, flat twists offer a platform for showcasing artistic ingenuity and embracing the diversity of natural hair textures.
Furthermore, the process of crafting flat twists fosters a sense of mindfulness and self-care, providing a meditative and therapeutic experience as individuals immerse themselves in the art of twisting and styling their hair. This intentional and nurturing approach to hairstyling reinforces a positive relationship with one's hair, fostering a deeper appreciation for its natural beauty and versatility.
As individuals embark on their flat twist journey, they not only elevate their personal style but also contribute to a vibrant and inclusive hairstyling community. The art of flat twisting transcends cultural boundaries, serving as a unifying and celebratory practice that honors the diversity of hair textures and styling traditions. Through the sharing of techniques, tips, and creative inspirations, individuals come together to celebrate the artistry and craftsmanship of flat twists, fostering a sense of camaraderie and mutual support within the hairstyling community.
In essence, the journey of creating flat twists is a testament to the beauty of diversity, creativity, and self-expression. With each carefully crafted twist, individuals embrace their natural hair and celebrate its unique character, knowing that their flat twist hairstyle is a reflection of their artistry, individuality, and unwavering confidence. As we conclude this guide, we invite you to embark on your own flat twist journey, embracing the transformative power of this timeless and elegant hairstyling technique.