Home>Home and Garden>How To Turn Off Water To Toilet
Home and Garden
How To Turn Off Water To Toilet
Published: March 5, 2024
Learn how to turn off the water to your toilet with our step-by-step guide. Essential home and garden knowledge for any homeowner. Keep your plumbing in top shape!
(Many of the links in this article redirect to a specific reviewed product. Your purchase of these products through affiliate links helps to generate commission for Regretless.com, at no extra cost. Learn more)
Table of Contents
Introduction
When it comes to home maintenance, knowing how to turn off the water to your toilet is a valuable skill that can save you from potential water damage and costly repairs. Whether you're dealing with a leaky toilet, replacing a fill valve, or embarking on a bathroom renovation project, being able to shut off the water supply to the toilet is essential.
Understanding the location and function of the shut-off valve is the first step in this process. By familiarizing yourself with this crucial component, you'll be better equipped to handle any unexpected plumbing issues that may arise. Additionally, being able to confidently turn off the water supply to the toilet can provide peace of mind, especially when leaving your home unattended for an extended period.
In this guide, we will walk you through the step-by-step process of locating the shut-off valve, turning off the water supply, and testing the water supply to ensure that it has been successfully shut off. By following these simple yet essential steps, you can effectively manage your toilet's water supply and tackle various maintenance tasks with confidence.
Now, let's delve into the specifics of how to locate and operate the shut-off valve, empowering you to take control of your toilet's water supply and safeguard your home from potential water-related mishaps.
Read more: How To Turn Off Messages On Mac
Step 1: Locate the Shut-Off Valve
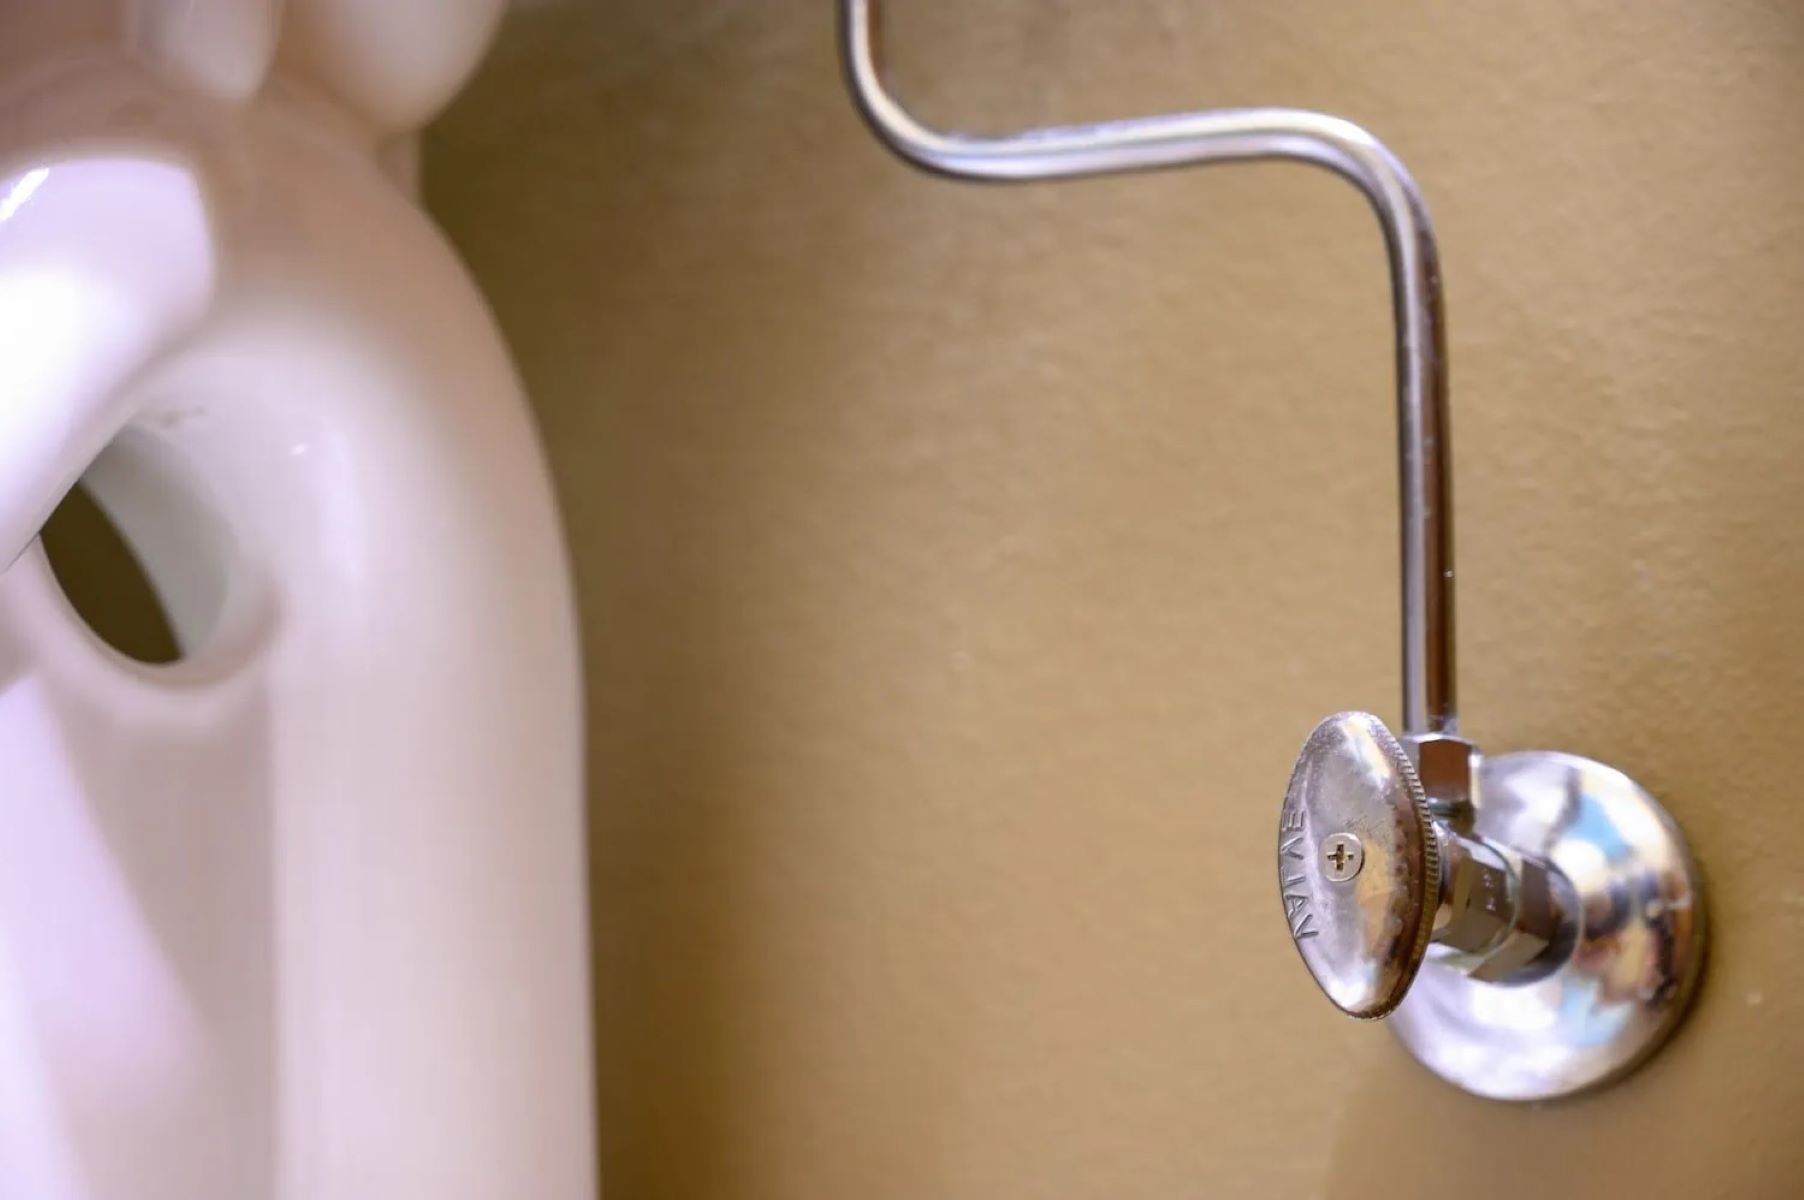
Locating the shut-off valve is the first crucial step in gaining control over your toilet's water supply. The shut-off valve is typically located near the base of the toilet, either on the left or right side. It is essential to familiarize yourself with the valve's appearance and position to ensure quick access in case of emergencies or routine maintenance.
Visual Inspection
Begin by visually inspecting the area around the base of the toilet. Look for a small valve connected to a pipe that supplies water to the toilet tank. The shut-off valve is commonly a small, oval-shaped handle that can be turned clockwise to shut off the water supply. It's important to note that the shut-off valve may be located behind or alongside the toilet, so a thorough visual inspection is necessary to pinpoint its exact position.
Check the Wall Behind the Toilet
In some cases, especially in older homes, the shut-off valve may be located on the wall behind the toilet. This placement is often found in bathrooms where the toilet is installed against the wall rather than in the center of the room. Take a moment to inspect the wall behind the toilet, as the shut-off valve may be readily accessible in this area.
Utilize a Flashlight
If the shut-off valve is not immediately visible, using a flashlight can aid in locating it. Shine the light around the base of the toilet and along the wall, paying close attention to any pipes and valves in the vicinity. The additional illumination can help you identify the shut-off valve, especially if it is situated in a dimly lit or confined space.
Read more: How To Turn Off Windshield Wipers
Underneath the Toilet
In certain instances, particularly in bathrooms with limited space, the shut-off valve may be located underneath the toilet. If this is the case, you may need to crouch down and look beneath the toilet bowl to find the valve. It's important to approach this task with caution and ensure that the area is well-lit to avoid any potential hazards.
By diligently inspecting these areas and familiarizing yourself with the appearance and location of the shut-off valve, you can successfully complete the first step in taking control of your toilet's water supply. Once you have located the shut-off valve, you can proceed to the next step of turning off the water supply, empowering yourself to effectively manage your toilet's maintenance and safeguard your home from potential water-related issues.
Step 2: Turn Off the Water Supply
Once you have successfully located the shut-off valve, the next crucial step is to turn off the water supply to the toilet. This action is essential for performing maintenance tasks, addressing leaks, or making repairs without the risk of water flow causing potential damage. Follow these detailed steps to effectively shut off the water supply:
-
Positioning: Stand or kneel near the shut-off valve, ensuring that you have clear and unobstructed access to the valve handle. It's important to be in a comfortable position to apply the necessary force to turn the valve.
-
Clockwise Rotation: The shut-off valve handle typically requires a clockwise rotation to turn off the water supply. Grasp the handle firmly and begin turning it in a clockwise direction. Apply steady pressure, as the valve may be stiff if it hasn't been operated in a while.
-
Turn Until Resistance: As you turn the valve handle clockwise, you will encounter resistance as the valve closes. Continue turning until you feel the resistance, indicating that the water supply has been successfully shut off. It's important to ensure that the valve is fully closed to prevent any water from flowing into the toilet.
-
Check Water Flow: After turning off the shut-off valve, it's beneficial to flush the toilet and run the sink faucet in the same bathroom to confirm that the water supply has been effectively shut off. If the toilet tank does not refill and the sink faucet produces no water, it indicates that the shut-off valve has successfully stopped the water flow.
-
Visual Confirmation: While the water is running, visually inspect the shut-off valve and the surrounding pipes for any signs of leakage. This visual confirmation ensures that the shut-off valve is functioning as intended and that there are no unexpected water leaks occurring.
By following these detailed steps, you can confidently turn off the water supply to your toilet, empowering yourself to tackle maintenance tasks and address plumbing issues with ease. Understanding the process of shutting off the water supply is a valuable skill that can contribute to the overall maintenance and care of your home, providing you with the confidence to handle unexpected situations effectively.
Step 3: Test the Water Supply
After successfully turning off the water supply to your toilet, it's essential to perform a thorough test to ensure that the shut-off valve has effectively stopped the water flow. This critical step provides peace of mind and confirms that you have full control over the toilet's water supply, enabling you to proceed with maintenance tasks or repairs without the risk of unexpected water flow. Follow these detailed guidelines to test the water supply and validate the shut-off valve's functionality:
Flush the Toilet
Begin by flushing the toilet to observe its response after the water supply has been shut off. If the shut-off valve has been successfully closed, the toilet tank should not refill after flushing. This absence of water replenishment indicates that the shut-off valve has effectively halted the water flow to the toilet, validating its functionality.
Read more: How To Get Water Spots Off Car Windows
Check for Water Flow
In addition to flushing the toilet, it's beneficial to run the sink faucet in the same bathroom to verify that the shut-off valve has indeed stopped the water supply. Turn on the sink faucet and observe the water flow. If the shut-off valve is functioning correctly, the sink faucet should produce no water, confirming that the water supply has been successfully shut off.
Visual Inspection
While the toilet is flushing and the sink faucet is running, visually inspect the shut-off valve and the surrounding pipes for any signs of leakage. This visual confirmation ensures that the shut-off valve is not only stopping the water flow but also maintaining a secure seal without any unexpected water leaks occurring. A thorough visual inspection provides added assurance of the shut-off valve's reliability.
Addressing Leaks
If, during the testing process, you notice any unexpected water flow or signs of leakage around the shut-off valve or the connected pipes, it's crucial to address these issues promptly. In the event of leaks or persistent water flow, it may indicate a faulty shut-off valve or a related plumbing issue that requires attention. Addressing any leaks or irregular water flow is essential to maintain the integrity of the shut-off valve and prevent potential water damage.
By meticulously testing the water supply and confirming the functionality of the shut-off valve, you can confidently proceed with maintenance tasks, repairs, or renovations, knowing that you have complete control over the toilet's water supply. This comprehensive testing process ensures that the shut-off valve is operating as intended, providing you with the assurance of a secure and reliable water supply control mechanism.
Conclusion
In conclusion, mastering the process of turning off the water supply to your toilet is a fundamental aspect of home maintenance that empowers homeowners to effectively manage plumbing-related tasks and safeguard their properties from potential water damage. By following the step-by-step guide outlined in this article, you have gained valuable insights into locating the shut-off valve, turning off the water supply, and testing the water supply to ensure its successful shutdown.
The ability to locate the shut-off valve, whether it is positioned near the base of the toilet, on the wall behind the toilet, or underneath the fixture, is the first crucial step in taking control of your toilet's water supply. Through visual inspection, the use of a flashlight, and diligent exploration, you can confidently identify the shut-off valve and prepare to shut off the water supply when necessary.
Turning off the water supply to the toilet involves a systematic process of positioning yourself near the shut-off valve, applying a clockwise rotation to close the valve, and confirming the successful cessation of water flow. This essential step provides the foundation for performing maintenance tasks, addressing leaks, or making repairs without the risk of water-related mishaps.
Furthermore, testing the water supply after shutting off the shut-off valve ensures that the valve is functioning as intended, halting the water flow to the toilet and maintaining a secure seal without any signs of leakage. This comprehensive testing process, including flushing the toilet, running the sink faucet, and visually inspecting the shut-off valve and connected pipes, offers peace of mind and validates the reliability of the shut-off valve.
By mastering the process of turning off the water supply to your toilet, you have equipped yourself with a valuable skill that contributes to the overall maintenance and care of your home. Whether it's addressing a leaky toilet, replacing a fill valve, or embarking on a bathroom renovation project, the ability to confidently manage your toilet's water supply is essential.
In essence, understanding how to turn off the water supply to your toilet empowers you to take proactive measures in maintaining your home, mitigating potential water-related issues, and ensuring the efficient operation of your plumbing system. This newfound knowledge not only enhances your confidence in handling unexpected plumbing situations but also contributes to the overall well-being of your home.
By incorporating these essential steps into your home maintenance repertoire, you are well-prepared to navigate various plumbing-related scenarios with confidence and competence, ultimately contributing to the longevity and functionality of your home's plumbing infrastructure.