Lifestyle
How To Patch Jeans
Modified: March 13, 2024
Learn how to patch jeans and extend the life of your favorite denim with our easy step-by-step guide. Discover a sustainable lifestyle solution today!
(Many of the links in this article redirect to a specific reviewed product. Your purchase of these products through affiliate links helps to generate commission for Regretless.com, at no extra cost. Learn more)
Table of Contents
Introduction
Patching jeans is a practical and creative way to extend the life of your favorite denim garments. Whether you want to repair a beloved pair of jeans or add a touch of personal flair to a plain pair, patching can breathe new life into your wardrobe. With a few simple materials and a bit of creativity, you can transform a worn or torn pair of jeans into a stylish and unique fashion statement.
Patching jeans is not just about mending a hole; it's an opportunity to showcase your individuality and creativity. Each patch tells a story, whether it's a carefully chosen fabric that reflects your personality or a whimsical design that adds a playful touch to your outfit. By learning the art of patching jeans, you can turn a potential fashion disaster into an opportunity for self-expression and sustainability.
In this comprehensive guide, we will walk you through the step-by-step process of patching jeans, from gathering the necessary materials to adding the finishing touches. Whether you're a seasoned sewing enthusiast or a novice looking to explore a new skill, this guide will equip you with the knowledge and confidence to tackle any jeans-patching project.
So, grab your sewing kit, unleash your creativity, and get ready to breathe new life into your denim collection. Let's embark on this journey of transforming ordinary jeans into extraordinary works of wearable art.
Materials Needed
To embark on your jeans-patching journey, you'll need a few essential materials to ensure a successful and visually appealing result. Here's a comprehensive list of items you'll need to gather before diving into the patching process:
-
Jeans in Need of Patching: Select the pair of jeans that you want to patch. Whether it's a favorite pair that has developed a hole or a plain pair that could use a touch of creativity, choose the jeans that will be the canvas for your patching project.
-
Fabric for Patching: This can be a piece of denim from an old pair of jeans, a colorful fabric that complements your jeans, or a patterned fabric that adds a unique flair. The fabric should be large enough to cover the damaged area on your jeans with a bit of extra room for sewing.
-
Scissors: A pair of sharp fabric scissors will be essential for cutting the patch fabric to the desired size and shape. Make sure they are suitable for cutting through denim and other sturdy fabrics.
-
Sewing Needles: Choose a sturdy sewing needle that is suitable for denim. A pack of assorted needles can be helpful, as it allows you to select the appropriate size and thickness for your specific patching project.
-
Thread: Select a strong and durable thread that matches the color of your jeans or complements the patch fabric. This will ensure that the stitches blend seamlessly with the denim, creating a polished and professional finish.
-
Pins: Straight pins or safety pins will be useful for securing the patch in place before sewing. They help to ensure that the patch remains aligned and taut during the sewing process.
-
Iron-on Patch (Optional): If you prefer a quick and easy patching method, consider using iron-on patches. These pre-adhesive patches can be applied with the help of an iron, eliminating the need for extensive sewing.
-
Iron and Ironing Board: If you opt for an iron-on patch, you'll need an iron and ironing board to activate the adhesive and secure the patch onto the jeans.
-
Thimble (Optional): A thimble can protect your fingers from the pressure of pushing the needle through thick denim, especially if you're working on a larger patch or multiple layers of fabric.
-
Embellishments (Optional): If you want to add a creative touch to your patched jeans, consider embellishments such as decorative buttons, embroidery floss, or fabric paint to personalize the patch and make it uniquely yours.
Gathering these materials will set the stage for a successful jeans-patching endeavor, allowing you to seamlessly progress through each step of the process with confidence and creativity. Now that you have your materials ready, it's time to prepare the jeans for patching.
Step 1: Gather Supplies
Before embarking on the journey of patching your jeans, it's essential to gather all the necessary supplies to ensure a smooth and successful patching process. Each item plays a crucial role in the transformation of your jeans, from mending a hole to adding a touch of personal style. Here's a detailed look at the supplies you'll need:
Jeans in Need of Patching
The first and most crucial item on your list is the pair of jeans that you intend to patch. Whether it's a cherished favorite that has developed a hole in a high-friction area or a plain pair that could benefit from a creative embellishment, selecting the right jeans sets the stage for your patching project. Consider the location and size of the damage, as well as the overall aesthetic you wish to achieve.
Fabric for Patching
Next, you'll need a piece of fabric to serve as the patch. This can be a section of denim salvaged from an old pair of jeans, a colorful fabric that complements the original denim, or a patterned fabric that adds a unique and eye-catching flair. The fabric should be large enough to cover the damaged area on your jeans with a bit of extra room for sewing, ensuring that it effectively reinforces the weakened area.
Scissors
A pair of sharp fabric scissors is an indispensable tool for cutting the patch fabric to the desired size and shape. It's essential to use scissors that are suitable for cutting through denim and other sturdy fabrics, allowing you to achieve clean and precise edges for the patch.
Sewing Needles
Selecting the right sewing needle is crucial for effectively stitching the patch onto the jeans. Choose a sturdy needle that is suitable for denim, and consider having a pack of assorted needles on hand to accommodate different patch sizes and fabric thicknesses.
Thread
Choosing the appropriate thread is essential for achieving a seamless and durable patch. Select a strong and durable thread that matches the color of your jeans or complements the patch fabric. This ensures that the stitches blend seamlessly with the denim, creating a polished and professional finish.
Pins
Straight pins or safety pins are invaluable for securing the patch in place before sewing. They help to ensure that the patch remains aligned and taut during the sewing process, preventing any shifting or misalignment that could compromise the final result.
Iron-on Patch (Optional)
If you prefer a quick and easy patching method, consider using iron-on patches. These pre-adhesive patches can be applied with the help of an iron, eliminating the need for extensive sewing and providing a convenient alternative for minor repairs or decorative patches.
Iron and Ironing Board
If you opt for an iron-on patch, you'll need an iron and ironing board to activate the adhesive and secure the patch onto the jeans. This step ensures that the patch adheres firmly to the denim, creating a strong and long-lasting bond.
Thimble (Optional)
A thimble can be a valuable addition to your supplies, especially when working with thick denim or multiple layers of fabric. It protects your fingers from the pressure of pushing the needle through the sturdy material, making the sewing process more comfortable and efficient.
Embellishments (Optional)
For those seeking to add a creative touch to their patched jeans, embellishments such as decorative buttons, embroidery floss, or fabric paint can personalize the patch and make it uniquely yours. These optional additions allow you to infuse your personality and style into the patch, transforming it into a distinctive and eye-catching feature.
By gathering these essential supplies, you'll be well-equipped to embark on your jeans-patching journey with confidence and creativity. Each item serves a specific purpose in the patching process, ensuring that you can seamlessly progress through each step and achieve a visually appealing and durable result. With your supplies in hand, you're ready to prepare the jeans for the transformative patching process.
Step 2: Prepare the Jeans
Before diving into the patching process, it's crucial to prepare the jeans to ensure that the patch adheres securely and the stitching is executed with precision. Proper preparation sets the foundation for a successful and visually appealing patch, whether you're mending a hole or adding a decorative touch to your denim.
Clean the Jeans
Start by ensuring that the jeans are clean and free of any dirt, debris, or fabric softener residue. Washing and drying the jeans according to the care instructions not only removes any surface grime but also helps to soften the denim, making it more pliable for the patching process. Additionally, clean denim provides a smooth and even surface for applying the patch, ensuring that it adheres firmly without any obstructions.
Identify the Patch Placement
Carefully examine the damaged area or the section of the jeans where you intend to apply the patch. Assess the size and shape of the damaged area, and determine the ideal placement for the patch. Whether you're covering a hole, reinforcing a weakened area, or adding a decorative patch, visualizing the placement ensures that the patch enhances the overall aesthetic of the jeans while effectively addressing any damage.
Trim Excess Threads
If the damaged area includes frayed threads or loose fibers, carefully trim any excess threads using sharp scissors. This step ensures that the patch adheres smoothly to the denim without any stray fibers protruding from the edges. Trimming the excess threads also creates a clean and tidy surface for the patch, allowing for seamless integration with the original denim.
Smooth Out the Fabric
Lay the jeans on a flat surface and smooth out the fabric around the damaged area. Ensuring that the denim is taut and free of wrinkles or folds is essential for precise patch placement and stitching. Smooth fabric provides a stable foundation for the patch, allowing for accurate alignment and a professional finish.
Iron the Area (Optional)
For optimal patch adhesion, consider ironing the area where the patch will be applied. This step helps to flatten the denim and creates a smooth surface for the patch to adhere to. If you're using an iron-on patch, ironing the area beforehand ensures a secure and long-lasting bond. However, exercise caution and refer to the patch manufacturer's instructions to determine the appropriate heat setting and duration for ironing.
By meticulously preparing the jeans, you set the stage for a successful patching process, ensuring that the patch adheres securely and the stitching is executed with precision. With the jeans primed and ready, you're now prepared to choose a patch that complements your style and the overall aesthetic of the denim.
Step 3: Choose a Patch
Selecting the right patch is a pivotal step in the jeans-patching process, as it not only addresses the practical need for reinforcement but also offers an opportunity to infuse your personal style into the garment. Whether you're aiming for a seamless repair or a bold fashion statement, the choice of patch fabric and design can significantly impact the overall look and feel of the jeans.
When choosing a patch, consider the following factors to ensure a harmonious and visually appealing result:
Fabric Selection
The fabric you choose for the patch should complement the original denim while offering the necessary durability to withstand everyday wear. If you're mending a hole, opt for a sturdy fabric that matches the weight and texture of the jeans. For decorative patches, explore a wide range of options, from colorful cotton prints to intricately woven textiles. Additionally, consider the color and pattern of the fabric to ensure that it harmonizes with the existing denim, creating a cohesive and polished appearance.
Size and Shape
The size and shape of the patch should align with the damaged area or the intended design. For hole repairs, the patch should adequately cover the damaged section with a margin for stitching, ensuring that it effectively reinforces the weakened area. When adding a decorative patch, consider the overall aesthetic and balance of the design. Whether you opt for a small, discreet patch or a bold statement piece, the size and shape should harmonize with the jeans' silhouette and your personal style.
Personalization
Patching jeans presents an opportunity for personal expression and creativity. Consider personalizing the patch with unique embellishments, such as embroidery, decorative stitching, or fabric paint. These custom touches infuse the patch with individuality, transforming it into a reflection of your personality and style. Whether it's a subtle monogram, a vibrant floral motif, or a playful embroidered design, personalization adds a distinctive and meaningful element to the patch.
Theme and Aesthetic
If you're aiming to convey a specific theme or aesthetic through the patch, consider the visual impact and storytelling potential of the fabric and design. Whether it's a vintage-inspired patch, a bohemian motif, or a modern geometric pattern, the theme and aesthetic of the patch can elevate the overall appeal of the jeans, creating a cohesive and intentional style statement.
By carefully considering these factors, you can choose a patch that not only addresses the practical need for reinforcement but also enhances the visual appeal of the jeans. The patch becomes a canvas for self-expression, allowing you to seamlessly integrate practicality and creativity into the art of jeans patching. With the patch selected, you're ready to position it onto the jeans and proceed to the next step of the patching process.
Step 4: Position the Patch
Positioning the patch onto the jeans is a critical step that sets the foundation for a successful and visually appealing patching process. Proper placement ensures that the patch effectively reinforces the damaged area or seamlessly integrates as a decorative element, enhancing the overall aesthetic of the jeans. Here's a detailed guide on how to position the patch with precision and intention:
-
Aligning the Patch: Carefully place the patch over the damaged area or the designated placement, ensuring that it aligns seamlessly with the surrounding denim. The edges of the patch should align with the edges of the damaged area, creating a cohesive and integrated appearance. For decorative patches, position the patch in a visually balanced and intentional manner, considering the overall composition and style of the jeans.
-
Securing the Patch: Once the patch is aligned, use straight pins or safety pins to secure it in place. This step prevents any shifting or misalignment during the subsequent sewing process, ensuring that the patch remains taut and stable. For iron-on patches, follow the manufacturer's instructions to secure the patch onto the jeans, activating the adhesive for a firm bond.
-
Assessing the Aesthetic: Take a step back and assess the visual impact of the positioned patch. Consider how it integrates with the denim, whether it effectively covers the damaged area, and how it contributes to the overall style of the jeans. This assessment allows you to make any necessary adjustments before proceeding to the sewing or ironing stage.
-
Exploring Creative Placement: If you're adding a decorative patch, consider exploring creative placement options to infuse the jeans with a unique and personalized touch. Whether it's an asymmetrical placement, a clustered arrangement, or a strategic positioning that complements the jeans' design, creative placement can elevate the patch from a mere repair to a deliberate style statement.
-
Ensuring Symmetry and Balance: For decorative patches or multiple patches, ensure symmetry and balance in the placement. Visual harmony is key to creating a polished and intentional look, whether you're aiming for a subtle embellishment or a bold and expressive design. Take the time to adjust the placement until you achieve the desired symmetry and balance.
By meticulously positioning the patch onto the jeans, you lay the groundwork for a successful and visually appealing patching process. The careful alignment, secure placement, and aesthetic assessment ensure that the patch seamlessly integrates with the denim, whether it's serving a practical purpose or adding a touch of creativity. With the patch securely positioned, you're ready to proceed to the next step: sewing the patch onto the jeans.
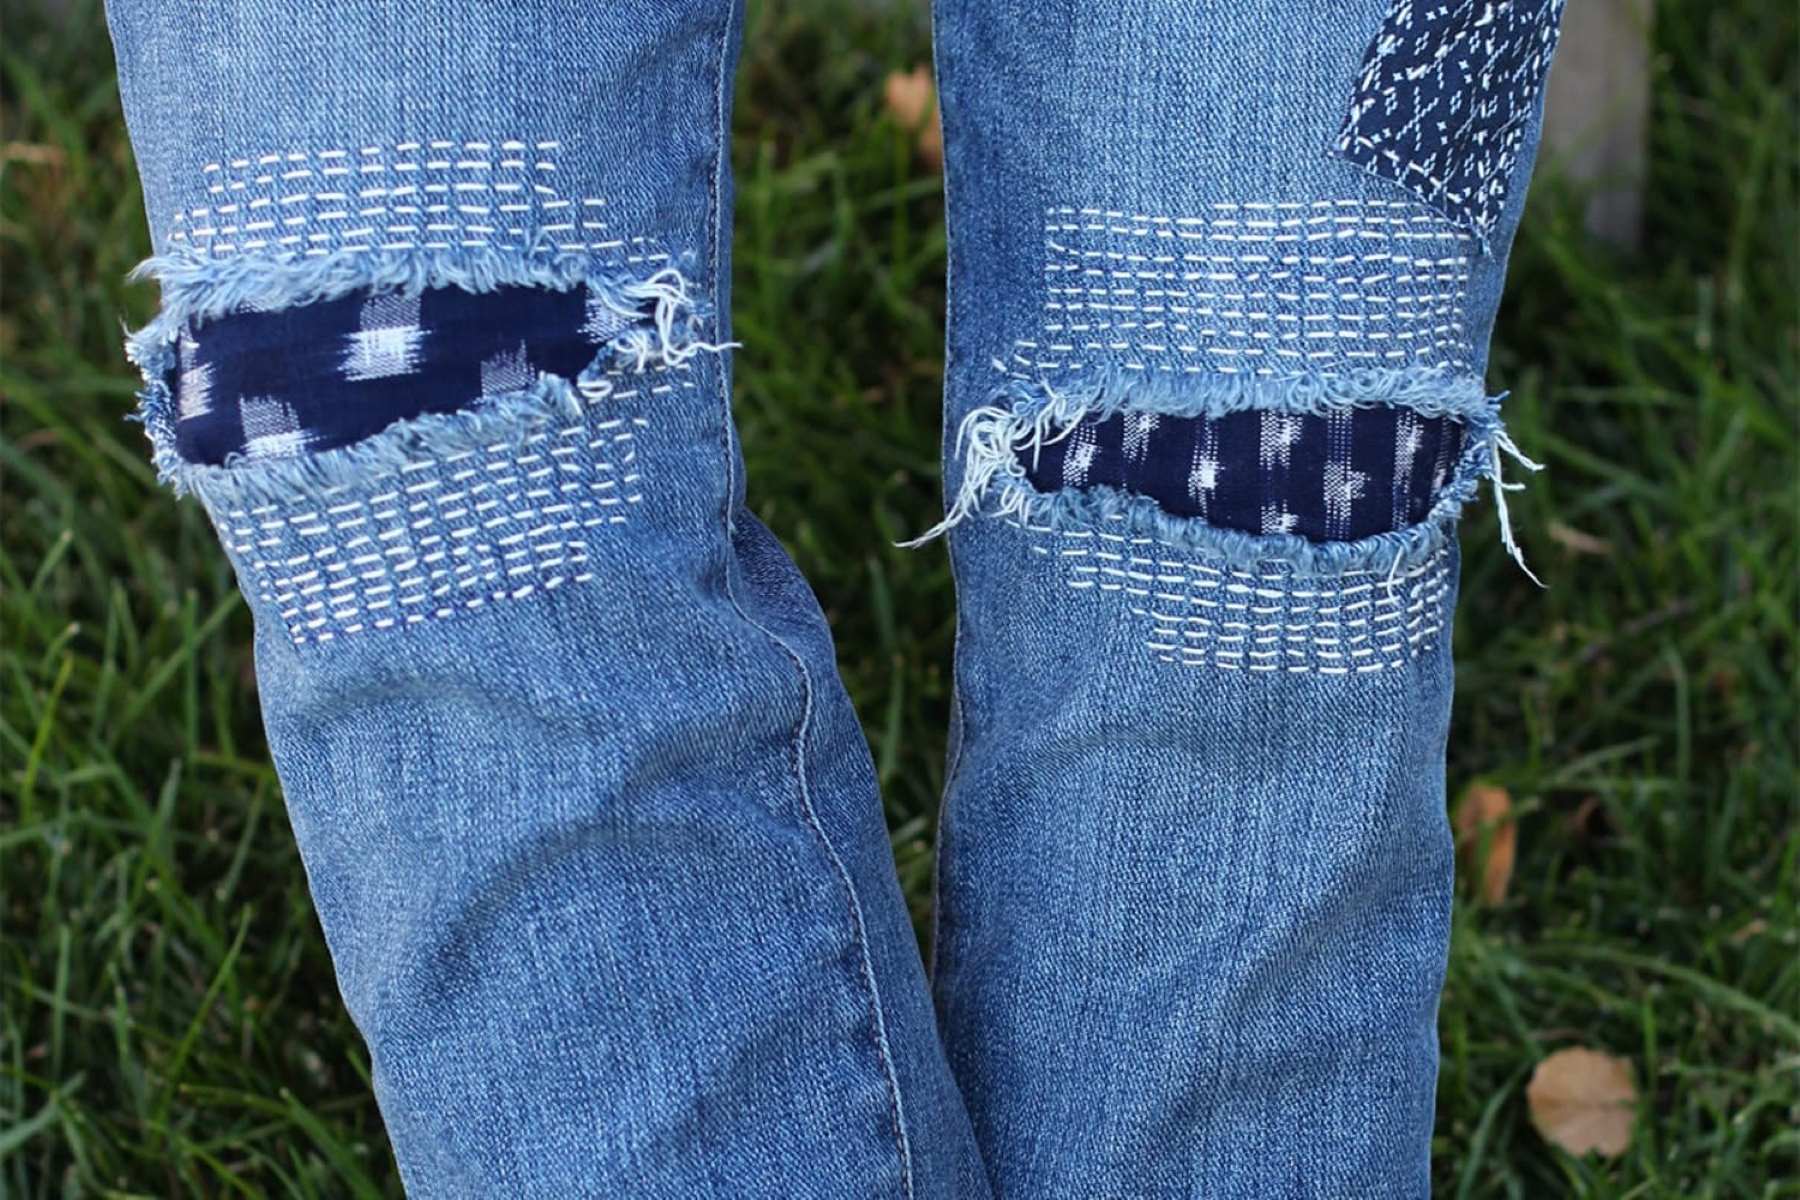
Step 5: Sew the Patch
Sewing the patch onto the jeans is a pivotal stage in the patching process, where precision and attention to detail are paramount. Whether you're reinforcing a weakened area or adding a decorative touch, the sewing stage ensures that the patch adheres securely and seamlessly integrates with the denim. Here's a comprehensive guide on how to sew the patch with skill and finesse:
Thread Selection
Begin by selecting a sturdy and durable thread that matches the color of your jeans or complements the patch fabric. The thread should be strong enough to withstand everyday wear and provide a secure bond between the patch and the denim. Ensure that the thread is of sufficient length to complete the sewing process without the need for frequent re-threading, allowing for uninterrupted and efficient stitching.
Needle Threading
Thread a sturdy sewing needle with the selected thread, ensuring that the needle's eye accommodates the thickness of the thread. If you're working with a particularly thick patch or multiple layers of fabric, consider using a thimble to protect your fingers from the pressure of pushing the needle through the denim. Threading the needle with precision sets the stage for smooth and consistent stitching, ensuring that the patch is securely affixed to the jeans.
Stitching Technique
Choose a stitching technique that suits the nature of the patch and the desired aesthetic. For discreet and practical patches, opt for a straightforward running stitch or a backstitch, ensuring that the stitches are evenly spaced and securely fastened. If you're adding decorative stitching to the patch, explore creative embroidery techniques or decorative stitches that enhance the visual appeal of the patch while providing structural reinforcement.
Securing the Patch
Commence sewing along the edges of the patch, ensuring that the stitches penetrate both the patch fabric and the denim. The stitches should be tight and secure, creating a durable bond that withstands the rigors of daily wear. As you progress along the edges, maintain a consistent stitch length and tension, ensuring that the sewing is uniform and visually appealing. If you're working with an iron-on patch, follow the manufacturer's instructions to activate the adhesive and secure the patch onto the jeans with a firm and lasting bond.
Finishing Touches
Once the patch is securely sewn onto the jeans, tie off the thread with a secure knot and trim any excess thread with sharp scissors. If you've added decorative stitching or embellishments, take the time to assess the overall appearance and make any final adjustments to ensure a polished and professional finish. Smooth out the fabric around the patch, ensuring that the denim lies flat and free of any wrinkles or puckering.
By following these steps, you can sew the patch onto the jeans with precision and skill, ensuring that the patch is securely affixed and seamlessly integrated with the denim. The careful selection of thread, meticulous stitching technique, and attention to detail culminate in a visually appealing and durable patch that breathes new life into your jeans. With the patch securely sewn in place, you're ready to proceed to the final step of the patching process: adding the finishing touches.
Step 6: Finishing Touches
With the patch securely sewn onto the jeans, the final step involves adding the finishing touches to ensure a polished and professional result. This stage allows you to refine the appearance of the patch, address any remaining imperfections, and elevate the overall aesthetic of the jeans. Here's a detailed guide on how to perfect the patching process with meticulous attention to detail:
Trim Excess Fabric
Carefully trim any excess fabric from the edges of the patch using sharp scissors. This step ensures that the patch seamlessly integrates with the denim, creating a clean and tidy appearance. Precision trimming allows for a smooth transition between the patch and the original fabric, enhancing the overall cohesion of the jeans.
Pressing the Patch
If you've sewn the patch onto the jeans, consider pressing the patched area with an iron to set the stitches and create a flat, uniform surface. Use a pressing cloth to protect the fabric and apply gentle pressure to ensure that the patch adheres securely. For iron-on patches, follow the manufacturer's instructions to activate the adhesive and press the patch firmly onto the denim, ensuring a strong and lasting bond.
Assessing the Appearance
Take a step back and assess the overall appearance of the patched area. Look for any remaining loose threads, uneven edges, or areas that may require additional reinforcement. This assessment allows you to identify any final adjustments needed to achieve a flawless and seamless integration of the patch with the jeans.
Personalization and Embellishments
If you've opted for a decorative patch, consider adding personalized embellishments to further enhance the patch's visual appeal. Whether it's decorative stitching, embroidered details, or the addition of unique buttons or beads, these personalized touches infuse the patch with individuality and style, transforming it into a distinctive and eye-catching feature.
Reinforcement and Durability
For patches intended to reinforce weakened areas, ensure that the stitching is secure and durable. Double-check the integrity of the stitches and reinforce any areas that may require additional support. This step guarantees that the patched area is resilient and capable of withstanding the demands of regular wear, extending the lifespan of your favorite jeans.
By meticulously attending to these finishing touches, you elevate the patched area from a mere repair to a refined and visually appealing feature of the jeans. The careful trimming, pressing, assessment, personalization, and reinforcement ensure that the patch seamlessly integrates with the denim, creating a polished and durable result that breathes new life into your beloved jeans. With the finishing touches complete, your patched jeans are ready to make a stylish and sustainable statement, showcasing your creativity and resourcefulness.
Conclusion
In conclusion, the art of patching jeans transcends mere mending; it is a celebration of creativity, sustainability, and personal expression. Through this comprehensive guide, we have delved into the step-by-step process of patching jeans, from gathering the necessary materials to adding the finishing touches. Each stage of the patching journey presents an opportunity to breathe new life into beloved denim garments, transforming them into unique and personalized works of wearable art.
Patching jeans is a testament to resourcefulness and sustainability, allowing us to extend the lifespan of our favorite denim pieces while infusing them with individuality and style. Whether it's mending a well-worn pair of jeans or adding a decorative patch to elevate their aesthetic, the patching process empowers us to reimagine and revitalize our wardrobe staples.
Furthermore, the act of patching jeans fosters a deeper connection with our clothing, encouraging us to cherish and preserve the stories woven into each garment. Every patch carries a narrative, whether it's a carefully chosen fabric that reflects our personality or a whimsical design that adds a playful touch to our outfit. By embracing the art of patching, we honor the value of our clothing and the memories they hold.
Moreover, patching jeans embodies the spirit of self-expression, allowing us to showcase our creativity and individuality through personalized patches and embellishments. From intricate embroidery to unique fabric choices, each patch becomes a canvas for storytelling and self-representation, transforming ordinary jeans into extraordinary reflections of our style and personality.
As we conclude this guide, let us carry forward the art of patching jeans as a testament to ingenuity, creativity, and mindful consumption. Let us embrace the imperfections of our beloved denim and celebrate the opportunity to mend, embellish, and personalize our jeans, infusing them with character and charm. With each patch, we not only mend the fabric but also weave new stories, leaving a lasting imprint of our creativity and resourcefulness on our most cherished garments.