Home>Home and Garden>Top Tips For Painting Knotty Pine Paneling
Home and Garden
Top Tips For Painting Knotty Pine Paneling
Published: January 16, 2024
Transform your home with our top tips for painting knotty pine paneling. Elevate your home and garden with our expert advice. Discover the best techniques for a flawless finish.
(Many of the links in this article redirect to a specific reviewed product. Your purchase of these products through affiliate links helps to generate commission for Regretless.com, at no extra cost. Learn more)
Table of Contents
Introduction
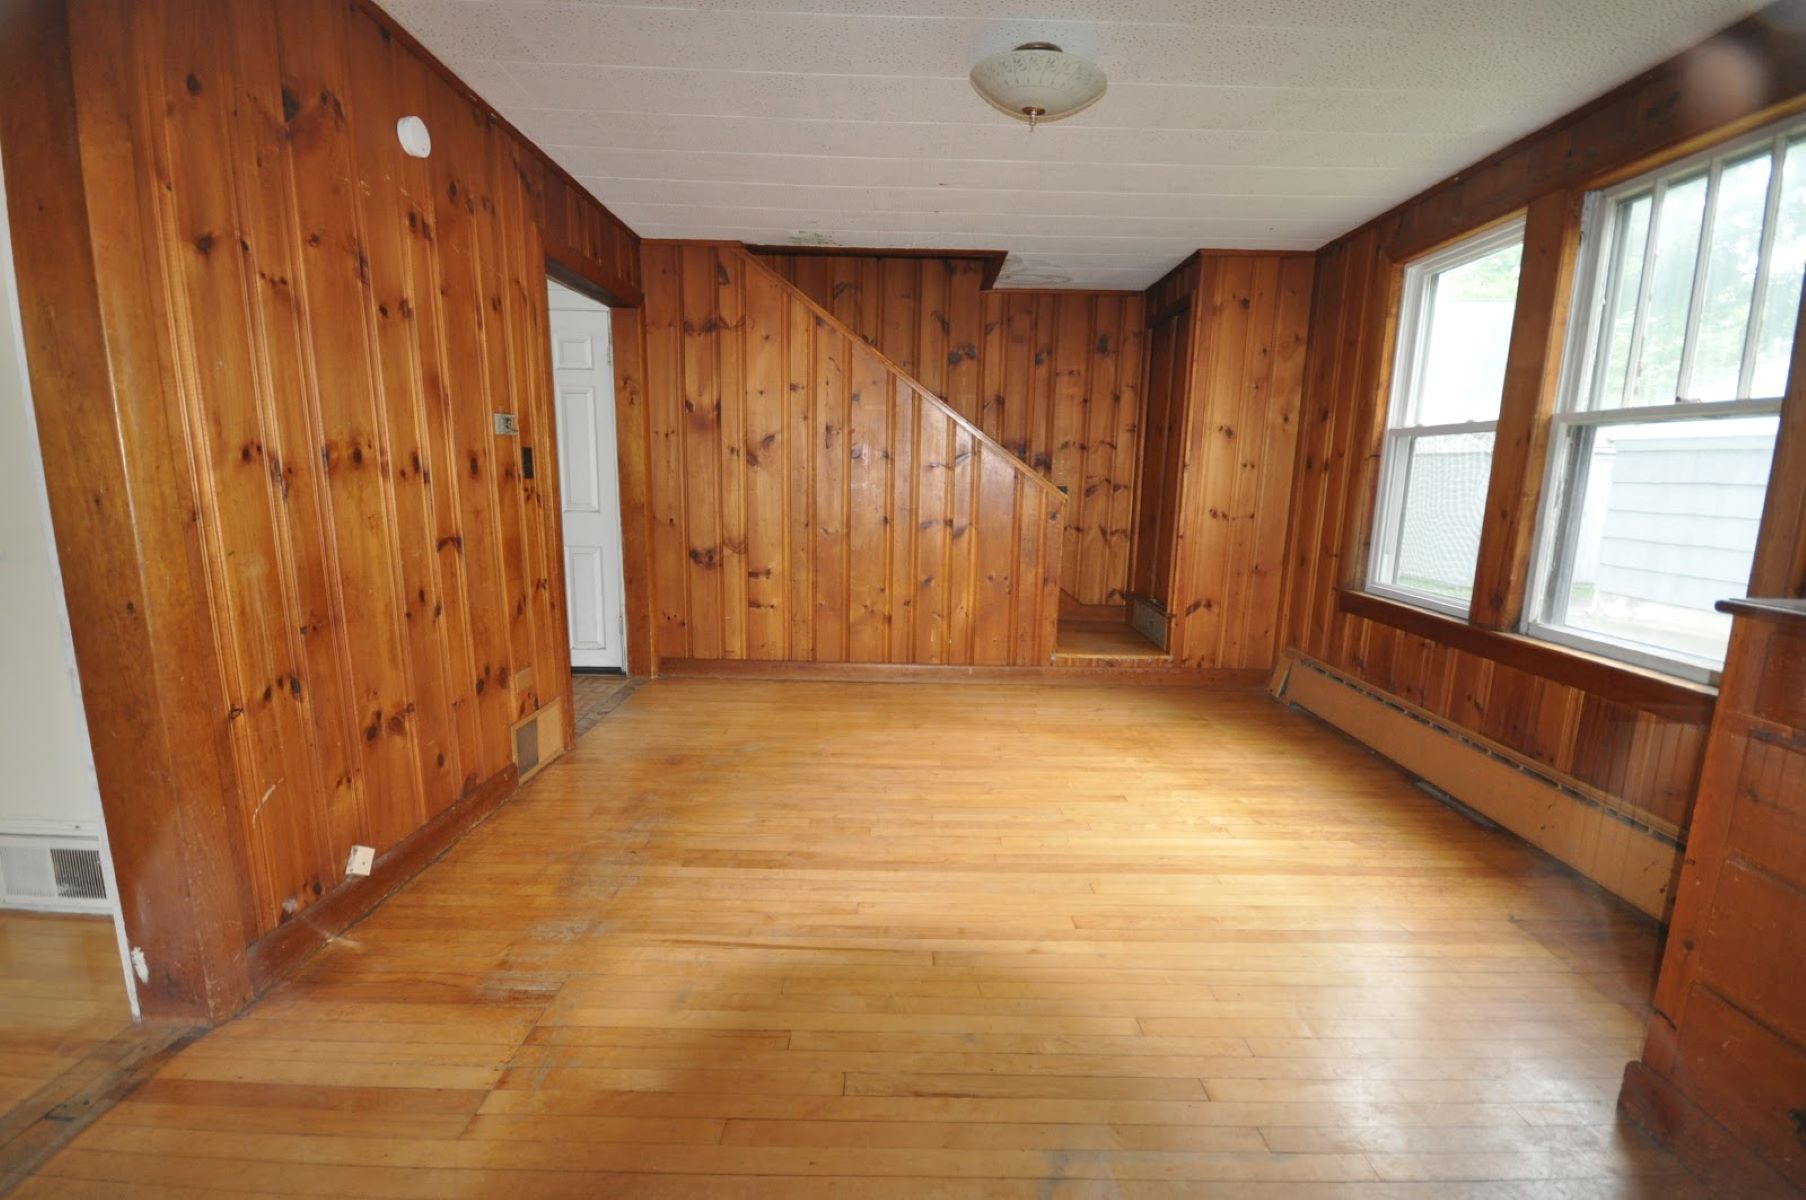
Painting knotty pine paneling can breathe new life into a room, transforming its aesthetic appeal and creating a fresh, inviting atmosphere. Whether you're looking to modernize a rustic space or revamp outdated decor, a fresh coat of paint can work wonders. However, achieving a professional-looking finish on knotty pine requires careful preparation, the right materials, and proper techniques. In this article, we'll explore the top tips for painting knotty pine paneling, guiding you through each step of the process to ensure a successful and visually stunning outcome.
When it comes to painting knotty pine, there are several key factors to consider. From preparing the surface to choosing the right paint and applying it effectively, each step plays a crucial role in achieving a flawless finish. By understanding the nuances of painting knotty pine paneling and implementing the best practices, you can elevate the look of any room while expressing your personal style and creativity.
Now, let's delve into the essential tips and techniques for painting knotty pine paneling, empowering you to embark on this transformative home improvement project with confidence and expertise.
Read more: How To Get Paint Off Of Vinyl Floor
Preparing the Surface
Before diving into the painting process, it's crucial to prepare the knotty pine paneling surface adequately. This step is fundamental to ensure the paint adheres properly and the final result is smooth and flawless. Here are the essential steps to prepare the surface:
-
Clean the Surface: Begin by thoroughly cleaning the knotty pine paneling to remove any dust, dirt, or grime that may have accumulated over time. Use a mild detergent solution and a sponge or cloth to wipe down the entire surface. This step is vital for promoting paint adhesion and preventing imperfections in the final finish.
-
Sand the Paneling: Knotty pine paneling often features a textured surface, which can affect the smooth application of paint. To address this, lightly sand the paneling using fine-grit sandpaper. This process helps to smooth out any rough spots, removes existing finishes or coatings, and creates a slightly roughened surface for better paint adhesion. Be sure to wipe away any sanding dust with a clean, damp cloth afterward.
-
Fill Knots and Gaps: Knotty pine paneling is characterized by its distinctive knots and occasional gaps between the boards. To achieve a seamless and uniform finish, it's essential to fill these knots and gaps with a high-quality wood filler. After applying the wood filler, allow it to dry completely before sanding the surface again to ensure a level and smooth base for painting.
-
Prime the Surface: Once the paneling is clean, sanded, and any imperfections have been addressed, it's time to prime the surface. Using a high-quality wood primer specifically designed for knotty pine or other softwoods is crucial. This primer helps to seal the wood, prevent tannin bleed-through, and create an optimal base for the paint to adhere to.
By meticulously preparing the knotty pine paneling surface through cleaning, sanding, filling knots and gaps, and applying a suitable primer, you set the stage for a successful and professional-looking paint job. This thorough preparation ensures that the paint will adhere uniformly, resulting in a stunning finish that enhances the beauty of the knotty pine while reflecting your personal style and vision for the space.
Choosing the Right Paint
Selecting the appropriate paint for knotty pine paneling is a critical decision that significantly impacts the overall outcome of the painting project. When it comes to choosing the right paint, several factors should be taken into consideration to ensure a durable, high-quality finish that aligns with your aesthetic preferences. Here's a detailed look at the key considerations for selecting the right paint for painting knotty pine paneling:
Consider the Type of Paint:
When painting knotty pine paneling, it's essential to choose a paint that is well-suited for wood surfaces. Acrylic latex paint is a popular choice for its durability, ease of application, and ability to withstand wear and tear. This type of paint dries relatively quickly, has low levels of volatile organic compounds (VOCs), and offers excellent color retention, making it an ideal option for interior wood paneling.
Opt for a High-Quality Finish:
The finish of the paint plays a significant role in the overall aesthetic of the knotty pine paneling. For a smooth and refined look, consider using a satin or semi-gloss finish. These finishes not only provide a subtle sheen that enhances the natural beauty of the wood but also offer increased durability and are easier to clean, making them well-suited for high-traffic areas.
Assess Color Options:
When selecting a paint color for knotty pine paneling, consider the existing decor, lighting, and the desired ambiance of the space. Lighter paint colors can brighten a room, create a sense of openness, and complement various design styles, while darker hues can add warmth, depth, and a touch of sophistication. Additionally, exploring neutral tones, earthy shades, or even bold accent colors can help achieve the desired visual impact while harmonizing with the overall design scheme.
Verify Compatibility with Primer:
Ensure that the chosen paint is compatible with the primer used on the knotty pine paneling. This compatibility is crucial for achieving optimal adhesion, uniform coverage, and long-term durability. Consulting with a paint specialist or following the manufacturer's recommendations can help in selecting a paint that complements the specific primer used, ensuring a seamless and professional finish.
By carefully considering the type of paint, the preferred finish, color options, and compatibility with the primer, you can confidently choose the right paint for painting knotty pine paneling. This thoughtful selection process sets the stage for a successful painting project, resulting in a visually striking transformation that enhances the beauty of the knotty pine while reflecting your personal style and design vision.
Applying Primer
Priming the knotty pine paneling is a crucial step in the painting process, laying the foundation for a durable and visually appealing finish. The primer serves multiple essential purposes, including sealing the wood, promoting adhesion, and preventing tannin bleed-through, ultimately ensuring that the paint adheres uniformly and the final result is long-lasting. Here's a detailed exploration of the key aspects involved in applying primer to knotty pine paneling:
Choose the Right Primer:
Selecting a high-quality wood primer specifically formulated for softwoods such as knotty pine is essential. Look for a primer that offers excellent adhesion, stain-blocking properties, and compatibility with the chosen paint. Additionally, consider a primer that is designed to seal the wood effectively, creating a smooth and uniform base for the paint to adhere to.
Application Techniques:
When applying the primer to knotty pine paneling, ensure that the surface is clean, dry, and free of any dust or debris. Use a high-quality paintbrush or a roller to apply the primer evenly, working in the direction of the wood grain to ensure thorough coverage. Pay special attention to the knots and grooves, ensuring that the primer penetrates into these areas to create a seamless base for the paint.
Multiple Coats if Necessary:
Depending on the condition of the knotty pine paneling and the type of primer used, applying multiple coats may be necessary to achieve optimal coverage and adhesion. Follow the manufacturer's recommendations regarding the number of coats required, and allow sufficient drying time between each coat to ensure that the primer fully penetrates and seals the wood surface.
Addressing Tannin Bleed-Through:
Knotty pine is known for containing natural tannins, which can sometimes bleed through the primer and paint, causing discoloration. To prevent this, consider using a stain-blocking primer specifically designed to inhibit tannin bleed-through. This additional step can be particularly important when working with knotty pine, as it ensures that the final paint color remains true and free from any underlying discoloration.
Allow Sufficient Drying Time:
After applying the primer, allow ample time for it to dry completely before proceeding with the painting process. This drying period is critical for the primer to bond effectively with the wood surface, creating a stable and receptive base for the paint. Refer to the primer manufacturer's guidelines for the recommended drying time before applying the paint.
By meticulously applying the primer to the knotty pine paneling, you establish a solid foundation for the subsequent painting process. The primer's sealing, adhesion-promoting, and stain-blocking properties not only contribute to a flawless finish but also enhance the overall durability and longevity of the painted surface. This meticulous approach to priming sets the stage for a successful painting project, ensuring that the knotty pine paneling undergoes a stunning transformation that reflects your personal style and elevates the aesthetic appeal of the space.
Read more: How To Cook A Perfect Top Round Roast
Painting Techniques
When it comes to painting knotty pine paneling, employing the right techniques is essential to achieve a professional-looking finish that enhances the natural beauty of the wood while reflecting your personal style. The following painting techniques are crucial for ensuring a seamless and visually striking outcome:
Brushing and Rolling:
Utilizing a combination of high-quality paintbrushes and rollers is key to achieving even coverage and a smooth finish on knotty pine paneling. Begin by cutting in the edges and corners with a high-quality angled brush, ensuring precise application along the trim and grooves. Subsequently, use a paint roller to cover larger surface areas, working in manageable sections to maintain a wet edge and avoid lap marks. This technique ensures that the paint is applied uniformly, effectively covering the textured surface of the knotty pine.
Feathering:
Feathering, or blending, the paint is crucial for achieving a seamless finish, especially when working with knotty pine paneling. After applying the paint with a roller, use a dry brush to lightly feather the edges, blending any overlapping areas and smoothing out any visible brush or roller marks. This technique helps to create a consistent and uniform appearance, minimizing any potential irregularities and enhancing the overall aesthetic appeal of the painted surface.
Working with the Grain:
When painting knotty pine paneling, it's important to work with the natural grain of the wood to achieve a cohesive and visually pleasing result. By following the direction of the wood grain with your brush and roller strokes, you can enhance the inherent beauty of the knotty pine while ensuring that the paint application appears harmonious and seamless. This technique also helps to accentuate the unique texture and character of the wood, creating a stunning visual impact.
Read more: How To Paint Flowers
Applying Multiple Coats:
Achieving full coverage and a rich, consistent color on knotty pine paneling often requires applying multiple coats of paint. After the initial coat has dried completely, carefully inspect the surface for any uneven areas or missed spots, and proceed to apply additional coats as needed. Building up the paint in thin, even layers ensures a professional-quality finish, allowing the natural charm of the knotty pine to shine through while concealing any imperfections.
By implementing these essential painting techniques, you can elevate the appearance of knotty pine paneling, transforming it into a focal point that enhances the overall aesthetic of the room. These techniques not only contribute to a flawless and durable finish but also allow you to express your individual style and creativity, resulting in a stunning transformation that revitalizes the space.
Finishing Touches
After completing the painting process, attention to the finishing touches is crucial to ensure a polished and professional outcome. The following steps and considerations are essential for adding the final touches that elevate the overall appearance of the painted knotty pine paneling:
Inspecting the Painted Surface:
Thoroughly inspect the painted knotty pine paneling to identify any imperfections, uneven areas, or missed spots. Take the time to assess the overall coverage and ensure that the paint has been applied uniformly across the entire surface. Address any touch-ups or corrections as needed to achieve a seamless and flawless finish.
Detailing and Trimming:
Carefully inspect the edges, corners, and trim areas of the knotty pine paneling to ensure that the paint has been applied precisely and evenly. Use a high-quality trim brush to touch up any areas that require additional attention, ensuring that the edges are crisp and well-defined. This meticulous detailing enhances the overall visual impact of the painted surface.
Emphasizing Texture and Grain:
To accentuate the natural texture and grain of the knotty pine, consider applying a wood conditioner or clear finish specifically designed for interior wood surfaces. This step can enhance the depth and character of the wood, adding a subtle sheen while preserving its organic charm. Additionally, it provides an extra layer of protection, contributing to the longevity of the painted surface.
Hardware and Accessories:
If the knotty pine paneling features hardware, such as door handles, hinges, or decorative accents, ensure that they complement the newly painted surface. Consider updating or refinishing hardware to coordinate with the refreshed appearance of the paneling. Similarly, selecting accessories and decor elements that harmonize with the painted knotty pine can further enhance the overall aesthetic of the space.
Final Clean-Up:
Once the finishing touches have been applied, conduct a final clean-up to remove any dust, debris, or paint splatters that may have accumulated during the painting process. Thoroughly wipe down the surfaces, trim, and surrounding areas, ensuring that the room is left immaculate and the painted knotty pine paneling is showcased in its best light.
By meticulously attending to these finishing touches, you can elevate the visual impact of the painted knotty pine paneling, achieving a refined and cohesive appearance that revitalizes the entire space. These final steps not only contribute to a polished and professional outcome but also ensure that the painted knotty pine reflects your personal style and attention to detail, creating a captivating and inviting environment.
Conclusion
In conclusion, painting knotty pine paneling presents a rewarding opportunity to revitalize the aesthetic appeal of any interior space. By following the top tips and techniques outlined in this article, you can embark on this transformative home improvement project with confidence and achieve a stunning outcome that reflects your personal style and creativity.
The process begins with meticulous surface preparation, including thorough cleaning, gentle sanding, and the filling of knots and gaps. This crucial step sets the foundation for a flawless finish, ensuring that the paint adheres uniformly and the natural beauty of the knotty pine is accentuated. Choosing the right paint is equally essential, considering factors such as type, finish, color options, and compatibility with the primer. This thoughtful selection process lays the groundwork for a durable and visually striking result.
Applying the primer and paint with precision and attention to detail is paramount. The primer seals the wood, promotes adhesion, and prevents tannin bleed-through, while the painting techniques, including brushing, rolling, feathering, and working with the grain, contribute to a professional-quality finish that enhances the unique texture and character of the knotty pine.
The finishing touches add the final polish to the painted knotty pine paneling, encompassing meticulous inspection, detailing, emphasizing texture and grain, coordinating hardware and accessories, and conducting a thorough final clean-up. These steps ensure that the painted surface reflects a cohesive and refined appearance, elevating the overall aesthetic of the room.
Ultimately, painting knotty pine paneling is a transformative process that allows you to breathe new life into your living spaces, expressing your individual style and enhancing the visual appeal of the interior environment. Whether aiming to modernize a rustic setting or infuse a touch of elegance into a traditional space, the art of painting knotty pine paneling empowers you to create a captivating and inviting atmosphere that resonates with your personal vision.
By embracing these top tips and techniques, you can embark on the journey of painting knotty pine paneling with confidence, knowing that each step is carefully designed to achieve a professional-quality finish that revitalizes the space and reflects your unique sense of style and creativity.